In my last post, I looked at adding extra color themes to PowerPoint masters. But any color theme can only hold a maximum of 10 colors (not counting the hyperlink colors, which are not available in the color picker). The solution is to add Custom Colors to the theme.
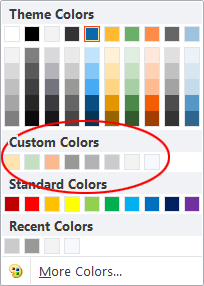
Fortunately, most desktop versions of Office programs beginning with 2007 have a hidden capacity to display up to 50 additional colors. These form a new row below the theme colors and above the stock Microsoft row. These extra colors are not supported in PowerPoint 2008 or 2011 for OS X. While these versions will open a file with more colors, the colors do not get added to the color picker. Here’s what the color picker in every other variety of Word or PowerPoint looks like after adding additional colors:
Custom Colors in Office
Custom colors do not appear in PowerPoint for iOS, PowerPoint for Android or PowerPoint for the web. The web version of Office is also used in SharePoint, so SharePoint users won’t see them. You must be using PowerPoint for Windows or for Mac to see them.
OOXML Basics
If you’re new to XML hacking, be sure to read my Introduction to the subject first. If you’re editing on a Mac, there are some other considerations covered in this article. I should also clarify: a Color Theme or a Font Theme are only sub-parts of a Theme as saved by PowerPoint. A PowerPoint Theme file contains the entire presentation, including masters, layouts, and full theme files. It’s this full theme file that we need to edit. Custom colors never appear in a Color Theme file.
As with the extra color themes we looked at last time, custom colors are added to the XML theme files found in ppt>theme. I mentioned in the last article, presentations almost always include a default Office theme as a fallback and this theme is always last in the list. So in a presentation with 1 color theme, there will be a theme1.xml and a theme2.xml inside the theme folder. Ignore theme2.xml and customize only theme1.xml.
Setting Custom Colors
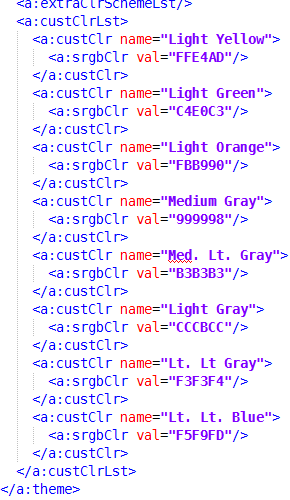
These colors are the last category in a theme file, so it’s easy to find. As before, we expand the PowerPoint file (really a zip archive with a different file ending), open ppt/theme, open theme1.xml in a text editor and reflow the text to be humanly readable. Then scroll all the way down to the end. An unmodified file will only display the <a:extraClrSchemeLst/> self-closing tag. To add more colors, we add a new branch to the tree. Below <a:extraClrSchemeLst/>, we type a new entry: <a:custClrLst>. This is followed by our additional color definitions and the closing tag </a:custClrLst>. Here’s what a list of custom colors as seen in the screenshot above would look like in XML:
A nice feature here is that, unlike color themes, you can actually supply a name for the color. This is followed a hexadecimal RGB color value, as used in web design. This list has only 8 colors, but there is room for up to 50 in the color picker. If you read the last article about color themes, you’ll soon realize that each theme file can have a different set of additional colors that goes with it as well. The combination of themes and custom colors gives you 18 colors per theme to play with, almost enough for the most color-crazed designer!
Custom colors can be added to the theme1.xml file in Word and Excel using exactly the same syntax. The colors appear in the color picker as expected in Word but are partially ignored in Excel. In Excel, these colors display for almost all objects on the Insert tab: Text Boxes, Shapes, SmartArt, Charts, WordArt, etc. But if you’re seeking to format worksheet text, cell fills or borders, they do not show. (Thanks to reader Kaz for pointing this out.)
Custom Colors in Columns
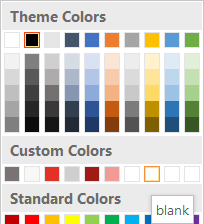
By default, the colors appear in 5 rows of 10 colors each. Some designers prefer to display the colors in columns instead of rows. To work around this, add your colors to form the top row of your columns. Then complete the row of 10 with dummy colors that have a value of FFFFFF and blank as a name:
Another limitation is that if you save a presentation as a Theme (*.thmx) file, custom colors in the presentation don’t get added to the Theme file. You’ll have edit a saved Theme file to add the custom colors to it, then they can be applied to another file. Or you can save the original presentation as a Presentation (*.pptx, *.pptm) or Template (*.potx, *.potm) to preserve the Custom Colors.
By extension, this also means that to add custom colors to Word by applying a PowerPoint Theme file, you must edit the Theme file to add the custom colors. Or course, you can hack the Word document or template to get them. The file name in Word will be the same: theme1.xml, but it is to be found in the word/themes folder instead of ppt/themes. As with PowerPoint, custom colors are added to the very end of the theme.xml part.
If you have added custom colors, then duplicate the slide master, the custom colors will also be duplicated (each slide master has a separate theme file as well). But if your first slide master has custom colors and you simply create a second slide master, the second master will not include the custom colors in it’s theme.
Unlike theme colors, custom colors are not automatically applied to charts. Automatic chart coloring in PowerPoint, Excel and Word is limited to 6 settable colors (see this post for chart coloring details). After that, the host program starts generating automatic variants based on the theme. However, for the detail-oriented among us, manual recoloring of data series with custom colors is very convenient and miles above the previous technique, inputting RGB values from text.
I’ve written a lot about PowerPoint, but the additional colors can be used anywhere in Word as well. In Excel, you get partial access. Most objects on the Insert tab can have custom colors applied, like AutoShapes and SmartArt. Custom colors cannot be used for worksheet formatting. Cell and font coloring won’t use use them, they just don’t appear in the color picker for those objects.
We’re here to do this for you, if you prefer! Please contact me at production@brandwares.com. Next time, I’ll tackle formatting custom table formats in XML. This is a complex subject, so it will take at least 2 posts. Stay tuned!
9:35 pm
127 thoughts on “OOXML Hacking: Custom Colors”
Thanks for this — good stuff. I am on a Mac. This seems to work ok for me on PowerPoint 2016 but does not show up in PowerPoint 2011 which from the screenshot above seems to be what you used on this. Any thoughts?
I do a lot of work with both PowerPoint 2011 and 2016 and also answer questions on answers.microsoft.com. If you could post more details there of what does and doesn’t work for you, I’ll be able to help you and others at the same time. Thanks!
Great! I took a ppt file I am making, went through the whole thing to get to the theme1.xml file, edited in BBedit to add custom colors, zipped it up and back into a pptx file. When I open the pptx file in 2016 the custom color set show up in the color picker just as in your screenshot above — works great. Open the same file in PowerPoint 2011 it does not show. Not sure if the XML has to be setup differently in 2011 but looking at built in templates all seems the same.
Thanks Craig, after checking this out, I’ve discovered that custom colors are not supported in either PowerPoint 2008 or 2011 for Mac. For these users, you would have to revert to supplying a sample slide with RGB values and instructions on how to use the More Colors link in the color picker.
Thanks again for checking on this for me. Had time to play with it over the weekend and worked as you said across everything but those — so just will do your suggestion and add those in as a reference page for those using those 2 versions. Thanks for your help — great series of articles — has been very useful!!
Thanks very much for the post. I’ve found this xml hack a while back too and it’s proofed very useful. I’m currently exploring ways to write these xml nodes with VBA but so far to no avail. Have you got any hints on how to go about this? Thanks for any pointers you may be able to give me.
Unfortunately, there’s no way to set a style that automatically removes underlines from hyperlinks in PowerPoint, though the same thing is easy in Word. Instead, you have to work around it with each hyperlink by removing the hyperlink from the text, then adding a transparent shape over top that is hyperlinked. Here’s a page from Microsoft with the steps: Remove the underline from hyperlink text This was written for 2007, but applies to all versions of PowerPoint.
Under the styles menu if you go to the advanced settings there you should find “last hyperlink” and “last followed hyperlink” you can modify them through there and you can remove the hyperlink. (last means as last priority which font styles do have a priority for example “normal” and “no spacing” font styles have priority as 2nd)
Hello All,
Could one of you steer me in the right direction?
I have made some custom colours for PowerPoint, and they show up and work well.
I moved this to other PowerPoint documents by, changing the file name to a .zip, then I copied the ‘<a:custClrLst…' section into the other PowerPoint documents 'theme1.xml' file. This all worked well.
So I tried moving the '<a:custClrLst…' section into the 'theme1.xml' for my Word and Excel templates.
But when i open the Word and Excel templates i cannot see the extra colour menu.
Excel doesn’t support custom colors in the theme (why not? good question!). With Word, it may be simpler to save your PowerPoint file as a theme and apply the theme to the Word file using the program interface. That should automatically place the custom colors in the right spot. But I’ve made a note to write an update about adding custom colors to Word. Thanks!
Hi John, this method didn’t work for me. Even applying the PowerPoint file, that shows Custom Colors, as a theme, Custom Colors does not appear in the color picker for the Word Document. Any thoughts?
Thank you for this article John! Just wanted to share how I solved and issue with the custom colors not appearing in Power Point 2016 file.
I tried to include some custom colors without success and found that after <a / rel=”nofollow”> there was an <a> xml seccion that had to be removed for the custom colors to appear in the color picker. Tried inserting the custom color seccions before and after the <a> seccion but the custom colors didn’t appear, till I erased all that <a> seccion.
Thank you SO much for this content! Do you know of a way to override the variants under the accent colors? Those automated values are usually so far off hue or saturation that it’s embarrassing!
Unfortunately, those colors are created by PowerPoint on the fly. They are not part of the presentation file, so there is no XML to edit. The algorithm is built into the program and is not user-modifiable.
This code worked for me and I’ve used it in PPT, Excel and Word – though in Word the extended custom colour palette isn’t stable (sometimes disappears – I don’t understand this)
I mainly use PPT and Xls however and I love it
What I’d like to know is… if there is a way to customise the table styles. The design options that come with PPT aren’t useful to me. I’d like to be able to put some customed tables in the Table Tools Design Tab. Does anyone know how to do this?
Thank you – will investigate this further next week. On quick inspection it looks like something I can understand – thank you for making it as clear as possible for someone with little experience in this area.
Thanks very much for confirming that the variants – the tints of the accent (theme) colours – were not editable. Thanks also for the xml branching info to add custom colours.
Brilliant – your site is so useful! I have a question about editing XML parts for color and table customisations. I have a lot of documents which were created using a potx template. I then enhanced the template by adding a custom table style, custom colors and a few others things, by unzipping and then editing the xml parts as you explain.
Now I want to go back to the documents which were created using the original, NON-customised potx, and add the customisations. What is the simplest way of doing this to a whole set of files (apart from manually copying everything into new documents opened from the new template)? Is there a VBA way of doing it? My other thought was a Python script. And one other thing that a quick online search seems to suggest would be something using VSTO, but I don’t know anything about Visual Studio and I can’t seem to find anything directly applicable to this issue – is there a quick way that is worth the learning curve?
Brilliant site, so useful. Apologies if this is a double-post – I tried earlier and don’t see my comment/question.
I used your explanations to put custom table styles and some custom colors into a potx, which is working great. But I have a bunch of other files that are from the original, non-customised template. Is there a good way of processing all of them so I don’t have to manually add/change the XML for each, or manually copy all the presentations to new documents opened from the new template?
Is there a VBA way to do it? I don’t know Visual Studio, and I can’t find any obvious way to do this with VSTO via Google. I was also considering writing a Python script. What would be your recommendation for best practice for this?
To get the custom parts in your presentation, you’ll have to create a new file from the POTX that has the custom parts, then use Home>NewSlide>Reuse Slides… to import the slides from the presentation that is lacking the custom parts.
You might think that using the Design tab to apply a custom theme would work, but unfortunately the custom parts do not get copied over this way.
Hi, this is a fantastic post, thank-you very much. I’ve been successful in applying custom colours into a blank word document, however when I try and adjust the Theme1.xml file in an already mature document the custom colours don’t display. In the unzipped folder structure includes a customXml folder.
Do you know what might be inhibiting the visibility of the custom colours I’ve added?
Hi, after some further testing it seems that the custom colours were applied, however disappear as soon as an object is selected (an object was the first things selected in my template). Do you know how to combat this?
When you write “disappear as soon as an object is selected”, do you mean the swatches disappear from the color chooser, or that the object color disappears from the object? By object, do you mean an autoshape, or some other object? What version of Word are you using? If you can email the file in question to me at production at brandwares dot com, I’ll take a look at it.
Thank you for your post! One quick question, where can I find recent colors tag? I’m trying to erase all recent colors that I have been using to build the master slide. I found that in Excel is .
I have edited the xml file and added my colors, but when I zip the file back up and change it back to .pptx and try to open it keeps saying it needs to be repaired. I’m in Powerpoint 2013.
As noted above the Comment box, please replace the less than sign “<“ with “<” and the greater than sign “>” with “>”. Otherwise, WordPress strips out those characters and only a blank space appears on the page.
Just out of curiosity (and my apologies if this has already been addressed), but is it possible to change the text “Custom Colors” to something like “Colors for Charts Only”?
Sorry for the late reply, I had to do some research on this. Custom Colors appear in the Font Fill, Font Outline, Shape Fill, Shape Outline, Table Shading, Table Border Pen Color and Format Background dialogs in PowerPoint. In Word, Custom Colors do not appear in the Table Shading, Table Border Pen Color or Page Color dialogs, but they are available for fonts and shapes. This is true for Office 2007, 2010, 2013 and 2016, plus 2016 for Mac.
They seem to be now appearing in word in the border and shading menu but not in the simple shading or pen color option. very odd.
Thanks for all your posts, they are incredibly helpful. After battling for hours with zip on my mac I used visual studio code with the OOXML extension and it worked very well. I also decided to edit the dotx file instead of the thmx file wich made it a lot easier as no unzipping was necessary.
Custom Colors do not appear in all color pickers, just ones where Microsoft has allowed them. As another example, you can’t use them to format table borders or fills, though you can apply them to table text.
Also, a helpful tip for all: If you use 7-zip (free from 7-zip.org), you can (on Windows at least), right click your document and select “Open as Archive”. Browse to the file, and select “Edit” from the context menu. Make the desired changes, save, and answer yes to the prompt to change the file in the archive. Fini!
Hi
I used your example and managed to make it work. I want to ask if there is any way to group my colours, for example to make them appear in multiple lines:
CL1 CL2 CL3
CL4 CL5 CL6
CL7 CL8 CL9
rather than in one row
Excel question: Is there anyway to automatically apply custom colors to every excel workbook opened (e.g., as part of my personal vba workbook or something)? that way if someone sends me an XLSX it will have my custom colors available?
Sorry, as noted in the article, Excel does not recognize custom colors for cell fills and most other worksheet formatting, and will not display them in any of the color picker dialogs. Most items on the Insert menu, such as Shapes and SmartArt, will display and can use custom colors.
Hi John,
Thanks a lot for this tut. Seems easy enough to replicate, however, I feel like I might be a bit late to the “show”. I can’t seem to make it work. I’m using Powerpoint for Office 365 (2016).
I made sure that there all “>” and “<" set correctly, and also made sure that there are no soft quotes like "“" and "”".
After all the modifications, once I doubleclick on the thmx file, the template is opened correctly, all set as intended except for the custom colors.
Could it be that this is no longer supported? Or do I have to do it differently?
Hi John, is there a way to apply names to “Theme Colors” the same as “Custom Colors”? For example, $lt;a:accent2$gt;$lt;a:srgbClr val=”818A37″/$gt; is given the name “Dark Green”, and I don’t know where that name comes from. Can I name it “Olive” instead? I.e. when resting the mouse in the color picker, I want the name “Olive” to appear instead of “Dark Green”. In other words, is there a “name” tag that complements the “val” entry for the theme color? Thanks!
PS: expecting my comment #23 will be updated with this corrected version using your XML provided instructions (sorry for the confusion).
Hi John,
Thanks for this! I defined a few custom colors and put them into my Normal.dotm file. These appear fine in a new document. However, they do not show up in a document that has already been created. Any thoughts?
BTW, they do appear (in the new document) and can be used for table shading, etc. as well as font color.
That’s normal Word behavior. After a document is spawned from a template, it exists independently unless you actively update it. You can export a theme file, use the same steps to add custom colors to it, then apply it to a Word document and it will update with the custom colors.
Thanks. Actually, it was easier than that. I think it is Word Office 365. Under the Design menu, Themes, I simply did Reset to Theme from Template and there they are…
There are no custom themes, etc. in the document, so no chance of inadvertently screwing anything up. YMMV though.
Hi John. Thank you for this post. Is there a way to hack the colour codes for the tints of each Theme Colour? I often find that I’m not happy with the 5 light and dark tints automatically provided underneath each of the Theme Colours and it would be great if there was a way to change these. Do you have a post on this subject already?
Unfortunately, those theme color variants are not stored in the file. Instead Office programs generate them on the fly, so you can’t control them or the names they are assigned.
Thank you for this post! It has been very useful. I have an interesting development: You *can* get custom colors in Excel 2016. Do the following:
Add custom colors to a theme file and verify that they definitely work via PPT.
Open up Excel.
Apply the theme to your spreadsheet.
Click in a cell and type, then go to the font color menu. No new colors appear!
Insert a shape into your spreadsheet.
Select the shape.
Type in the shape.
Go to the font color menu. New colors have appeared!
It seems that Excel does not like to show custom colors in its color menus until the color menu has been “refreshed” with the new colors. I can get the fill, line color, and font color menus to accept the new custom colors this way. I use this for shapes and charts a lot. I haven’t succeeded with the border color menus yet. Sometimes Excel forgets this if you close the file so you need to do it again next time you open it.
This is weird and inconsistent, but you *can* get them in there.
Your observations were close enough to get me to take a look at custom colors in Excel more closely. They are never available for Worksheet formatting, like text, or cell fills or borders. Custom Colors do display with most of the items on the Insert menu, like text boxes, shapes, charts, etc. So I’ve updated the article. Thanks for writing!
It seems Kaz is right in saying that in a blank new sheet the custom colors are not immediately available for cell fills etc., but if you insert for example a shape, the custom colors appears. After that, they are also available for cells fills. So it seems one has to “shake them out of bed”…
It also seems that using only a ThemeColorScheme (xml file) doesn’t seem to work for bringing along custom colors. However, applying a whole Theme (thmx file) allows you to bring along the custom colors.
So another question is: whether it is possible to save the thmx file using VBA? I’ve searched and searched, but the answer seems to be no?
In testing Excel 2019, I don’t see Custom Colors becoming available for cell fills even after a custom color is applied to a shape. Perhaps you could specify in which version of Excel and operating system you see this happen.
Here’s a line of VBA that will save the active presentation as a full theme file:
Works on excel 2013. Open xl add text shape, apply custom color to text in text object and custom colors “jump” to the ribbon… Delete shape the colors remain on ribbon until xl is closed.
I don’t see any colors “jumping” anywhere in any version of Excel. As noted in the article, if a theme containing custom colors is applied to a workbook in Excel, the custom colors can be applied to text boxes, shapes, SmartArt, charts and WordArt. Applying a custom color to a shape is not necessary to make this happen. Custom colors do not remain active in Excel after the workbook with custom colors is closed, they disappear from the interface. Custom colors do not appear when you’re formatting worksheet text, cell fills or borders.
This is great, thank you. Are you aware of any way to set the tint values?
So when unzipping using terminal I see the files being created but where are these files being saved, there is no new file/folder located in the folder where the original file is located. Can someone hlep me with this?
With a standard terminal unzip (unzip path/to/the/zipfile), the unzipped files are normally created in the same folder as the original zip file. To find them, do a Spotlight search for [Content_Types].xml. That file name is only found in OOXML files.
No, it’s not. You get 50 colors maximum. To have more, you would have to use multiple slide masters, but you would then have to switch between color themes to have access to them all.
If i have a corporate branded theme installed / selected as Default in Excel and i open a new workbook and add a sample chart based on sample data manually (Alt+ F1), without formatting any part of it e.g. a clustered Column/Bar chart, it does not seem to highlight the Default Theme Background color used in the Color Picker. However, it definitely hightlights the Default Theme Font color. What could be the reason?
I’m not clear what you’re referring to by “highlight the default theme background color”. Is the chart coming out with the background set to the text color and the text set to the background color? If not, please post more details. You can also post a screenshot or video capture to a cloud service, then post a Share link here so I can see what you are.
Thanks for sending the screenshots. It looks like the data series is colored in green, but Excel is not picking up that this is supposed to be the Accent 6 of the color theme. I don’t know what your workflow is, but you could correct this in Excel by applying the same color theme used in your presentation, then selecting the data series in Excel and applying Accent 6 to that data series. If you apply a color as RGB, Excel will not notice that the color is also used in the theme. Instead, you must apply the theme color to the data series from the theme color palette. Then Office will recognize it as a theme color instead of an RGB color. Please post again if I have misunderstood your reply.
Green was just an example. It happens with any of theme colors on the top. I am using `msoThemeColorAccent3` on the bars:
With Selection.Format.Fill
.Visible = msoTrue
.ForeColor.ObjectThemeColor = msoThemeColorAccent3
.ForeColor.TintAndShade = 0
.ForeColor.Brightness = 0
.Transparency = 0
.Solid
End With
Another thing i found out is, if i move or copy this sheet to a new workbook, it loses the Corporate Brand theme colors (as well as Custom theme colors) and i see the default Office theme as selected in PageLayout > Themes. I than have to again apply the Corporate Brand Theme to show the theme colors again. Why is this happening? Maybe i created the Corporate Theme file incorrectly?
Isn’t there a way to make my entire Excel application just have the Corporate Brand theme for any new or existing workbook that was created?
Your code sample doesn’t run as posted. Format is not a property of Selection.
Your code appears to set the theme color, but it is followed by three commands that could alter that color (TintAndShade, Brightness and Transparency. If you apply a theme color, then modify it, Office programs see it as an arbitrary RGB color, not a theme color.
The workbook determines the file’s theme, not the worksheet. So moving a worksheet will change the colors, as you’ve found. Instead, keep a saved copy of your preferred theme and apply it to all workbooks. So all your files are using the same theme.
You can set a default workbook. Then whenever you open Excel, the theme colors will be correct. Here’s an article on how to do that: How to set a default template in Excel
Hey John,
I’m having the same problem as Karen above… I’m on Powerpoint 2013, Windows 7 Ultimate (64). Couple of things I noticed:
1) Shouldn’t there be a closing tag for <a:extraClrSchemeLst/> ?
2) The instructions above say to add a new branch between said tag, and the very last closing tag </a:theme>
Empty XML elements can be written 2 ways, with opening and closing tags:
<element></element>
Or as a a self-closing tag:
<element/>
Note the slash at the end that closes it.
PowerPoint may add custom XML as a:extList elements. The custom color element should go after a:extraClrSchemeLst but before a:extlist, if it exists.
If you get error messages, it means there is an error in your XML or in your rezipping process. XML errors can be minimized when you’re beginning to edit by doing just one change, then testing. Rezipping errors are easy to get with the Windows Zip utility, as it creates a non-existent top-level folder when you unzip. Including that top-level folder when rezipping will prevent PowerPoint from being able to read the file. I use 7-Zip (free) to edit without unzipping, it saves time and prevents such errors.
Does this method work for Office 365? I follow the procedure in my Word 365 desktop application, and afterwards Word does allow me to select the theme (including my new custClrLst section) but the custom colours are not present in any of the colour tools?
Office 365 is Microsoft’s subscription plan. You’re actually getting Office 2019, so all the techniques in these pages apply.
Feel free to email your theme with custom colors and I’ll trouble-shoot it for you. production at brandwares dot com is the addfress.
Thanks John
OK, I have realised that the Custom Colors do in fact show up in Powerpoint, but they do not show up in Word. My understanding was that after adding into the theme.xml file then they also show up in the other MS Applications too. Do they need duplicating in a different folder as well? Currently the theme is placed here:
C:\Users\username\AppData\Roaming\Microsoft\Templates\Document Themes\mytheme.thmx
If that folder works for PowerPoint, it should work for Word as well.
In Word, use Design>Themes to find your theme in the Custom row at the top of the list of themes. Apply it to your template or document, then the custom colors will become available.
OK, I figured it out!
The “Custom Colors” showed in NEW Word documents, but not in EXISTING Word documents I had (even if I selected the new theme).
It turned out that my existing Word documents were in “Compatibility Mode” (with the originals created with earlier versions of Word).
I re-saved them whilst UNTICKING “Maintain compatibility with previous versions of Word”, and afterwards the “Custom Colors” showed in these Word documents too.
Hopefully this will be useful if anyone else can’t figure out why the Custom Colors aren’t showing despite being set correctly in the XML file.
Hi John
I have been working on a powerpoint template with two slidemasters and a set of custom colors for a client. The custom colors are accessible using the first slidemaster but as soon as I insert a slide from the second slidemaster, they disappear. Do you have an idea on why that is? I have edited both xml theme files but the custom colors doesn’t show up in the second slidemaster.
Each slide master has a separate theme file. sildeMaster1.xml:theme1.xml, then slideMaster2.xml:theme2.xml. After adding custom colors, if you duplicate the slide master, the custom colors will be included. If you simply create a new master, they will not, and must be added later.
Custom colors can be used on most items on the Insert tab of the ribbon, like shapes and SmartArt. Custom Colors can’t be used for any object that is on the worksheet, like cell or font coloring.
Hi, currently have implemented the custom colors the way you have mentioned and it works great for PowerPoint and Excel. However in Word I seem to be getting the custom colors only in the font color selection and not in the Shading color selections.
Is there a way to get them to show in the Shading color selection menu?
Sure. This is listed under Home>Paragraph>Shading (Icon looks like a bucket spilling paint). It’s the same command you would use by right clicking to change the colors of cells in a table or change the background color of text.
The tooltip reads “Change the color behind the selected text, paragraph or table cell.”
Sorry, custom colors don’t appear in color pickers for backgrounds (they don’t appear in the Page Color or Table Shading dialogs either). Microsoft would have to revise the program to make them visible.
Hi.
I use my custom colours for shading, both paragraphs and table cells, by using the menu under Border and Shading > Border and shading…, select tab “Shading” and then select a custom colour from the drop down list “Fill”.
Not a very user friendly option but it works for creating templates with custom colour shaded table cells for example.
I have noticed an odd thing about custom colors and cell shading in Excel for both Windows and Mac.
I created a template and added some custom colors. If I try using Fill Color to shade a cell the custom colors do NOT appear. However, if I first fill an object, such as a shape or chart with a custom color, and then click on Fill Color the custom colors DO appear!
I am using Microsoft 365 Version 2011.
Your comment might be helpful if it was specific. Fill Color is not an Excel command name, so we can only guess at what steps you’re using to fill a cell. After applying a custom color to a shape or chart, then clicking on a cell and selecting the Fill dropdown on the popup formatting palette, custom colors are not displayed. Choosing Format Cells>Fill, from either the right-click menu, or from Home>Cells>Format>Format Cells command on the Ribbon doesn’t display them either. If someone can post a reproducible way of using custom colors for cell fills and cell text, I’d love to know about it.
Jon – thank you again for this post. It’s continued to be very useful to me over the years. (Love the book, too!)
I realize that when I first commented here I didn’t actually explain how to get the custom colors to stick around for cells in the worksheet. Here’s a more specific explanation. It works in Excel 2016 and 2019. It should work in 2013, but I cannot remember if I was using 2013 or 2016 when I first tried it.
1. Open up Excel, open up a new sheet.
2. Apply the thmx file to your sheet. (Or, open up a sheet with the right theme already in it.)
3. Go to the HOME tab. Click on an empty cell in the worksheet. In the home tab, look at the FONT section of the ribbon. Using the fill color (paint bucket) button in this section, try to put a custom fill color in your cell. (You can’t! This is to confirm that this button is behaving as expected at this point.)
— At this point, we have the custom colors in the file, but not yet available for cells in the worksheet —
4. Go to the INSERT tab. Insert an item, like a circle.
5. Go back to the HOME tab. (This is key.)
6. Click on the circle.
7. Still on the HOME tab, click the *exact same button* you used before – the Fill Color button in the Font section of the ribbon. (You must click this specific button.) You should now see the custom colors (because the circle is selected).
8. Click on a cell in the worksheet. (The circle is no longer selected.)
9. Stay on the HOME tab and click the *exact same fill color button* again. It should now have the custom fill colors in it, even though you have a cell selected. (Hooray!)
NOTE: This procedure is a per-button procedure! That means you have to ‘remind’ the buttons individually that they can use custom colors. You have to do this again for the font color button on the ribbon, too. (Hint: make one circle then click all the buttons in one go. Delete the circle afterwards, you don’t need it.)
NOTE 2: Not every button works for this. I still can’t get the Cell Borders menu to acknowledge custom colors (and some parts of that menu won’t even do ‘Recent Colors.’)
NOTE 3: Excel won’t always ‘remember’ that these buttons have custom colors, so if you close your window or document it may forget and you have to do this again.
Thanks for posting those details. The procedure is a bit complex, perhaps there’s a way to simplify it with a VBA add-in for Excel. I’ll give it some thought, it might make a good article.
Hi,
I’m looking for a solution to get custom colors again in Powerpoint. They used to be there in our previous template, but now I created a new one starting from the standard office template, and they’re gone. Since the hacking explanation is way beyond my capabilities, and since they date from 2015, I wonder if in the meantime there is another way to get the custom colors. I’m using Office 365.
Thank you in advance.
Hi John, thanks for your rich material on creating Custom Colors, which I’ve been digging into for the last couple of weeks. I’ve also been following you on “answers.microsoft.com”, “experts-exchange.com”, etc. With your articles and answers I am able to successfully include Custom Colors in Power Point files. But I’m absolutely not able do the same with Word files, and I have no idea why I can’t. Could you please help me in somehow? In which Word/Office XML file should I include the XML codes related to Custom Colors? What, in general, are the steps to include Custom Colors in a word file? How do these steps differ from those used to include Custom Colors in a PowerPoint file? Forgive me if I bother you with so many questions, but being successful with PowerPoint files and not succeeding with Word files is driving me crazy. Thank you in advance for your kindness in helping me.
Sorry, I can’t tell what problem you might be having. We add custom colors to Word files on a frequent basis and don’t see any problems. They go in the word/theme/theme1.xml file at the bottom, exactly the same position and syntax as in PowerPoint.
Please note that Word will not display custom colors for coloring tables. Neither the table Shading dialog, nor the table Pen Color dialog will show them.
For any techniques you read about in this blog, we can do the work for you if you’re unable to make it work. The cost for adding custom colors is $5 each.
If you’re using Windows, you can edit OOXML with VBA. You could create custom colors or apply most of the other OOXML hacking techniques I write about here.
Hi John, thank you very much for your detailed explanations of this little incredible hack! The Chrome extension option worked great for me when I started with a Powerpoint file that was originally created in Windows, and then adjusted on a Mac. However, now I have a pptx file that was created on a Mac, and I have tried adding the custom colors in theme2.xml AND theme1.xml multiple times, but they just won’t show up. I tried exporting the file as a .potx file, then upload it to the OOXML extension, still nothing.
Another thing of note is if I only type <a:extraClrSchemeLst/> before the list of colors, and then try opening the file in Powerpoint, I always get an error and a prompt to repair the file. So instead, I wrote <a:extraClrSchemeLst> [custom colors] </a:extraClrSchemeLst> . This caused the error to go away, but I am still unable to find the custom colors in the file. Do you know any trouble shooting methods to try out for Mac?
Custom Colors and Extra Colors are 2 different ways of adding to the basic color theme. In a new presentation, the theme already contains a <a:extraClrSchemeLst/> tag. Don’t add another one.
The custom color additional XML goes after <a:extraClrSchemeLst/>, not inside it.
Hi, many thanks for this very useful post. However, I can’t make it work (powerpoint wants to repair the presentation and can’t do it).
Do I have any error in my xml?
The quote marks in the text you have post are not straight quotes. They are angled quotes, which is the wrong character to use in XML. Please try replacing them with straight quotes.
You also have multiple instances of parameters like name”Asso-Admin-Politique-Light”, where the equals sign is missing. Here is how they should appear: name=”Asso-Admin-Politique-Light”
A simple trouble-shooting technique is to allow the Office program to repair the file. Then see what has been deleted. The error will be in the deleted content. Unfortunately, in your example, all of the content probably would have been deleted, as all the quote marks are incorrect.
Thank you for your answer. Yes, I’ve seen this issue and managed to have the custom colors displayed properly.
BUT my pptx also contain custom font (.ttf, embedable) that I embed to the document and when I share it with someone else, the custom colors are displayed but not the font.
To fix it I found out that I need to apply my theme to each master slide I’ve created and the fonts are displayed properly on every machine, but the custom colors disappeared…
In other words, I’m unable to display properly and the custom colors and the embedded font…
Could you help me? thank you
Hello! Im trying to follow this to do custom colors in Word, not PPT, and it says you “just opened theme2.xml to get the values for this” – for the custom colors. But in my Word files, there’s no theme2.xml, just theme1.xml. So where do I get the values? Thank you!
Sorry, but the text you quoted doesn’t appear in the article. The article does mention editing theme1.xml to add custom colors in Word: “Custom colors can be added to the theme1.xml file in Word and Excel using exactly the same syntax.”
You can get the hexadecimal color value from the color picker, or you can type RGB values into our RGB/Hexadecimal Calculator to get the hex colors.
Sorry! I was reading a few different articles and that quote was from your article “OOXML Hacking: Color Themes.” But you answered my question anyways! Thanks so much!
I think you’re referring to the 50 tints and shades that appear directly below the Theme colors, Unfortunately, those are automatically created by Office programs and cannot be set by hacking.
Custom Colors are not included in the PowerPoint user interface, so Microsoft has never included them in the VBA object model. There is very little you can do to hack OOXML with VBA unless you unzip the PowerPoint file into its component parts. The file being modified cannot be open in PowerPoint while you do this. Here’s my article on how to Edit OOXML with VBA – Cool Code. After that code unzips the files, you would use string manipulation to add the custom colors to the theme1.xml part. Then the code can re-zip everything back into a useable PowerPoint file. Best of luck with your coding!
with the code ><a:extraClrSchemeLst/><a:custClrLst><a:custClr name=”AZUL CLARO”><a:srgbClr val=”57CCFF”/></a:custClr><a:custClr name=”FUCSIA”><a:srgbClr val=”FF0066″/></a:custClr></a:custClrLst></a:theme>
Subscribe to the Best Practices blog and get a free copy of our new Control Control add-in. This is the easiest way to create the same modern form controls that are in Word for Windows. Enter your real email and hit Subscribe in the right-hand column of this page. You’ll receive the add-in and installation instructions within 3 days.


Thanks for this — good stuff. I am on a Mac. This seems to work ok for me on PowerPoint 2016 but does not show up in PowerPoint 2011 which from the screenshot above seems to be what you used on this. Any thoughts?
I do a lot of work with both PowerPoint 2011 and 2016 and also answer questions on answers.microsoft.com. If you could post more details there of what does and doesn’t work for you, I’ll be able to help you and others at the same time. Thanks!
Great! I took a ppt file I am making, went through the whole thing to get to the theme1.xml file, edited in BBedit to add custom colors, zipped it up and back into a pptx file. When I open the pptx file in 2016 the custom color set show up in the color picker just as in your screenshot above — works great. Open the same file in PowerPoint 2011 it does not show. Not sure if the XML has to be setup differently in 2011 but looking at built in templates all seems the same.
Also posted this on the MS answers site: http://answers.microsoft.com/en-us/mac/forum/macoffice2016-macpowerpoint/xml-hack-for-custom-colors/5df82de3-f854-452c-bb15-3a8bbbfc4f82?tm=1444872944916
Thanks Craig, after checking this out, I’ve discovered that custom colors are not supported in either PowerPoint 2008 or 2011 for Mac. For these users, you would have to revert to supplying a sample slide with RGB values and instructions on how to use the More Colors link in the color picker.
Thanks again for checking on this for me. Had time to play with it over the weekend and worked as you said across everything but those — so just will do your suggestion and add those in as a reference page for those using those 2 versions. Thanks for your help — great series of articles — has been very useful!!
Thanks very much for the post. I’ve found this xml hack a while back too and it’s proofed very useful. I’m currently exploring ways to write these xml nodes with VBA but so far to no avail. Have you got any hints on how to go about this? Thanks for any pointers you may be able to give me.
Modifying XML with VBA will be a topic of a future post, I’m still researching the topic. If you subscribe, you get notice as soon as it’s posted.
Hi there, do you know if we can control the hyperlink style e.g. no underline in PowerPoint 2016? Many thanks!
Unfortunately, there’s no way to set a style that automatically removes underlines from hyperlinks in PowerPoint, though the same thing is easy in Word. Instead, you have to work around it with each hyperlink by removing the hyperlink from the text, then adding a transparent shape over top that is hyperlinked. Here’s a page from Microsoft with the steps: Remove the underline from hyperlink text This was written for 2007, but applies to all versions of PowerPoint.
Under the styles menu if you go to the advanced settings there you should find “last hyperlink” and “last followed hyperlink” you can modify them through there and you can remove the hyperlink. (last means as last priority which font styles do have a priority for example “normal” and “no spacing” font styles have priority as 2nd)
You appear to be referring to some other program, possibly Word. This thread is about PowerPoint, which does not have a Styles menu.
Do you know why the custom colours section shows up in all Office applications except for Excel ?
Which version and platform (Windows/Mac) are you using?
Hello All,
Could one of you steer me in the right direction?
I have made some custom colours for PowerPoint, and they show up and work well.
I moved this to other PowerPoint documents by, changing the file name to a .zip, then I copied the ‘<a:custClrLst…' section into the other PowerPoint documents 'theme1.xml' file. This all worked well.
So I tried moving the '<a:custClrLst…' section into the 'theme1.xml' for my Word and Excel templates.
But when i open the Word and Excel templates i cannot see the extra colour menu.
Any ideas?
Thanks
Colin
Excel doesn’t support custom colors in the theme (why not? good question!). With Word, it may be simpler to save your PowerPoint file as a theme and apply the theme to the Word file using the program interface. That should automatically place the custom colors in the right spot. But I’ve made a note to write an update about adding custom colors to Word. Thanks!
Hi John, this method didn’t work for me. Even applying the PowerPoint file, that shows Custom Colors, as a theme, Custom Colors does not appear in the color picker for the Word Document. Any thoughts?
Thank you for this article John! Just wanted to share how I solved and issue with the custom colors not appearing in Power Point 2016 file.
I tried to include some custom colors without success and found that after <a / rel=”nofollow”> there was an <a> xml seccion that had to be removed for the custom colors to appear in the color picker. Tried inserting the custom color seccions before and after the <a> seccion but the custom colors didn’t appear, till I erased all that <a> seccion.
Thanks for all the great articles.
Jean Pierre
I’m not clear under which circumstances you would get those tags. Please email a sample file and I’ll take a look at it.
Thank you SO much for this content! Do you know of a way to override the variants under the accent colors? Those automated values are usually so far off hue or saturation that it’s embarrassing!
Unfortunately, those colors are created by PowerPoint on the fly. They are not part of the presentation file, so there is no XML to edit. The algorithm is built into the program and is not user-modifiable.
This code worked for me and I’ve used it in PPT, Excel and Word – though in Word the extended custom colour palette isn’t stable (sometimes disappears – I don’t understand this)
I mainly use PPT and Xls however and I love it
What I’d like to know is… if there is a way to customise the table styles. The design options that come with PPT aren’t useful to me. I’d like to be able to put some customed tables in the Table Tools Design Tab. Does anyone know how to do this?
I’ve written a pair of articles on this site about creating custom table styles. Part 1 is XML Hacking: Custom Table Styles and the second part is XML Hacking: Table Styles Complete. Formatting text levels is done in a different XML section of the file, so I cover that in this piece: XML Hacking: Default Table Text.
Thank you – will investigate this further next week. On quick inspection it looks like something I can understand – thank you for making it as clear as possible for someone with little experience in this area.
Hi Sue
I tryed also the code for Excel 2017 but in my templates it dosnt work. Have you a example Excle file that you can post here?
As noted in the article, custom colors do not work in Excel, only Word and PowerPoint.
Thanks very much for confirming that the variants – the tints of the accent (theme) colours – were not editable. Thanks also for the xml branching info to add custom colours.
Brilliant – your site is so useful! I have a question about editing XML parts for color and table customisations. I have a lot of documents which were created using a potx template. I then enhanced the template by adding a custom table style, custom colors and a few others things, by unzipping and then editing the xml parts as you explain.
Now I want to go back to the documents which were created using the original, NON-customised potx, and add the customisations. What is the simplest way of doing this to a whole set of files (apart from manually copying everything into new documents opened from the new template)? Is there a VBA way of doing it? My other thought was a Python script. And one other thing that a quick online search seems to suggest would be something using VSTO, but I don’t know anything about Visual Studio and I can’t seem to find anything directly applicable to this issue – is there a quick way that is worth the learning curve?
Any suggestions would be greatly appreciated!
Brilliant site, so useful. Apologies if this is a double-post – I tried earlier and don’t see my comment/question.
I used your explanations to put custom table styles and some custom colors into a potx, which is working great. But I have a bunch of other files that are from the original, non-customised template. Is there a good way of processing all of them so I don’t have to manually add/change the XML for each, or manually copy all the presentations to new documents opened from the new template?
Is there a VBA way to do it? I don’t know Visual Studio, and I can’t find any obvious way to do this with VSTO via Google. I was also considering writing a Python script. What would be your recommendation for best practice for this?
Thank you!
To get the custom parts in your presentation, you’ll have to create a new file from the POTX that has the custom parts, then use Home>NewSlide>Reuse Slides… to import the slides from the presentation that is lacking the custom parts.
You might think that using the Design tab to apply a custom theme would work, but unfortunately the custom parts do not get copied over this way.
Hi, this is a fantastic post, thank-you very much. I’ve been successful in applying custom colours into a blank word document, however when I try and adjust the Theme1.xml file in an already mature document the custom colours don’t display. In the unzipped folder structure includes a customXml folder.
Do you know what might be inhibiting the visibility of the custom colours I’ve added?
Hi, after some further testing it seems that the custom colours were applied, however disappear as soon as an object is selected (an object was the first things selected in my template). Do you know how to combat this?
When you write “disappear as soon as an object is selected”, do you mean the swatches disappear from the color chooser, or that the object color disappears from the object? By object, do you mean an autoshape, or some other object? What version of Word are you using? If you can email the file in question to me at production at brandwares dot com, I’ll take a look at it.
Hi John
Thank you for this, however I cannot get it to work.. I have asked a question on answers.microsoft.com https://answers.microsoft.com/en-us/msoffice/forum/msoffice_powerpoint-mso_mac/adding-colors-in-powerpoint-theme-by-changing-xml/28119de9-cede-48ce-bdb0-e56b18f7c4f2
Maybe you could help?
Best,
Sara
I’ve answered on answers.microsoft.com as well, but you need to change all instances of <a:custClt to <a:custClr. Then try it again.
Hi John,
Thank you for your post! One quick question, where can I find recent colors tag? I’m trying to erase all recent colors that I have been using to build the master slide. I found that in Excel is .
Any help would be appreciated!
Thanks!
In PowerPoint, recent colors are stored in ppt\presProps.xml. Delete the <p:clrMenu> section, then re-zip the files.
I have edited the xml file and added my colors, but when I zip the file back up and change it back to .pptx and try to open it keeps saying it needs to be repaired. I’m in Powerpoint 2013.
Below is my code:
As noted above the Comment box, please replace the less than sign “<“ with “<” and the greater than sign “>” with “>”. Otherwise, WordPress strips out those characters and only a blank space appears on the page.
Just out of curiosity (and my apologies if this has already been addressed), but is it possible to change the text “Custom Colors” to something like “Colors for Charts Only”?
Unfortunately, no. The Custom Colors title is created automatically by the Office program and can’t be changed.
It seems the custom colors are only accessible for fonts, and not backgrounds (Office 2016, Win10). Is that the behavior others see as well?
Sorry for the late reply, I had to do some research on this. Custom Colors appear in the Font Fill, Font Outline, Shape Fill, Shape Outline, Table Shading, Table Border Pen Color and Format Background dialogs in PowerPoint. In Word, Custom Colors do not appear in the Table Shading, Table Border Pen Color or Page Color dialogs, but they are available for fonts and shapes. This is true for Office 2007, 2010, 2013 and 2016, plus 2016 for Mac.
They seem to be now appearing in word in the border and shading menu but not in the simple shading or pen color option. very odd.
Thanks for all your posts, they are incredibly helpful. After battling for hours with zip on my mac I used visual studio code with the OOXML extension and it worked very well. I also decided to edit the dotx file instead of the thmx file wich made it a lot easier as no unzipping was necessary.
Thanks, I’m glad the information has helped.
Custom Colors do not appear in all color pickers, just ones where Microsoft has allowed them. As another example, you can’t use them to format table borders or fills, though you can apply them to table text.
Also, a helpful tip for all: If you use 7-zip (free from 7-zip.org), you can (on Windows at least), right click your document and select “Open as Archive”. Browse to the file, and select “Edit” from the context menu. Make the desired changes, save, and answer yes to the prompt to change the file in the archive. Fini!
Thanks for the tip!
Hi
I used your example and managed to make it work. I want to ask if there is any way to group my colours, for example to make them appear in multiple lines:
CL1 CL2 CL3
CL4 CL5 CL6
CL7 CL8 CL9
rather than in one row
Sorry, but the colors are automatically placed in rows of 10 by PowerPoint and I haven’t found any formatting control over this.
–
Thanks for your answer. I was searching too if there is a separator or break that works for OOXML but no luck
Excel question: Is there anyway to automatically apply custom colors to every excel workbook opened (e.g., as part of my personal vba workbook or something)? that way if someone sends me an XLSX it will have my custom colors available?
Sorry, as noted in the article, Excel does not recognize custom colors for cell fills and most other worksheet formatting, and will not display them in any of the color picker dialogs. Most items on the Insert menu, such as Shapes and SmartArt, will display and can use custom colors.
Hi John,
Thanks a lot for this tut. Seems easy enough to replicate, however, I feel like I might be a bit late to the “show”. I can’t seem to make it work. I’m using Powerpoint for Office 365 (2016).
I made sure that there all “>” and “<" set correctly, and also made sure that there are no soft quotes like "“" and "”".
After all the modifications, once I doubleclick on the thmx file, the template is opened correctly, all set as intended except for the custom colors.
Could it be that this is no longer supported? Or do I have to do it differently?
I have uploaded my theme1.xml file to dropbox, as well as my entire theme file in case this is useful.
https://qbdclandauer-my.sharepoint.com/:f:/g/personal/daniel_amstutz_qbdclandauer_onmicrosoft_com/EjtURM_xNTRAnd73edBfPwIBOH62ZK_pRSvxWO85GMUbEQ?e=upy9hQ
Kind regards,
Custom Colors will travel with a PowerPoint Template, but not with a Theme file. First resave as a .potx file, then add your custom colors to it.
I see. I’ll try that then. Thanks a lot
Hi John, is there a way to apply names to “Theme Colors” the same as “Custom Colors”? For example, is given the name “Dark Green”, and I don’t know where that name comes from. Can I name it “Olive” instead? I.e. when resting the mouse in the color picker, I want the name “Olive” to appear instead of “Dark Green”. In other words, is there a “name” tag that complements the “val” entry for the theme color? Thanks!
Sorry, the names of theme colors are generated automatically by PowerPoint and can’t be over-ridden.
Uhg! Oh well. Thank you so much for these pages you’ve posted. So helpful!!
Hi John, is there a way to apply names to “Theme Colors” the same as “Custom Colors”? For example, $lt;a:accent2$gt;$lt;a:srgbClr val=”818A37″/$gt; is given the name “Dark Green”, and I don’t know where that name comes from. Can I name it “Olive” instead? I.e. when resting the mouse in the color picker, I want the name “Olive” to appear instead of “Dark Green”. In other words, is there a “name” tag that complements the “val” entry for the theme color? Thanks!
PS: expecting my comment #23 will be updated with this corrected version using your XML provided instructions (sorry for the confusion).
Hi John,
Thanks for this! I defined a few custom colors and put them into my Normal.dotm file. These appear fine in a new document. However, they do not show up in a document that has already been created. Any thoughts?
BTW, they do appear (in the new document) and can be used for table shading, etc. as well as font color.
That’s normal Word behavior. After a document is spawned from a template, it exists independently unless you actively update it. You can export a theme file, use the same steps to add custom colors to it, then apply it to a Word document and it will update with the custom colors.
Thanks. Actually, it was easier than that. I think it is Word Office 365. Under the Design menu, Themes, I simply did Reset to Theme from Template and there they are…
There are no custom themes, etc. in the document, so no chance of inadvertently screwing anything up. YMMV though.
Hi John. Thank you for this post. Is there a way to hack the colour codes for the tints of each Theme Colour? I often find that I’m not happy with the 5 light and dark tints automatically provided underneath each of the Theme Colours and it would be great if there was a way to change these. Do you have a post on this subject already?
Unfortunately, those theme color variants are not stored in the file. Instead Office programs generate them on the fly, so you can’t control them or the names they are assigned.
Hi John,
Thank you for this post! It has been very useful. I have an interesting development: You *can* get custom colors in Excel 2016. Do the following:
Add custom colors to a theme file and verify that they definitely work via PPT.
Open up Excel.
Apply the theme to your spreadsheet.
Click in a cell and type, then go to the font color menu. No new colors appear!
Insert a shape into your spreadsheet.
Select the shape.
Type in the shape.
Go to the font color menu. New colors have appeared!
It seems that Excel does not like to show custom colors in its color menus until the color menu has been “refreshed” with the new colors. I can get the fill, line color, and font color menus to accept the new custom colors this way. I use this for shapes and charts a lot. I haven’t succeeded with the border color menus yet. Sometimes Excel forgets this if you close the file so you need to do it again next time you open it.
This is weird and inconsistent, but you *can* get them in there.
Your observations were close enough to get me to take a look at custom colors in Excel more closely. They are never available for Worksheet formatting, like text, or cell fills or borders. Custom Colors do display with most of the items on the Insert menu, like text boxes, shapes, charts, etc. So I’ve updated the article. Thanks for writing!
It seems Kaz is right in saying that in a blank new sheet the custom colors are not immediately available for cell fills etc., but if you insert for example a shape, the custom colors appears. After that, they are also available for cells fills. So it seems one has to “shake them out of bed”…
It also seems that using only a ThemeColorScheme (xml file) doesn’t seem to work for bringing along custom colors. However, applying a whole Theme (thmx file) allows you to bring along the custom colors.
So another question is: whether it is possible to save the thmx file using VBA? I’ve searched and searched, but the answer seems to be no?
Thanks for a great post!
In testing Excel 2019, I don’t see Custom Colors becoming available for cell fills even after a custom color is applied to a shape. Perhaps you could specify in which version of Excel and operating system you see this happen.
Here’s a line of VBA that will save the active presentation as a full theme file:
Works on excel 2013. Open xl add text shape, apply custom color to text in text object and custom colors “jump” to the ribbon… Delete shape the colors remain on ribbon until xl is closed.
I don’t see any colors “jumping” anywhere in any version of Excel. As noted in the article, if a theme containing custom colors is applied to a workbook in Excel, the custom colors can be applied to text boxes, shapes, SmartArt, charts and WordArt. Applying a custom color to a shape is not necessary to make this happen. Custom colors do not remain active in Excel after the workbook with custom colors is closed, they disappear from the interface. Custom colors do not appear when you’re formatting worksheet text, cell fills or borders.
This is great, thank you. Are you aware of any way to set the tint values?
If you’re referring to the tint and tone variants directly below the theme colors, that’s not possible. Those are created on the fly by the program.
So when unzipping using terminal I see the files being created but where are these files being saved, there is no new file/folder located in the folder where the original file is located. Can someone hlep me with this?
With a standard terminal unzip (unzip path/to/the/zipfile), the unzipped files are normally created in the same folder as the original zip file. To find them, do a Spotlight search for [Content_Types].xml. That file name is only found in OOXML files.
Is it possible to add tiers? For example:
Custom color tier_1
50 colors here
Custom color tier_2
50 colors here
Custom color tier_3
50 colors here
…And so on?
No, it’s not. You get 50 colors maximum. To have more, you would have to use multiple slide masters, but you would then have to switch between color themes to have access to them all.
Hi @John Korchok,
If i have a corporate branded theme installed / selected as Default in Excel and i open a new workbook and add a sample chart based on sample data manually (Alt+ F1), without formatting any part of it e.g. a clustered Column/Bar chart, it does not seem to highlight the Default Theme Background color used in the Color Picker. However, it definitely hightlights the Default Theme Font color. What could be the reason?
I’m not clear what you’re referring to by “highlight the default theme background color”. Is the chart coming out with the background set to the text color and the text set to the background color? If not, please post more details. You can also post a screenshot or video capture to a cloud service, then post a Share link here so I can see what you are.
Hi @John Korchok,
Here are 2 screenshots of what i meant.
Theme Background Color not Highlighted in Color Picker :
https://drive.google.com/file/d/1cQPwaEcX7oOf8ReF49zc_YDQ0RH_pZqi/view?usp=sharing
Theme Font Color Highlighted in Color Picker :
https://drive.google.com/file/d/11_tK9N8abuAuPIk1nYFbdB3tyvM4pXbh/view?usp=sharing
Thanks for sending the screenshots. It looks like the data series is colored in green, but Excel is not picking up that this is supposed to be the Accent 6 of the color theme. I don’t know what your workflow is, but you could correct this in Excel by applying the same color theme used in your presentation, then selecting the data series in Excel and applying Accent 6 to that data series. If you apply a color as RGB, Excel will not notice that the color is also used in the theme. Instead, you must apply the theme color to the data series from the theme color palette. Then Office will recognize it as a theme color instead of an RGB color. Please post again if I have misunderstood your reply.
Green was just an example. It happens with any of theme colors on the top. I am using `msoThemeColorAccent3` on the bars:
With Selection.Format.Fill
.Visible = msoTrue
.ForeColor.ObjectThemeColor = msoThemeColorAccent3
.ForeColor.TintAndShade = 0
.ForeColor.Brightness = 0
.Transparency = 0
.Solid
End With
Another thing i found out is, if i move or copy this sheet to a new workbook, it loses the Corporate Brand theme colors (as well as Custom theme colors) and i see the default Office theme as selected in PageLayout > Themes. I than have to again apply the Corporate Brand Theme to show the theme colors again. Why is this happening? Maybe i created the Corporate Theme file incorrectly?
Isn’t there a way to make my entire Excel application just have the Corporate Brand theme for any new or existing workbook that was created?
Your code sample doesn’t run as posted. Format is not a property of Selection.
Your code appears to set the theme color, but it is followed by three commands that could alter that color (TintAndShade, Brightness and Transparency. If you apply a theme color, then modify it, Office programs see it as an arbitrary RGB color, not a theme color.
The workbook determines the file’s theme, not the worksheet. So moving a worksheet will change the colors, as you’ve found. Instead, keep a saved copy of your preferred theme and apply it to all workbooks. So all your files are using the same theme.
You can set a default workbook. Then whenever you open Excel, the theme colors will be correct. Here’s an article on how to do that: How to set a default template in Excel
Hey John,
I’m having the same problem as Karen above… I’m on Powerpoint 2013, Windows 7 Ultimate (64). Couple of things I noticed:
1) Shouldn’t there be a closing tag for <a:extraClrSchemeLst/> ?
2) The instructions above say to add a new branch between said tag, and the very last closing tag </a:theme>
But there’s some stuff already there in between:
<a:extLst><a:ext uri=”{05A4C25C-085E-4340-85A3-A5531E510DB2}”><thm15:themeFamily xmlns:thm15=”http://schemas.microsoft.com/office/thememl/2012/main” name=”3_UXD_DesignSpec_Template_v1″ id=”{B89D7B9F-6C35-44D6-B8EA-529A2EA5ABC4}” vid=”{DBAD6E5E-117B-4AC8-8F90-FEADB4860339}”/></a:ext></a:extLst>
Where should I past the new branch? Also, do spaces or new lines matter?
Thanks for your help!
Empty XML elements can be written 2 ways, with opening and closing tags:
Or as a a self-closing tag:
Note the slash at the end that closes it.
PowerPoint may add custom XML as a:extList elements. The custom color element should go after a:extraClrSchemeLst but before a:extlist, if it exists.
If you get error messages, it means there is an error in your XML or in your rezipping process. XML errors can be minimized when you’re beginning to edit by doing just one change, then testing. Rezipping errors are easy to get with the Windows Zip utility, as it creates a non-existent top-level folder when you unzip. Including that top-level folder when rezipping will prevent PowerPoint from being able to read the file. I use 7-Zip (free) to edit without unzipping, it saves time and prevents such errors.
Does this method work for Office 365? I follow the procedure in my Word 365 desktop application, and afterwards Word does allow me to select the theme (including my new custClrLst section) but the custom colours are not present in any of the colour tools?
Office 365 is Microsoft’s subscription plan. You’re actually getting Office 2019, so all the techniques in these pages apply.
Feel free to email your theme with custom colors and I’ll trouble-shoot it for you. production at brandwares dot com is the addfress.
Thanks John
OK, I have realised that the Custom Colors do in fact show up in Powerpoint, but they do not show up in Word. My understanding was that after adding into the theme.xml file then they also show up in the other MS Applications too. Do they need duplicating in a different folder as well? Currently the theme is placed here:
C:\Users\username\AppData\Roaming\Microsoft\Templates\Document Themes\mytheme.thmx
If that folder works for PowerPoint, it should work for Word as well.
In Word, use Design>Themes to find your theme in the Custom row at the top of the list of themes. Apply it to your template or document, then the custom colors will become available.
OK, I figured it out!
The “Custom Colors” showed in NEW Word documents, but not in EXISTING Word documents I had (even if I selected the new theme).
It turned out that my existing Word documents were in “Compatibility Mode” (with the originals created with earlier versions of Word).
I re-saved them whilst UNTICKING “Maintain compatibility with previous versions of Word”, and afterwards the “Custom Colors” showed in these Word documents too.
Hopefully this will be useful if anyone else can’t figure out why the Custom Colors aren’t showing despite being set correctly in the XML file.
Thanks for the tip!
Hi John
I have been working on a powerpoint template with two slidemasters and a set of custom colors for a client. The custom colors are accessible using the first slidemaster but as soon as I insert a slide from the second slidemaster, they disappear. Do you have an idea on why that is? I have edited both xml theme files but the custom colors doesn’t show up in the second slidemaster.
Thanks
Klaus
Each slide master has a separate theme file. sildeMaster1.xml:theme1.xml, then slideMaster2.xml:theme2.xml. After adding custom colors, if you duplicate the slide master, the custom colors will be included. If you simply create a new master, they will not, and must be added later.
Hi, do you know if this works for Excel templates?
Custom colors can be used on most items on the Insert tab of the ribbon, like shapes and SmartArt. Custom Colors can’t be used for any object that is on the worksheet, like cell or font coloring.
Hi, currently have implemented the custom colors the way you have mentioned and it works great for PowerPoint and Excel. However in Word I seem to be getting the custom colors only in the font color selection and not in the Shading color selections.
Is there a way to get them to show in the Shading color selection menu?
I’m using Office 365 on Windows 10.
Shading? Please post the Ribbon tab, group and command name under which you find this.
Sure. This is listed under Home>Paragraph>Shading (Icon looks like a bucket spilling paint). It’s the same command you would use by right clicking to change the colors of cells in a table or change the background color of text.
The tooltip reads “Change the color behind the selected text, paragraph or table cell.”
Sorry, custom colors don’t appear in color pickers for backgrounds (they don’t appear in the Page Color or Table Shading dialogs either). Microsoft would have to revise the program to make them visible.
Hi.
I use my custom colours for shading, both paragraphs and table cells, by using the menu under Border and Shading > Border and shading…, select tab “Shading” and then select a custom colour from the drop down list “Fill”.
Not a very user friendly option but it works for creating templates with custom colour shaded table cells for example.
I have noticed an odd thing about custom colors and cell shading in Excel for both Windows and Mac.
I created a template and added some custom colors. If I try using Fill Color to shade a cell the custom colors do NOT appear. However, if I first fill an object, such as a shape or chart with a custom color, and then click on Fill Color the custom colors DO appear!
I am using Microsoft 365 Version 2011.
Your comment might be helpful if it was specific. Fill Color is not an Excel command name, so we can only guess at what steps you’re using to fill a cell. After applying a custom color to a shape or chart, then clicking on a cell and selecting the Fill dropdown on the popup formatting palette, custom colors are not displayed. Choosing Format Cells>Fill, from either the right-click menu, or from Home>Cells>Format>Format Cells command on the Ribbon doesn’t display them either. If someone can post a reproducible way of using custom colors for cell fills and cell text, I’d love to know about it.
Jon – thank you again for this post. It’s continued to be very useful to me over the years. (Love the book, too!)
I realize that when I first commented here I didn’t actually explain how to get the custom colors to stick around for cells in the worksheet. Here’s a more specific explanation. It works in Excel 2016 and 2019. It should work in 2013, but I cannot remember if I was using 2013 or 2016 when I first tried it.
1. Open up Excel, open up a new sheet.
2. Apply the thmx file to your sheet. (Or, open up a sheet with the right theme already in it.)
3. Go to the HOME tab. Click on an empty cell in the worksheet. In the home tab, look at the FONT section of the ribbon. Using the fill color (paint bucket) button in this section, try to put a custom fill color in your cell. (You can’t! This is to confirm that this button is behaving as expected at this point.)
— At this point, we have the custom colors in the file, but not yet available for cells in the worksheet —
4. Go to the INSERT tab. Insert an item, like a circle.
5. Go back to the HOME tab. (This is key.)
6. Click on the circle.
7. Still on the HOME tab, click the *exact same button* you used before – the Fill Color button in the Font section of the ribbon. (You must click this specific button.) You should now see the custom colors (because the circle is selected).
8. Click on a cell in the worksheet. (The circle is no longer selected.)
9. Stay on the HOME tab and click the *exact same fill color button* again. It should now have the custom fill colors in it, even though you have a cell selected. (Hooray!)
NOTE: This procedure is a per-button procedure! That means you have to ‘remind’ the buttons individually that they can use custom colors. You have to do this again for the font color button on the ribbon, too. (Hint: make one circle then click all the buttons in one go. Delete the circle afterwards, you don’t need it.)
NOTE 2: Not every button works for this. I still can’t get the Cell Borders menu to acknowledge custom colors (and some parts of that menu won’t even do ‘Recent Colors.’)
NOTE 3: Excel won’t always ‘remember’ that these buttons have custom colors, so if you close your window or document it may forget and you have to do this again.
Thanks for posting those details. The procedure is a bit complex, perhaps there’s a way to simplify it with a VBA add-in for Excel. I’ll give it some thought, it might make a good article.
Hi,
I’m looking for a solution to get custom colors again in Powerpoint. They used to be there in our previous template, but now I created a new one starting from the standard office template, and they’re gone. Since the hacking explanation is way beyond my capabilities, and since they date from 2015, I wonder if in the meantime there is another way to get the custom colors. I’m using Office 365.
Thank you in advance.
We can add custom colors for you. The cost is US$5 per custom color.
Hi John, thanks for your rich material on creating Custom Colors, which I’ve been digging into for the last couple of weeks. I’ve also been following you on “answers.microsoft.com”, “experts-exchange.com”, etc. With your articles and answers I am able to successfully include Custom Colors in Power Point files. But I’m absolutely not able do the same with Word files, and I have no idea why I can’t. Could you please help me in somehow? In which Word/Office XML file should I include the XML codes related to Custom Colors? What, in general, are the steps to include Custom Colors in a word file? How do these steps differ from those used to include Custom Colors in a PowerPoint file? Forgive me if I bother you with so many questions, but being successful with PowerPoint files and not succeeding with Word files is driving me crazy. Thank you in advance for your kindness in helping me.
Sorry, I can’t tell what problem you might be having. We add custom colors to Word files on a frequent basis and don’t see any problems. They go in the word/theme/theme1.xml file at the bottom, exactly the same position and syntax as in PowerPoint.
Please note that Word will not display custom colors for coloring tables. Neither the table Shading dialog, nor the table Pen Color dialog will show them.
For any techniques you read about in this blog, we can do the work for you if you’re unable to make it work. The cost for adding custom colors is $5 each.
Thank you so much, John
How can I make use of the CustomColors by VBA code?
Thank you in advance
If you’re using Windows, you can edit OOXML with VBA. You could create custom colors or apply most of the other OOXML hacking techniques I write about here.
Hi John, thank you very much for your detailed explanations of this little incredible hack! The Chrome extension option worked great for me when I started with a Powerpoint file that was originally created in Windows, and then adjusted on a Mac. However, now I have a pptx file that was created on a Mac, and I have tried adding the custom colors in theme2.xml AND theme1.xml multiple times, but they just won’t show up. I tried exporting the file as a .potx file, then upload it to the OOXML extension, still nothing.
Another thing of note is if I only type <a:extraClrSchemeLst/> before the list of colors, and then try opening the file in Powerpoint, I always get an error and a prompt to repair the file. So instead, I wrote <a:extraClrSchemeLst> [custom colors] </a:extraClrSchemeLst> . This caused the error to go away, but I am still unable to find the custom colors in the file. Do you know any trouble shooting methods to try out for Mac?
Thank you!
Nada
Custom Colors and Extra Colors are 2 different ways of adding to the basic color theme. In a new presentation, the theme already contains a <a:extraClrSchemeLst/> tag. Don’t add another one.
The custom color additional XML goes after <a:extraClrSchemeLst/>, not inside it.
Hi, many thanks for this very useful post. However, I can’t make it work (powerpoint wants to repair the presentation and can’t do it).
Do I have any error in my xml?
—
<?xml version=”1.0″ encoding=”UTF-8″ standalone=”yes”?>
<a:theme xmlns:a=http://schemas.openxmlformats.org/drawingml/2006/main name=”ThèmeOW2024″><a:themeElements><a:clrScheme name=”OW-Theme”><a:dk1><a:sysClr val=”windowText” lastClr=”000000″/></a:dk1><a:lt1><a:sysClr val=”window” lastClr=”FFFFFF”/></a:lt1><a:dk2><a:srgbClr val=”3B2E40″/></a:dk2><a:lt2><a:srgbClr val=”FFEDDC”/></a:lt2><a:accent1><a:srgbClr val=”FFBE47″/></a:accent1><a:accent2><a:srgbClr val=”EA9389″/></a:accent2><a:accent3><a:srgbClr val=”B5586A”/></a:accent3><a:accent4><a:srgbClr val=”9E1A5B”/></a:accent4><a:accent5><a:srgbClr val=”6110BE”/></a:accent5><a:accent6><a:srgbClr val=”8560FF”/></a:accent6><a:hlink><a:srgbClr val=”3B2E40″/></a:hlink><a:folHlink><a:srgbClr val=”FFBE47″/></a:folHlink></a:clrScheme><a:fontScheme name=”OW-Fonts”><a:majorFont><a:latin typeface=”Gauthier FY Medium”/><a:ea typeface=””/><a:cs typeface=””/></a:majorFont><a:minorFont><a:latin typeface=”Poppins”/><a:ea typeface=””/><a:cs typeface=””/></a:minorFont></a:fontScheme><a:fmtScheme name=”Office”><a:fillStyleLst><a:solidFill><a:schemeClr val=”phClr”/></a:solidFill><a:gradFill rotWithShape=”1″><a:gsLst><a:gs pos=”0″><a:schemeClr val=”phClr”><a:lumMod val=”110000″/><a:satMod val=”105000″/><a:tint val=”67000″/></a:schemeClr></a:gs><a:gs pos=”50000″><a:schemeClr val=”phClr”><a:lumMod val=”105000″/><a:satMod val=”103000″/><a:tint val=”73000″/></a:schemeClr></a:gs><a:gs pos=”100000″><a:schemeClr val=”phClr”><a:lumMod val=”105000″/><a:satMod val=”109000″/><a:tint val=”81000″/></a:schemeClr></a:gs></a:gsLst><a:lin ang=”5400000″ scaled=”0″/></a:gradFill><a:gradFill rotWithShape=”1″><a:gsLst><a:gs pos=”0″><a:schemeClr val=”phClr”><a:satMod val=”103000″/><a:lumMod val=”102000″/><a:tint val=”94000″/></a:schemeClr></a:gs><a:gs pos=”50000″><a:schemeClr val=”phClr”><a:satMod val=”110000″/><a:lumMod val=”100000″/><a:shade val=”100000″/></a:schemeClr></a:gs><a:gs pos=”100000″><a:schemeClr val=”phClr”><a:lumMod val=”99000″/><a:satMod val=”120000″/><a:shade val=”78000″/></a:schemeClr></a:gs></a:gsLst><a:lin ang=”5400000″ scaled=”0″/></a:gradFill></a:fillStyleLst><a:lnStyleLst><a:ln w=”12700″ cap=”flat” cmpd=”sng” algn=”ctr”><a:solidFill><a:schemeClr val=”phClr”/></a:solidFill><a:prstDash val=”solid”/><a:miter lim=”800000″/></a:ln><a:ln w=”19050″ cap=”flat” cmpd=”sng” algn=”ctr”><a:solidFill><a:schemeClr val=”phClr”/></a:solidFill><a:prstDash val=”solid”/><a:miter lim=”800000″/></a:ln><a:ln w=”25400″ cap=”flat” cmpd=”sng” algn=”ctr”><a:solidFill><a:schemeClr val=”phClr”/></a:solidFill><a:prstDash val=”solid”/><a:miter lim=”800000″/></a:ln></a:lnStyleLst><a:effectStyleLst><a:effectStyle><a:effectLst/></a:effectStyle><a:effectStyle><a:effectLst/></a:effectStyle><a:effectStyle><a:effectLst><a:outerShdw blurRad=”57150″ dist=”19050″ dir=”5400000″ algn=”ctr” rotWithShape=”0″><a:srgbClr val=”000000″><a:alpha val=”63000″/></a:srgbClr></a:outerShdw></a:effectLst></a:effectStyle></a:effectStyleLst><a:bgFillStyleLst><a:solidFill><a:schemeClr val=”phClr”/></a:solidFill><a:solidFill><a:schemeClr val=”phClr”><a:tint val=”95000″/><a:satMod val=”170000″/></a:schemeClr></a:solidFill><a:gradFill rotWithShape=”1″><a:gsLst><a:gs pos=”0″><a:schemeClr val=”phClr”><a:tint val=”93000″/><a:satMod val=”150000″/><a:shade val=”98000″/><a:lumMod val=”102000″/></a:schemeClr></a:gs><a:gs pos=”50000″><a:schemeClr val=”phClr”><a:tint val=”98000″/><a:satMod val=”130000″/><a:shade val=”90000″/><a:lumMod val=”103000″/></a:schemeClr></a:gs><a:gs pos=”100000″><a:schemeClr val=”phClr”><a:shade val=”63000″/><a:satMod val=”120000″/></a:schemeClr></a:gs></a:gsLst><a:lin ang=”5400000″ scaled=”0″/></a:gradFill></a:bgFillStyleLst></a:fmtScheme></a:themeElements><a:objectDefaults><a:lnDef><a:spPr/><a:bodyPr/><a:lstStyle/><a:style><a:lnRef idx=”2″><a:schemeClr val=”accent1″/></a:lnRef><a:fillRef idx=”0″><a:schemeClr val=”accent1″/></a:fillRef><a:effectRef idx=”1″><a:schemeClr val=”accent1″/></a:effectRef><a:fontRef idx=”minor”><a:schemeClr val=”tx1″/></a:fontRef></a:style></a:lnDef></a:objectDefaults><a:extraClrSchemeLst/><a:custClrLst><a:custClr name”Nutri&Food”><a:srgbClr val=”FFBE47″/></a:custClr><a:custClr name”Nutri&Food-Light”><a:srgbClr val=”FFC78E”/></a:custClr><a:custClr name”Cosmétique-Beauté”><a:srgbClr val=”EA9389″/></a:custClr><a:custClr name”Cosmétique-Beauté-Light”><a:srgbClr val=”D59296″/></a:custClr><a:custClr name”Asso-Admin-Politique”><a:srgbClr val=”B5586A”/></a:custClr><a:custClr name”Asso-Admin-Politique-Light”><a:srgbClr val=”9A6373″/></a:custClr><a:custClr name”Médias”><a:srgbClr val=”9E1A5B”/></a:custClr><a:custClr name”Médias-Light”><a:srgbClr val=”8C415B”/></a:custClr><a:custClr name”Banque-Assur-Finance”><a:srgbClr val=”6110BE”/></a:custClr><a:custClr name”Banque-Assur-Finance-Light”><a:srgbClr val=”5B4E85″/></a:custClr><a:custClr name”Telecom-New-techno”><a:srgbClr val=”8560FF”/></a:custClr><a:custClr name”Telecom-New-techno-Light”><a:srgbClr val=”9184FF”/></a:custClr><a:custClr name”Santé”><a:srgbClr val=”C7B1FF”/></a:custClr><a:custClr name”Santé-Light”><a:srgbClr val=”D7D5FF”/></a:custClr><a:custClr name”B2B”><a:srgbClr val=”A0D8D7″/></a:custClr><a:custClr name”B2B-Light”><a:srgbClr val=”C1CDD3″/></a:custClr><a:custClr name”Distribution”><a:srgbClr val=”54C990″/></a:custClr><a:custClr name”Distribution-Light”><a:srgbClr val=”96BEAF”/></a:custClr><a:custClr name”Transport-Mobilités”><a:srgbClr val=”72A2FF”/></a:custClr><a:custClr name”Transport-Mobilités-Light”><a:srgbClr val=”8EAEFF”/></a:custClr><a:custClr name”Gaming”><a:srgbClr val=”06008F”/></a:custClr><a:custClr name”Gaming-Light”><a:srgbClr val=”2F3084″/></a:custClr></a:custClrLst><a:extLst><a:ext uri=”{05A4C25C-085E-4340-85A3-A5531E510DB2}”><thm15:themeFamily xmlns:thm15=http://schemas.microsoft.com/office/thememl/2012/main name=”ThèmeOW2024″ id=”{65A233DC-35A3-40EB-8C67-C0802676EE5B}” vid=”{AACF6FED-1671-4B6D-9363-AA36B5E82111}”/></a:ext></a:extLst></a:theme>
The quote marks in the text you have post are not straight quotes. They are angled quotes, which is the wrong character to use in XML. Please try replacing them with straight quotes.
You also have multiple instances of parameters like name”Asso-Admin-Politique-Light”, where the equals sign is missing. Here is how they should appear: name=”Asso-Admin-Politique-Light”
A simple trouble-shooting technique is to allow the Office program to repair the file. Then see what has been deleted. The error will be in the deleted content. Unfortunately, in your example, all of the content probably would have been deleted, as all the quote marks are incorrect.
Thank you for your answer. Yes, I’ve seen this issue and managed to have the custom colors displayed properly.
BUT my pptx also contain custom font (.ttf, embedable) that I embed to the document and when I share it with someone else, the custom colors are displayed but not the font.
To fix it I found out that I need to apply my theme to each master slide I’ve created and the fonts are displayed properly on every machine, but the custom colors disappeared…
In other words, I’m unable to display properly and the custom colors and the embedded font…
Could you help me? thank you
Thanks for contacting us. This problem was solved with a brief paid consultation.
Hello! Im trying to follow this to do custom colors in Word, not PPT, and it says you “just opened theme2.xml to get the values for this” – for the custom colors. But in my Word files, there’s no theme2.xml, just theme1.xml. So where do I get the values? Thank you!
Sorry, but the text you quoted doesn’t appear in the article. The article does mention editing theme1.xml to add custom colors in Word: “Custom colors can be added to the theme1.xml file in Word and Excel using exactly the same syntax.”
You can get the hexadecimal color value from the color picker, or you can type RGB values into our RGB/Hexadecimal Calculator to get the hex colors.
Sorry! I was reading a few different articles and that quote was from your article “OOXML Hacking: Color Themes.” But you answered my question anyways! Thanks so much!
Hi there!
Thanks to the article!
There´s still no hack to add custom colors to shading, right?
I think you’re referring to the 50 tints and shades that appear directly below the Theme colors, Unfortunately, those are automatically created by Office programs and cannot be set by hacking.
Hi, do you know how to do it using VBA code? I have the code to set “recent colors” but i would like to do it in “custom colors”
Custom Colors are not included in the PowerPoint user interface, so Microsoft has never included them in the VBA object model. There is very little you can do to hack OOXML with VBA unless you unzip the PowerPoint file into its component parts. The file being modified cannot be open in PowerPoint while you do this. Here’s my article on how to Edit OOXML with VBA – Cool Code. After that code unzips the files, you would use string manipulation to add the custom colors to the theme1.xml part. Then the code can re-zip everything back into a useable PowerPoint file. Best of luck with your coding!
Hello!
Do you see the error here? I’ve just edited this part for test and I have an error when trying to reopen de ppt
with the code ><a:extraClrSchemeLst/><a:custClrLst><a:custClr name=”AZUL CLARO”><a:srgbClr val=”57CCFF”/></a:custClr><a:custClr name=”FUCSIA”><a:srgbClr val=”FF0066″/></a:custClr></a:custClrLst></a:theme>
Your example shows the most common error with XML editing: You aren’t using straight quotes. XML will not tolerate curly or “smart” quotes.
This works, thanks a lot!