In my last post, I translated the classic method of outline numbering for macOS. But Shauna Kelly’s original steps have an element of personal preference them. We can also get reliable results from outline numbering variations.
Unfortunately, Shauna passed away a few years ago. I’m glad her site is still kept running by volunteers. If you’re formatting for Windows, you should read her article first: How to create numbered headings or outline numbering in Word 2007 and Word 2010
I think one notable restriction of Shauna’s procedure is that she relies on the built-in Heading styles. Often a numbering scheme is required that has nothing to do with headings. Here’s how we can separate these concepts and create solid numbering using an arbitrary style set. This applies to both Windows and OS X versions of Word.
In Shauna’s classic technique, the first step is to revise the built-in Headings 1 to 9 so that Heading 1 is independent of other styles, then all the subsequent headings inherit characteristics from Heading 1. We’ll reuse this basic concept for a different style set.
First create a style that will be the basis for the first level of your outline numbering. For a start, this style should be based on No Style (Word for Mac: Format>Style>Modify>Style based on:>(no style) Word for Windows: Ctrl + Alt + Shift + S to open the Styles list>Click on Manage Styles button>Modify>Style based on:>(no style)). This style really only needs to include the font, font size, line spacing, space before and after the paragraph. Any indenting or number style will be handled later. For this article, let’s call it Number Style 1. There is one essential parameter you must set. In the Paragraph format for the style, you must set the Outline level to Level 1 (With the Modify Style dialog still open, click on Format>Paragraph>Outline level. This is the key to making this work!
Next, we’ll create the second style. Start by basing it on Number Style 1, then format whatever variation it might have, staying away from indentation or numbering. Outline numbered styles are often very similar, this style might be exactly the same as Number Style 1. However, in Format>Paragraph, Outline level must be set to Level 2. Are we picking up the pattern yet?
Each additional style in the outline numbered series must be:
- based on the previous style, and
- have an outline level that is one level down from the previous style.
As long as you can format a chain of styles following these principles, you should be able to get it to work with the technique on this page for MacOS (replace the first section Outline Numbering in Word for Mac – The Classic Method with the procedure on this page) or Windows (replace section 3. Set up your Heading paragraph styles with this page’s technique instead.
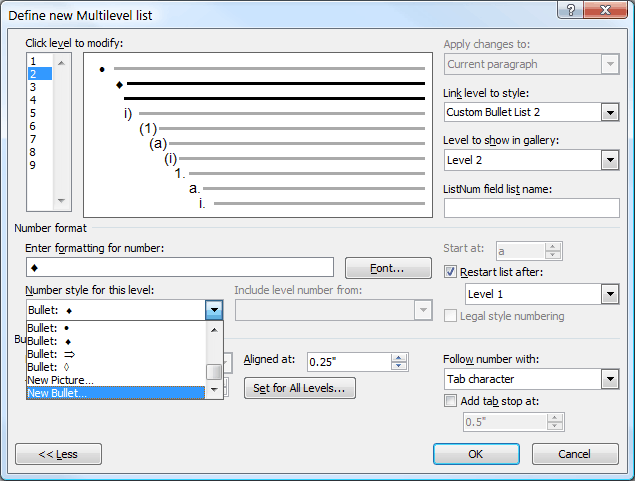
You can create nested sets of bullet styles by following the same steps as above. When the Define new Multilevel list dialog is open, use the dropdown called Number style for this level, scroll all the way down and you’ll find 6 bullet presets and options for choosing a different bullet or a picture bullet. Nested bullet styles work like outline numbering for bullets, though they’re a new concept for most users.
Feel free to post constructive comments suggesting improvements, I’m always trying to make these articles better.


Hi John,
I’ve been round and round on how to define gray square bullets to replace the default circle ones for a Word 365 (PC) letterhead template. First I defined list bullet styles, but users are accustomed to just clicking the bullet button, so that would require all my end users to take a tutorial on why they should use Styles. Additionally, some users like to take notes with multilevel bullets in real time, using tab/shift-tab to jump between levels, and Styles isn’t as fast enough for that. I finally figured out how to do this thru a defined multilevel list, and it works great, but users sometimes still need to select the embedded/defined list. Is there ANY way to make my Defined Multilevel list the default – or at a very minimum, define more than the first level of default bullet? Can send the template for refernce if it would help. Thanks in advance!
In older versions of Word, you would be able to replace the default bullet button with a custom button that looked the same. Unfortunately, modern versions of Word no longer allow replacement of built-in commands. You can only add new ones. A workaround is to hide the Home tab and replace it with a custom Home tab with a custom bullet button that invokes your multilevel style, but that’s a huge amount of work. You have to rebuild the entire tab.