Multiple color themes in the same PowerPoint template are useful for companies with several divisions or for presenters who need color-coded sections. Here are 3 ways to add that capability to your presentations.
Multiple Color Themes, One Template – Best Practices
Multiple Color Themes: Using Super Themes in PowerPoint
PowerPoint 2013 and 2016 for Windows and Mac all feature a new theme format developed by Microsoft: the Super Theme:

The user sees a preview of the color palette that will be used, then picks the variant they want to use. It’s an elegant, attractive interface and makes the design variants plainly visible on the Ribbon. Super Themes also allow the inclusion of size variants, so that resizing a deck doesn’t distort the logos.
Brandwares now creates custom Super Themes, so we can make these for you. However, the technique is tricky, so if you’re an independent designer without the budget for professional assistance, you’ll have to find another way. Fortunately, there are other methods to add multiple color themes.
Multiple Color Themes: Hacking XML
This technique works to add multiple color themes to PowerPoint. You can also add them to Word and Excel files, but those programs will simply ignore them. These extra color themes will travel with a theme saved from such a Word or Excel file, but you already knew that PowerPoint is the program to use for creating theme files. To hack the XML, start by reading XML Hacking: An Introduction. If you’re using a Mac, you should also read XML Hacking: Editing in OS X.
Now, expand your Office file to see the XML. Open the ppt folder, then open the theme folder inside that. PowerPoint saves every theme that’s ever been applied to the presentation, starting with theme1.xml, so you’ll have to check the theme name in each variant to get the right one. If you’re trying this with Word or Excel, look in word\theme or xl\theme respectively, where you will find only one theme1.xml file.
Format the XML to be readable, then go right to the bottom of the listing, where you’ll find the self-closing stub called <a:extraClrSchemeLst/>. First, open up the stub:
<a:extraClrSchemeLst>
</a:extraClrSchemeLst>
Then add a color scheme:
<a:extraClrSchemeLst>
  <a:extraClrScheme>
    <a:clrScheme name="Red-Tan Chart Colors">
      <a:dk1>
        <a:srgbClr val="000000"/>
      </a:dk1>
      <a:lt1>
        <a:srgbClr val="FFFFFF"/>
      </a:lt1>
      <a:dk2>
        <a:srgbClr val="082948"/>
      </a:dk2>
      <a:lt2>
        <a:srgbClr val="FAF9F9"/>
      </a:lt2>
      <a:accent1>
        <a:srgbClr val="C46158"/>
      </a:accent1>
      <a:accent2>
        <a:srgbClr val="E69779"/>
      </a:accent2>
      <a:accent3>
        <a:srgbClr val="699BC5"/>
      </a:accent3>
      <a:accent4>
        <a:srgbClr val="6E9C82"/>
      </a:accent4>
      <a:accent5>
        <a:srgbClr val="1F497D"/>
      </a:accent5>
      <a:accent6>
        <a:srgbClr val="4A8363"/>
      </a:accent6>
      <a:hlink>
        <a:srgbClr val="1F497D"/>
      </a:hlink>
      <a:folHlink>
        <a:srgbClr val="699BC5"/>
      </a:folHlink>
    </a:clrScheme>
  </a:extraClrScheme>
</a:extraClrSchemeLst>
The syntax is exactly the same as for the clrScheme listing that every theme includes as its main color theme, so you can simply copy and paste the whole block of XML. The theme file can hold any number of extra color schemes. When you are using the final file, you can change the theme colors by choosing View>Slide Master>Colors in PowerPoint (actual menu names change in different versions of Office).
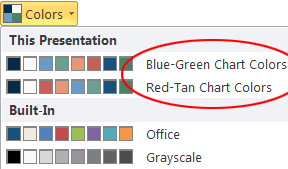
Clicking on the Colors dropdown shows the extra color themes.
When you choose a new color theme, all elements keyed to the color theme will change throughout the presentation.
Multiple Color Themes: Multiple Masters (PowerPoint only)
For Word and Excel, a document can have only one color theme applied at a time, and that theme affects all pages in the file. PowerPoint allows more flexibility, since it can have multiple master slides and each of those master slides has its own color theme. This means that different parts of a PowerPoint file can have different color themes. This is often used to color-code different sections of a presentation.
In its most basic form, this is the simplest technique. No XML hacking required:
- In PowerPoint, choose View>Slide Master to view the masters.
- Right-click on the Slide Master (the larger slide at the top of the left-hand display) and choose Duplicate Slide Master. The new master is added below the slide layouts for the first master. (In Windows versions, right-click and check that each Master has the Preserve Master attribute checked, or they’ll vanish later.)
- Select the new master, then choose Color>Customize Colors.
- Revise the color theme, or apply a color theme you created earlier. OK out.
Repeat the steps above for each different color theme you need to include. In the program interface, the user will see a group of slide layouts for each slide master. Here is a presentation where only one colors changes in each color theme:
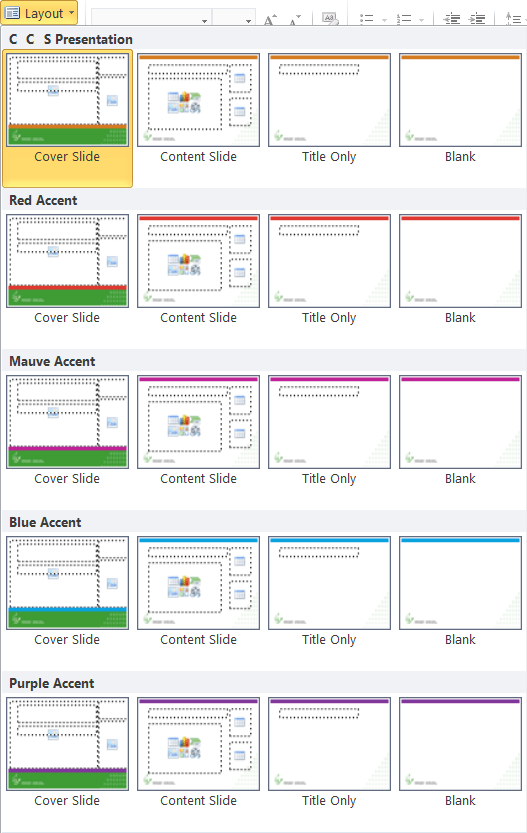
While this is the simplest method to use, it’s not self-evident to all users that you change color themes by choosing a different set of slide layouts. So you’ll probably have to include at least an explanatory note with the template when you distribute it. But what if you want a premium solution for a high-end client? Read on…
Multiple Color Themes: XML Hacked Multiple Masters (PowerPoint only)
A solution that is simpler to use is to combine techniques 2 and 3. Create multiple masters, each with a different color theme. This will create a theme#.xml file in ppt/theme. Open all the theme#.xml file and copy the clrScheme for each to an extraClrScheme tag in all the others. So if you have 3 masters and color themes, copy the clrScheme tag for theme1.xml to an extraClrScheme tag in theme2.xml and theme3.xml. Then copy the clrScheme from theme2.xml to extraClrScheme tags in theme1.xml and theme3.xml.
The result is that it doesn’t matter so much which master you choose, you can change the color theme later. Of course, changing the color theme affects all slides based on the same master. This is an easy-to-use method for providing presentation with sections in different colors.
My thanks to Timothy Rylatt for his assistance with fact checking and corrections in this article.
Brandwares employees are world experts in PowerPoint template and theme creation. Send me a line at production@brandwares.com for assistance with your project.


I believe this is only supported in PowerPoint. If you are getting this to work in Word or Excel please post screenshots of where the extra colour schemes show up. It is possible that it may be Mac only functionality.
Hello. Do you have any articles or procedures for editing the XML super theme to include layouts for both wide screen and standard slide display? We need to include this in our custom theme to control background shapes and images to keep them from stretching.
Thank you!
I’ve been working on an article about this for awhile. SuperThemes are tricky to create and edit, but once I get a reliable method, I’ll be posting it. Thanks!
Good news, we can now provide custom Super Themes! Please see this article for the details: SuperThemes from Brandwares
Hey Don,
I have learned so much from your posts and put it to goo use. Thank you, sir!
In trying to incorporate the extraClrSchemeLst, I did as mentioned and copied my existing clrScheme (Catalyst) into the new extra list section and changed the values there (Catalyst Blue). All passes the Microsoft validity tests, but I still don’t see the new clr scheme in Powerpoint when I open a new presentation based on the new template. It sill only shows the one (Catalyst)
Any ideas?
<a:extraClrSchemeLst&rt;
<a:clrScheme name=”Catalyst Blue”&rt;
<a:dk1&rt;
<a:srgbClr val=”393533″/&rt;
</a:dk1&rt;
<a:lt1&rt;
<a:srgbClr val=”F7F6F4″/&rt;
</a:lt1&rt;
<a:dk2&rt;
<a:srgbClr val=”000000″/&rt;
</a:dk2&rt;
<a:lt2&rt;
<a:srgbClr val=”FFFFFF”/&rt;
</a:lt2&rt;
<a:accent1&rt;
<a:srgbClr val=”9ABAEF”/&rt;
</a:accent1&rt;
<a:accent2&rt;
<a:srgbClr val=”F3776F”/&rt;
</a:accent2&rt;
<a:accent3&rt;
<a:srgbClr val=”B9ACE2″/&rt;
</a:accent3&rt;
<a:accent4&rt;
<a:srgbClr val=”7CD273″/&rt;
</a:accent4&rt;
<a:accent5&rt;
<a:srgbClr val=”E6B25D”/&rt;
</a:accent5&rt;
<a:accent6&rt;
<a:srgbClr val=”F9AC84″/&rt;
</a:accent6&rt;
<a:hlink&rt;
<a:srgbClr val=”324FA5″/&rt;
</a:hlink&rt;
<a:folHlink&rt;
<a:srgbClr val=”324FA5″/&rt;
</a:folHlink&rt;
</a:clrScheme&rt;
</a:extraClrSchemeLst&rt;
My apologies – typo in the xml
<a:extraClrSchemeLst>
<a:clrScheme name=”Catalyst Blue”>
<a:dk1>
<a:srgbClr val=”393533″/>
</a:dk1>
<a:lt1>
<a:srgbClr val=”F7F6F4″/>
</a:lt1>
<a:dk2>
<a:srgbClr val=”000000″/>
</a:dk2>
<a:lt2>
<a:srgbClr val=”FFFFFF”/>
</a:lt2>
<a:accent1>
<a:srgbClr val=”9ABAEF”/>
</a:accent1>
<a:accent2>
<a:srgbClr val=”F3776F”/>
</a:accent2>
<a:accent3>
<a:srgbClr val=”B9ACE2″/>
</a:accent3>
<a:accent4>
<a:srgbClr val=”7CD273″/>
</a:accent4>
<a:accent5>
<a:srgbClr val=”E6B25D”/>
</a:accent5>
<a:accent6>
<a:srgbClr val=”F9AC84″/>
</a:accent6>
<a:hlink>
<a:srgbClr val=”324FA5″/>
</a:hlink>
<a:folHlink>
<a:srgbClr val=”324FA5″/>
</a:folHlink>
</a:clrScheme>
</a:extraClrSchemeLst>
Glad you got it figured out. It’s often a tiny spelling mistake or an errant “smart quote” that causes a problem. In general, XML is not very forgiving of those.
My apologies – typo in the xml
<a:extraClrSchemeLst>
<a:clrScheme name=”Catalyst Blue”>
<a:dk1>
<a:srgbClr val=”393533″/>
</a:dk1>
<a:lt1>
<a:srgbClr val=”F7F6F4″/>
</a:lt1>
<a:dk2>
<a:srgbClr val=”000000″/>
</a:dk2>
<a:lt2>
<a:srgbClr val=”FFFFFF”/>
</a:lt2>
<a:accent1>
<a:srgbClr val=”9ABAEF”/>
</a:accent1>
<a:accent2>
<a:srgbClr val=”F3776F”/>
</a:accent2>
<a:accent3>
<a:srgbClr val=”B9ACE2″/>
</a:accent3>
<a:accent4>
<a:srgbClr val=”7CD273″/>
</a:accent4>
<a:accent5>
<a:srgbClr val=”E6B25D”/>
</a:accent5>
<a:accent6>
<a:srgbClr val=”F9AC84″/>
</a:accent6>
<a:hlink>
<a:srgbClr val=”324FA5″/>
</a:hlink>
<a:folHlink>
<a:srgbClr val=”324FA5″/>
</a:folHlink>
</a:clrScheme>
</a:extraClrSchemeLst>
Hi John, since I started to work more closely with custom templates for word and powerpoint your website has been from amazing use! Thank you for that.
Just a quick question, is it possible to have “Custom Colors” renamed? or even multiple sections with different color groups? Just wondering.
Thanks
Cris
Thanks for your kind words.
The Custom Colors title is automatically created by PowerPoint and is not changeable.
The Custom Color panel is always filled from left to right, filling the row with 10 swatches before creating a new row. You can fake color sections by inserting unnamed white swatches to create the illusion of rows or columns of colors separated by white patches: