My last post began the subject of styled text boxes. There I covered the parameters contained in the first line of each level definition. Today’s entry continues by introducing the XML elements inside the level definition that format text. As a reminder, a level definition is the equivalent of a PowerPoint style. Since a text box can have up to 9 text levels, we can format 9 unique styles.
OOXML Hacking: Styled Text Boxes Complete
Styled Text Boxes – Child elements
Child Elements are XML parameters that are within an a:lvl#pPr level definition, as opposed to the first line values covered in my last post. Here is a super simple level with only 2 enclosed parameters, shown in bold:
<a:lvl1pPr marL="0" indent="0">
  <a:buNone/>
  <a:defRPr sz="1400"/>
</a:lvl1pPr>
The first tag, a:buNone, sets the level to not have a bullet, while a:defRPr sets the text size to 14 points.
Next, here’s an example that shows line spacing and tab settings:
<a:lvl2pPr marL="0" indent="0">
  <a:lnSpc>
    <a:spcPct val="125000"/>
  </a:lnSpc>
  <a:spcBef>
    <a:spcPts val="1200"/>
  </a:spcBef>
  <a:spcAft>
    <a:spcPts val="500"/>
  </a:spcAft>
  <a:tabLst>
    <a:tab pos="457200" algn="l"/>
    <a:tab pos="914400" algn="l"/>
    <a:tab pos="1371600" algn="l"/>
  </a:tabLst>
In order, this block sets line spacing of 125% (or leading, for the designers), 12 points of space before and space after of 5 points. Finally, three left-aligned tabs are set. The units are EMUs, so these tabs are spaced 1/2″ apart.
Child Elements – Bullets
Out of 16 possible child elements, 11 are for bullet formatting. Creating bullets by editing XML is an exercise in frustration. It’s far easier to create bullets using the program interface and then transfer that XML to the p:defaultTextStyle section of presentation.xml.
For an overview of all level definition parameters, this page covers them: Datypic page for List Level Text Style
Styled Text Boxes – The Easy Way
Sure, you could do all of the above in a text editor, if you wanted to prove your coding prowess. But time is short and there’s a faster way to get this job done using PowerPoint’s program interface. This leverages the fact that the structure for list level text is exactly the same for p:titleStyle, p:bodyStyle and p:otherStyle as used in slideMaster1.xml, p:txBody, used in many slide layouts, and p:defaultTextStyle as seen in presentation.xml.
My preferred method is to start by making a copy of the Content with Caption slide layout, then deleting the title and content placeholder, leaving only a text placeholder preformatted with small text. Then I make 9 levels of text and format each to match a design or client specs for what the text box styles should look like. Do all your bullet formatting here. Save the file and exit PowerPoint.
Now expand the file and look in ppt/slideLayouts. The Content and Caption layout is usually slideLayout8.xml. If you duped it as suggested, open slideLayout9.xml and format the code to be humanly readable. Just below <a:lstStyle> are 9 level definitions with all the formatting you created in the program interface. Each level starts with <a:lvlXpPr where X is the level number. Copy all 9 level definitions, but not the starting <a:lstStyle> or closing </a:lstStyle> tags.
Now open ppt/presentation.xml, select all 9 level definitions (starting just below </a:defPPr>) and paste in the 9 levels from slideLayout9.xml. Save the file, zip everything back into a presentation. Each inserted text box should now have up 9 levels of styles that match the formatting you created on the duplicated layout. Delete the extra layout and you’re done.
Styled Text Boxes – What about the Font?
If you’ve tried these steps out, you might notice one glaring omission in the XML. When you format a slide layout and copy the XML, there is no font information in the level definitions. This is because the layout gets its font info from the slide master. There are 2 ways to fix this:
- If all levels the text box are in the same font, open the presentation, create a text box, set the font, right-click on the text box and choose Set as Default Text Box.
This action fills an objectDefaults stub at the bottom of ppt/theme/theme1.xml. It looks something like this:
<a:objectDefaults>
  <a:txDef>
    <a:spPr>
      <a:noFill/>
    </a:spPr>
    <a:bodyPr wrap="square" rtlCol="0">
      <a:spAutoFit/>
    </a:bodyPr>
    <a:lstStyle>
      <a:defPPr>
        <a:defRPr dirty="0" smtClean="0">
          <a:latin typeface="+mn-lt"/>
        </a:defRPr>
      </a:defPPr>
    </a:lstStyle>
  </a:txDef>
</a:objectDefaults>
In this case typeface=”+mn-lt” sets the text box font to the Minor (hence mn) or Body theme font. The Heading theme font would appear as +mj-lt.
- If there are different fonts for different levels, apply those fonts when formatting the duplicate slide layout.
Interesting fact: If a level is set by default to a theme font, clicking on the font dropdown and re-selecting the same theme font breaks the font inheritance from the slide master and specifies the theme font in the layout instead. Here’s the default XML from the layout level 1 again:
<a:lvl1pPr marL="0" indent="0">
  <a:buNone/>
  <a:defRPr sz="1400"/>
</a:lvl1pPr>
And here’s what it looks like after reapplying the theme font in the layout:
<a:lvl1pPr marL="0" indent="0">
  <a:buNone/>
  <a:defRPr sz="1400">
    <a:latin typeface="+mn-lt"/>
  </a:defRPr>
</a:lvl1pPr>
Styled Text Boxes = Instant Text Placeholders
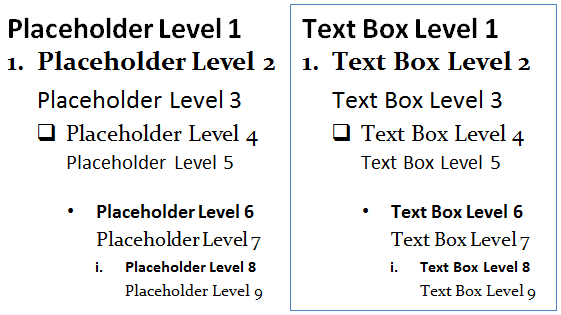
I believe this hack vastly increases the utility of the text box. In effect, it becomes a text placeholder that a user can easily add to any slide. Accessing the styles works exactly the same as a text placeholder. Use the Increase List Level button (Indent More on a Mac) to move through the levels.
Here’s a visual comparison of a text placeholder and a styled text box:
Styled Text Boxes – Other Issues
I’ve run across a couple of minor problems that you will need to keep in mind.
- Picture bullets aren’t going to work. These require building an XML relationship to the bullet image stored in the file, which is very hard to do manually. Don’t bother.
- Similar to the theme font issue mentioned above, default paragraph spacing in the layout is inherited from the slide master. This means your text box paragraphs will be missing any space before or after that displays in the layout. To fix this, set the paragraph spacing for each level in the layout. It doesn’t have to change, but you still have to set it to include the spacing in the layout XML.
As always, I welcome your questions, feedback and suggestions. Contact me at production@brandwares.com. Keep hacking!


Hi John,
Love your XML hack tutorials, thanks for posting.
I’m interested in using your ‘Text Box Style’ hack to assign a ‘hierarchy of styles’ (heading 1, heading 2, body, bullet etc) within PPT — assigning font styles, leading and spaces before and after. So the end use simply toggles through the styles using to access the predefined hierarchy.
Have you seen this approach work successfully? Using, in essence, ‘paragraph/character styles’.
And, in order to get the most out of it, is there a way to assign ‘ALL CAPS’ and ‘E X T E N D E D F O N T’? And then both ‘C O M B I N E D’ (in bold!).
Thanks in advance
Richard
Apologies for posting twice. I only saw your XML note AFTER posing the first one. And things fell off!
Yes, you can use the 9 levels to be 9 different styles, though they can’t be named as Heading 1, etc. In fact this is how we create text placeholder levels in all of our templates. If you’re doing this for a client, you should include a sample slide that explains how to access all the styles by using the Increase Indent button (or Indent More on a Mac), since this will be a new technique for most PowerPoint users.
You can add either or both of all caps or expanded text to a text level. Here’s a default text definition:
Here it is formatted with both all caps and expanded text:
Hi John,
I just finished completing all of the steps in the section “Styled Text Boxes – The Easy Way”. When I opened my updated pptx file with my new code, the place holder was exactly as I designed it (gray font, a few different styles of orange bullets and specific line indentions). When I inserted a text box, none of my programmed changes were reflected. It was the black font with black bullets with standard line indents. I’ve spent a few hours combing through possible missteps on my part, but I can’t seem to isolate the issue. Can you give me some advice on things to look for?
I’d be happy to examine the file so see what the problem is. Please email it to me at production at brandwares dot com.
Hi John,
When I insert a text box in PPT, the words don’t automatically wrap within the box, so my coworkers have been grumbling to me about having to repeatedly open the shape format menu and check the Wrap Text in Shape box. I know the short term solution is to “Set Shape as Default”, but that only solves for that file. I’d like to add a feature to our corporate template that automatically wraps text within text boxes. I’ve been searching xlm files and can’t seem to find any code related to text wrapping. Can you help?
Hi Linda, This is a PowerPoint bug that occurs in presentations that have been edited in an Asian language. Here’s an article about this and how to fix it: Odd line breaks.
Hi John, thank you for all this great info, it’s easy to understand and implement.
Just one question – is there a way to specify the default internal margins of a text box? Also can the default be set to resize shape to fit/ do not autofit / shrink text on overflow as required?
Thanks!
The PowerPoint user interface has a feature for setting default text box formatting. Set the margins and resize options that you prefer, then right-click on the text box and choose Set as Default Text Box. This will not affect the text styling set in presentation.xml.
Hi John!
I used your method above back in January 2020 to make my default text boxes match the master’s text box styles but now that I’m modifying things for 2021, I’m finding the method above doesn’t seem to be working anymore. When I go to the “Content and Caption” layout and pull its styles, it seems to only have the font sizes. Bullet info is gone as is the indent info and bullet style info (it actually has no bullet styles listed yet they show up on the slide!).
Also, not sure if related but I think the link between it and my master got severed somehow as I noticed the default fonts sizes aren’t auto-updating with the master slide edits either. Is there a way to re-establish this link or can you think of a reason why this is happening? I checked the book for info too but I wonder if any Office 365 Updates this year changed things?
Any insight would be great as it would suck to have to lose this feture from our last PPT templates because I can’t figure out how to get it to work.
It sounds like you have a corrupt presentation. PowerPoint is still working the same. If any method here is too difficult, you can always hire us to fix it for you.
thanks. I tinkered around with it more and somehow got it to work though now I am debating on starting all over from scratch to rule out any corruption carrying over.
I do have a follow-up Q after all. This work for text boxes (and items classified as text boxes). However now I’m looking to customize how custom shapes have their text formatted. I found the link here last January to make all my shapes have text be middle and centered by default but now I’m looking to change the fonts but cannot remember how I set this in the past. I’ve been browsing through all your older articles but figure you may be able to provide the link faster than I can fin the old article. :
Thank you!
Up here. I cannot find the bullet info in the file.
Is it possible that this was changed with the new update?
The Office file formats have been the same since the 2007 version, with XML additions for new features. No old features have been removed. The bullet information in the first level of bodyStyle in slideMaster1.xml is bolded:
<p:bodyStyle> <a:lvl1pPr marL="228600" indent="-228600" algn="l" defTabSz="914400" rtl="0" eaLnBrk="1" latinLnBrk="0" hangingPunct="1"> <a:lnSpc> <a:spcPct val="90000"/> </a:lnSpc> <a:spcBef> <a:spcPts val="1000"/> </a:spcBef> <a:buFont typeface="Arial" panose="020B0604020202020204" pitchFamily="34" charset="0"/> <a:buChar char="•"/> <a:defRPr sz="2800" kern="1200"> <a:solidFill> <a:schemeClr val="tx1"/> </a:solidFill> <a:latin typeface="+mn-lt"/> <a:ea typeface="+mn-ea"/> <a:cs typeface="+mn-cs"/> </a:defRPr> </a:lvl1pPr>Hello John,
Can this bullet be applied in Word document? I’ve been creating some bullets (unordered list) but when I extract the docx file, the XML code doesn’t translate to its original form when applied in code.
Without a sample, I can’t tell what your problem may be, or what your workflow is. Bullets and numbering depend on list styles, which are often overlooked.
Hi John,
I’m almost there but not quite. My text box comes in with the first line with no bullets. I type in the text, press Enter, and turn on the bullets. A bullet comes. But when I press enter again, an indented bullet comes in (which shouldn’t be a round bullet but a hyphen). All subsequent sub bullets come in correctly formatted. In your sample “Styled Text Boxes = Instant Text Placeholders” is along the lines of what I’m after. Just that it starts with no bullets, then round bullet, hyphen sub bullet, hollow circle sub-sub bullet, etc. I’m not sure what is incorrect. Is the key here to only use the “Increase List Level” instead of using the TAB key? Which is something I normally use rather than Increase/Decrease list level.
In list styles in Office, the Tab key only works to changes list levels if the levels already has a bullet. Using the Increase List Level button does not have this shortcoming.
If you have designed the first level of text to not have a bullet, don’t add one. The program will only insert a Microsoft default bullet.
Hi John,
You’ve been a great help in creating a new template! Thanks for writing this all up.
My text box works as I’ve coded it, however the bullet points (i.e. the characters I’ve used) aren’t following what’s in my XML. I’ve even copied over what I had in my slide master which has all the right bullet points, but it seems like it’s ignoring the XML and inheriting the bullet point character hierarchy in the default PPT that appears when you create a new one from scratch. Is there any way to solve this?
Thanks!
Sorry, from your description, I can’t tell what mistake you’re making. I’m not able to reproduce that problem.
Hi John! Thank you for this great info, it is very useful and quite easy to follow.
I wanted to ask, is there a way, through xml, to set default spacing between the bullets and the following text at each of the different list levels? Currently it appears as 0.79cm on my presentation and I would like to make this space smaller.
(This would mean essentially setting the value marked under paragraph – indentation – special section by default).
Thanks!
As mentioned in the followup article OOXML Hacking: Styled Text Boxes Complete, “Out of 16 possible child elements, 11 are for bullet formatting. Creating bullets by editing XML is an exercise in frustration. It’s far easier to create bullets using the program interface and then transfer that XML to the p:defaultTextStyle section of presentation.xml.”
Create a copy of your presentation or template, then in PowerPoint open Slide Master view. Select the larger thumbnail in the left-hand list of thumbnails, the one at the very top. This is the actual slide master. Set the bullet spacing you want to see in your text boxes. Save the file, then open it in whatever software you use for XML editing. Look in ppt/slideMasters/slideMaster1.xml and find the p:bodyStyle section. Copy the formatting from that to the p:defaultTextStyle section of ppt/presentation.xml to recreate the bullet formatting.
Hi John–Thanks so much for this information. I’ve tried it a few times, completing every step up to an including the update of the ppt/presentation.xml file. But once I’ve converted the folder back to powerpoint and try to open it, I get an error message “PowerPoint found a problem with content … PowerPoint can attempt to repair the presentation.” I hit repair and get a “Sorry, Powerpoint can’t read . . .”
I think it might have something to do with how I’m saving the file for editing the xml. I save the file, then change the .pptx extension to .zip, Extract, make the edits, then recompress the folder, then change the new .zip extension back to .pptx. Is there another way?
The article on Editing in macOS should have some helpful tips. MacOS isn’t especially friendly to OOXML editing, because OS adds hidden .DS_Store files to viewed folders. Probably the simplest alternative is to use the Chrome browser with the OOXML Tools extension. Please see the linked page for details.
My issue is that the levels in the new default text box aren’t working like the one I set up and used to create the xml. When I go to the next level, all the way up to level 9, the formatting remains the same as level 1.
Level 1 has a “+” for the bullet, which is not a standard PPT bullet. Is it possible to make this hack work when the first bullet is text and not a standard PPT bullet?