Back at the dawn of time, when PowerPoint was first being programmed, a fateful and incorrect decision was made. Placeholder content would always appear in front of static content, regardless of how placeholders and other content were stacked on the layout. This has led to countless bald designers, from them tearing out their hair because there’s no way to place static graphics over placeholders. Here are 5 ways to work around this problem.
Graphics Over Placeholders – Best Practices
The Locked Graphics Graphics Over Placeholders Workaround
One way to circumvent this design flaw is to create a placeholder on the layout as usual. Then create a sample slide from it. Place the logo over the photo and lock its position in the XML. Here’s my article on how to do that: OOXML Hacking: Locking Graphics. This allows the user to replace the placeholder content while keeping the logo in front.
The disadvantage is that you can’t create a new slide from the layout. Instead, the user must copy and paste the sample slide to create another one.
The Background Picture Fill Workaround
If you’re trying to create replaceable background photos, there’s another method. Don’t place a picture placeholder on the layout. Instead, just place the graphic there. In use, the user right-clicks on the background and chooses Format Background. On the Format Background task pane, choose Picture or texture fill, then click on the File button and choose the background photo. The logo will stay on top.
The disadvantage to this technique is you have to include instructions to the end user, who may never have used a picture fill previously. My thanks to Jaakko Tuomivaara of Supergroup Studios in the UK for this tip.
Graphics Over Placeholders: The Placeholder Picture Fill Workaround
This works with any size photo, it doesn’t have to be full-frame like the previous hack. No copy and paste, no instructions required. I heard about this one from Joshua Finto (Make It So Studio in Austin, TX).
On the layout, insert a picture placeholder to hold the photo. Then add another placeholder on top, sized to exactly the same size as the logo. I use Online Image placeholders because they are rarely used, using a common placeholder type risks content being placed in it if you change layout types. Remove bullets, if there are any, and type a space character so no placeholder text appears.
In the Format Picture task pane, click on Picture or texture fill, then on the File button and fill the placeholder with the logo. Create a slide, place a photo and voila! The logo appears over top of the photo! After creating this, it’s wise to lock the placeholder in XML on that layout, to prevent distortion by the user playing with it. OOXML Hacking: Locking Graphics. EMF, SVG and transparent PNGs are all good logo formats for this application.
The Holey Placeholder (Windows)
For simple graphics, or logos contained in a simple shape like a circle or square, create a logo-shaped hole in the placeholder. Here’s how to do this in Windows:
- On the layout, create the picture placeholder.
- Insert the logo as an EMF vector file, then ungroup it twice, confirming with PowerPoint that you want to do this. This changes it from a placed picture to a set of vectors embedded on the layout.
- With the logo parts selected, hold the Shift key and click on the placeholder.
- Choose Drawing Tools Format>Merge Shapes>Subtract.
- Fill the background, or a shape placed behind the logo hole, with the logo color.
2024 Edit: I don’t know if this is a temporary bug, or a permanent change, but we’ve been seeing that using Merge Shapes on a placeholder changes it to a freeform shape instead remaining a placeholder. If you see that happen, you have to fix it with an OOXML hack. Find the shape on the slide layout and look for this line:
<p:nvPr userDrawn="1"/>
Replace it with this:
<p:nvPr>
    <p:ph type="pic" sz="quarter" idx="99"/>
</p:nvPr>
Make sure the idx number dosn’t conflict with any other shapes.
The Holey Placeholder (macOS)
If the logo is in a rectangle or circle, use this method in macOS. (It will work in Windows as well.) Place the logo over the placeholder, then draw a PowerPoint shape exactly the same size as the logo, placed over the logo precisely. Select the shape and the placeholder, then use Shape Format>Merge Shapes>Fragment, then delete the shape to reveal the logo-sized hole in the placeholder. For some reason, Merge Shapes>Subtract works differently on a Mac, deleting both the shape and the placeholder, but Fragment still get the job done. Thanks to Ute Simon for suggesting this method in the comments.
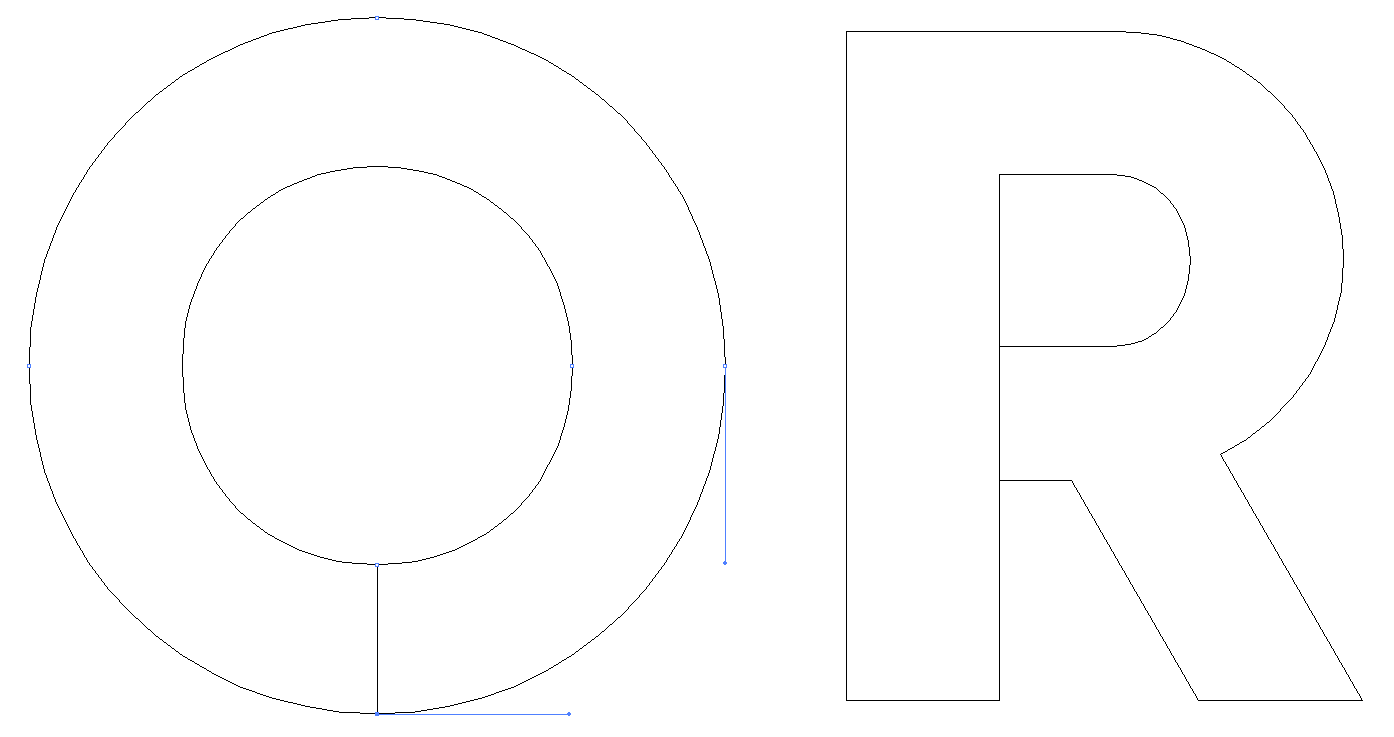
A variation on this that can be more detailed is to place a copy of the logo above the placeholder. Then, shape-by-shape, use the logo over the placeholder with the Combine variant of Merge Shapes to knock holes in the placeholder. Then add colored shapes below the placeholder to “fill” the holes. If you have compound shapes (like the letter O or A), you’ll have to release the compound shapes, then connect the inner shape with the outer one. Here’s what the end result looks like in Illustrator.
If you see the placeholder change to a freeform shape, use the OOXML hack in the previous section to fix it.
Graphics Over Placeholders: The ActiveX Hack
I’m including this for completeness, but it’s the least desirable workaround, as it only can be created in PowerPoint for Windows.
- Choose View>Slide Master and choose the master or the layout to which you want to add a graphic.
- On the Developer tab, choose the Image control from the Controls group.
- Click on the Enable ActiveX button when the Microsoft warning appears.
- Draw the Image control to the size and postion the graphic will be.
- Right-click on the control and choose Property Sheet.
- Set the PictureSizeMode property to 3 – fmPictureSizeModeZoom.
- Beside the Picture property, click on None, then click on the three-dot button that appears.
- Select the graphic. The primary format choices are EMF, WMF, JPG, GIF and BMP. You cannot use a PNG file.
This process will fill the control with the chosen graphic, and the control will float above a placeholder in Slideshow mode.
There are several down-sides to this method:
- If the graphic doesn’t fill the rectangle of the control, a light gray background will display in the unfilled area in PowerPoint for Windows
- In PowerPoint for Mac, an ActiveX warning pops up every time you open the deck.
- The graphics still fall behind the placeholders in Edit (Normal) mode. They only pop to the front in Slideshow mode.
- In PowerPoint for Mac and PowerPoint for the web, some opaque white EMF shapes become transparent.
Thanks to my readers who have added some useful suggestions!

Mostly I use the Placeholder Picture Fill Workaround. But with an additional step. If you insert a picture fill into a placeholder, the quality of the picture is degraded. Therefore I insert a placeholder twice the size of the logo (e.g. 20x4cm for a 10x2cm logo). Then fill in the background. And as a last step reduce the size of the placeholder to the desired logo size. The picture fill then has twice the dpi and looks better on screen.
that’s a good approach if the placed graphic must be a bitmap. It’s only necessary to use bitmaps for photos, or for logos that contain graduated tones. For logos that use solid colors, it’s better to use a vector format like EMF or SVG. Please see Best Quality Logos for Office – Best Practices for more details.