I don’t actually know much, but I have search engine expertise. I’ve answered thousands of question for users on various online fora, and I’m constantly amazed by the vast number of queries that could be answered by a simple Google search. My takeaway is that people just don’t know how to use search engines to their best advantage.
Search Engine Expertise – The Mandatory Word
When a search must include a particular word or phrase, put it in double quotes, if you’re using Google. For Bing and most other engines, add a plus sign before. Here’s a search that must include Word in the results:
Google - "Word" VBA typestyle
Bing and others - +Word VBA typestyle
Search Engine Expertise – The Excluded Word
You’re looking for Word VBA information, but you get pages of useless Excel stuff. For all search engines, add a minus sign before the word you don’t want:
VBA -Excel tables
Search Engine Expertise – The Special Site
You know that you saw an answer on a particular web site, but it was a long time ago and you can’t remember where. Type your search terms, then type site:, then the site URL. No space between site: and the URL:
"edit mode of header/footer" site:answers.microsoft.com
Searching Phrases Instead of Words
Put the phrase between double quotes. The following shows results about the top of the page that don’t refer to the header and footer:
Word top part of page -"header and footer"
A Practical Example
Do you use Office for Mac? It’s hard to find relevant information, since the Mac version is still quite different from Office for Windows. Just add “for Mac” to your search terms and watch as hundreds of pages of useless Windows pages disappear. This can save you hours of time!
Using just these 4 tips, you’ll find relevant information much more quickly. You may have even more specific requirements. Check out the Advanced Search page for your preferred engine, you may find some techniques that will make your day more efficient:
Legacy Slides – Making It Work the Way You Think It Should Work
Here’s an all-too-common scenario. An organization has a library of presentations built up over the years, full of valuable content. Time passes and a branding update becomes inevitable, to keep the corporate look contemporary. A designer is hired, a new template created and distributed. Users create new decks and start pasting in old slides. Chaos ensues: the formatting is all f***ed up! It could be something minor, like regular text changing to bold. But much more often, old formatting gets pasted in, and in Slide Master view you start seeing unwanted layouts, often with names preceded by numbers like 1_Title and Content. What went wrong?
PowerPoint has several requirements for pasting to work as expected. When you paste in old slides, and you want them to map to your new slide layouts, they must meet all 5 of these criteria:
The slide layout name must be the same. This can be set in Slide Master view.
The slide layout type (as set in XML) must be the same. If you copy an existing Title Slide layout, it will retain the layout type. But if you delete all Title Slide layouts, then realize you made a mistake, you’re in trouble. It’s possible to recreate a built-in slide layout by running a VBA macro:
Sub RestoreLayout()
  With ActivePresentation.Slides
    .Add(.Count + 1, ppLayoutObject).Delete
  End With
End Sub
The number of placeholders must be the same. When there is a different number of placeholders on the slide being pasted, PowerPoint goes mental and will reassign content randomly.
The types of placeholders must be the same. If a user is pasting a Microsoft-compatible Title and Content slide, PowerPoint is looking for:
1 Title, 1 Content, 1 Date, 1 Footer and 1 Page Number placeholder. No more, no less. If your old template layout has only a Title and Content placeholder, your new template must have the same.
For corresponding placeholders in the old and new layouts, the idx number must match. Title placeholders don’t have idx numbers, because there is only one of them on a slide at a time. The idx numbers tell PowerPoint which placeholder should receive information from a particular placeholder in the old layout. This allows you to have several of the same type of placeholder on a layout and still have PowerPoint map content correctly among them.
This simplest way to guarantee that all these criteria will be met is to not create a template from a brand new file. Instead, reformat the old template to the new branding, taking care not to delete or rename any layouts (you can add new ones), and not to add or delete any placeholders on the existing layouts.
Legacy Slides – Another Possible Hiccup
An additional wrinkle can appear if an embedded image is included, perhaps for a logo. Then the XML will include a line line this:
<a:blip r:embed="rId2">
rId numbers are used by the _rels file that corresponds with the layout to tell PowerPoint where to find the logo. If the rId number is wrong, PowerPoint will show an empty box with the text The picture could not be displayed. Of course, you could just replace the image if you see this error during file construction.
Static pictures, graphics, text boxes and shapes placed on the layout make no difference to layout mapping. Add them, remove them, they won’t stop PowerPoint finding the correct layout.
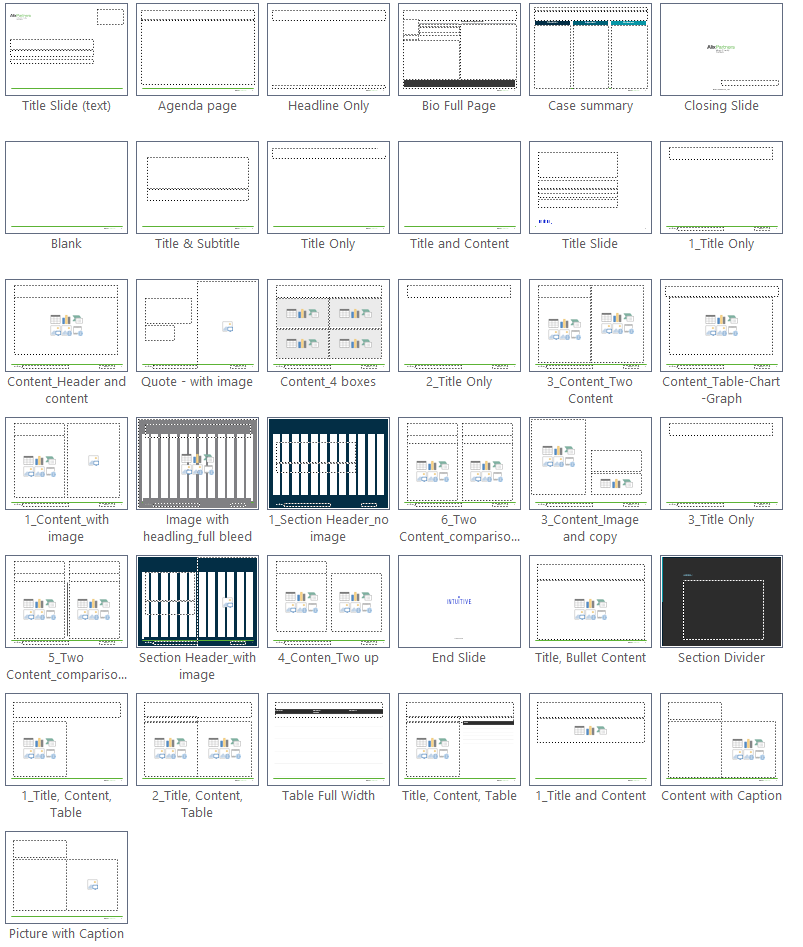
If a pasted slide does not meet all of the above criteria, PowerPoint imports the slide layout from the old deck, prepending it’s name with 1_, if it’s the first time it’s importing that layout. Very quickly, the client’s deck is polluted with multiple spurious slide layouts. When face with choices like Title and Content, 1_Title and Content, 2_Title and Content, 3_Title and Content, the user will simply give up trying to decide which one to use. Branding goes down the drain.
After 3 pastes from “designer” decks, this is what your client is struggling with:
For maximum legacy compatibility, new templates you create for a client should include the slide layouts and placeholders of previous templates they have commissioned. Often it’s feasible to segregate these using different slide masters, one for each previous template they have used. Each slide master includes exactly the same layouts and placeholders used in a previous version, but with the branding updated to the new look. Then in the receiving template, the user is instructed to paste immediately after a slide based on an earlier version. This method can reduce the user’s pain of having to follow your shiny new template.
In a workflow where PowerPoint files are converted to Google Slides and back, none of the above will work. The XML created by Google is a mess and pasted slides will inevitably bring their non-standard Google layouts with them. There is no fix for this other than a custom VBA conversion macro.
We have years of expertise in this area and can either assess your template for legacy slide compatibility or create a template or theme for you that will work seamlessly with your old files. We’re here to help! Contact me at production@brandwares.com.
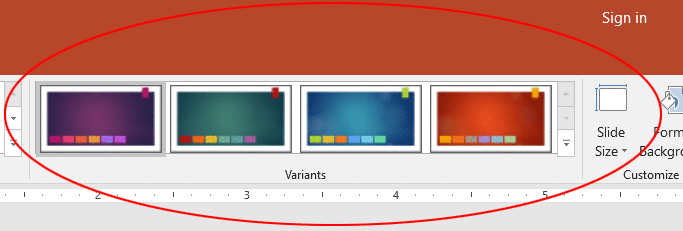
SuperThemes are a Microsoft-created theme format that includes more than one theme in the same file. You see them in action when you use a Microsoft theme in PowerPoint 2013 for Windows and PowerPoint 2016 for Windows and Mac. Opening a SuperTheme lights up the Design tab>Variants Gallery with design choices, like this selection used in Microsoft’s Ion Boardroom SuperTheme:
SuperThemes have 2 signficant advantages:
The design variants show right up front on the Ribbon, so users immediately see what alternate looks are available to them.
Including size variants ensure that the brand is never distorted by the user changing the slide size. The user can choose a slide size that completely fills any monitor, but the logos and artwork always remain at the aspect ratio you have set. No more graphic distortion
SuperThemes have been around for several years, but Microsoft has never released the specifications for creating them. Brandwares got to work on the problem and has reversed engineered the format. When I originally wrote this, we were the only company in the world that could create custom SuperThemes for you. But I published all the details in my book OOXML Hacking, so now anyone can do it!
SuperThemes – How They Work
Micrsoft’s SuperThemes include 4 to 8 design variants plus size variants for 16:9 and 4:3 aspect ratios. But that’s just a starting point. Down at the lab we found we can create size variants for 16:10 monitors, 35mm film and all the other preset sizes that Microsoft includes in PowerPoint. One client commissioned SuperThemes so they could display widescreen, then switch to 4:3 to print the deck on letter-size paper. Here’s a downloadable example you can try out: Test SuperTheme
This SuperTheme contains 2 design variants, one with a white background and a second with a grey background. It also includes 3 size variants, for 16:9, 16:10 and 4:3. After you download and unzip the file, copy it to the the Document Themes folder inside your Office templates folder. Under Windows, this will normally be in your user Documents folder under Custom Office Templates\Document Themes. Mac users will need to hold down the Alt key while clicking on the Go menu and choosing Library. This opens the hidden user Library. Once that’s open, look for Library/Group Containers/UBF8T346G9.Office/User Content/Themes and copy the .thmx file to that folder.
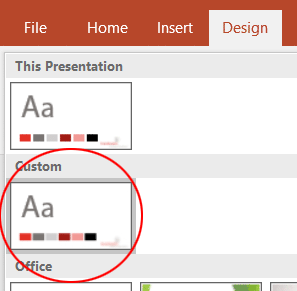
Now open PowerPoint, select the Design tab and drop down the Theme Gallery. Now there’s a new row called Custom and that’s where you’ll find the test SuperTheme:
Select it and you’ll see 2 variants appear:
Switching design variants will change all slides in the presentation to that design. Now try changing the Slide Size. There are 2 sizes immediately available, 4:3 and 16:9. Notice that the logo remains undistorted even when the slide size changes. You can’t do that with a normal theme!
But many monitors are 16:10 and using 16:9 leaves big black bars at the top and bottom of your show. That’s not a problem with this SuperTheme. Click on Slide Size>Custom Slide Size (Slide Size>Page Setup on a Mac). Change the Slide(s) sized for: dropdown to On-Screen Show (16:10). The presentation is resized without any distortion to the logo. (Since we’ve set up just 3 sizes, if you picked one of the other sizes like Banner or 35mm Film you would see logo distortion. So don’t do that!)
When PowerPoint is using a SuperTheme with size variants, the Slide Size button works in a different way than normal. Inside of actually resizing the slide, it calls the associated size variant. If there is no variant for the chosen size, then PowerPoint resizes as usual. When you change the slide size to a smaller canvas, PowerPoint will ask whether you want to Maximise or Ensure Fit (Don’t Scale or Scale on a Mac). In a SuperTheme where you are switching to a supported size variant, it doesn’t matter which you choose, because PowerPoint won’t actually be resizing the slides. It just applies a variant theme.
SuperThemes – What You Need to Know
SuperThemes are intended for use with PowerPoint 2013 and 2016. They can be used with earlier versions, but there will only be access to the primary theme. This is normally set to Widescreen, so a user of older software should switch the slide size from the default 4:3 10″ x 7.5″ format.
Research in 2019 has revealed that SuperThemes can only be constructed from Presentations having a single Slide Master. It appears that Microsoft didn’t design the format for the additional complexity of multiple masters.
For a custom SuperTheme, you can supply separate themes or templates for each design and size variant. Each design variant can be completely independant, using different font or color themes, if needed. Multiply the number of designs by the number of sizes to know how many theme to supply. The downloadable SuperTheme above uses 2 designs in 3 sizes, so 6 themes went into its making.
Keep in mind that SuperThemes have the same shortcomings as themes. They can’t contain custom tables styles, macro programming, sample slides or preformatted notes or handout masters. If you need to be distributing any of those, consider using a template instead of a theme or SuperTheme.
When designing for SuperThemes, consider what might happen to an existing deck if the user changes the slide size after inserting graphics. If content placeholders in your variant themes have different aspect ratios, photos will still get distorted. So part of your design would be to include picture boxes that have a constant aspect ratio in all themes. They can be bigger or smaller, as long as the ratio of long side to small side is the same.
For 16:9 themes, we do not recommend the older On-screen Show (16:9) slide size produced by PowerPoint 2007 and 2010. This creates a slide that is 10″ x 5.63″. It’s the right proportion, but when a user creates a new slide in PowerPoint 2013 or 2016, it defaults to the new Widescreen size 13.333″ x 7.5″. This means your theme graphics are scaled up and you lose quality. Instead, create 16:9 themes using the Widescreen size created by newer versions.
For 16:10, we’ve found that a 12″ x 7.5″ slide size works perfectly. Of course, 4:3 slides are still 10″ x 7.5″, as always. This means that you can keep the height constant on all size variants. Only the width changes.
Then email the themes to us and we’ll assemble them for you. Too complicated? We’re a full-service Office shop: we can create complete SuperThemes from an InDesign or Illustrator file. Just tell us which slide sizes you want to support and we’ll do the rest. When we create a deck, it’s always guaranteed to work as expected, since we know Microsoft Office at least as well as you know Adobe software. Contact me at production@brandwares.com
Recently one of our clients asked us to bring some InDesign templates up to their corporate specs. Part of this was inserting a set of GREP styles into the styles already contained in the documents. GREP styles are great ways to automatically apply formatting to particular text whenever it is entered, removing the obligation from the user to remember what phrases are non-breaking or italicized. Unfortunately, if you have to add GREPs to many existing style, the process is repetitive, slow and error-prone. The solution is InDesign JavaScript.
InDesign JavaScript to the Rescue!
The solution is a script. InDesign has good support for JavaScript, which works for both Windows and OSX versions of InDesign. The down-side to InDesign scripting is that there is not as much knowledge out there on the web, at least when you compare it to JavaScript for HTML. So, in the spirit of increasing human-kind’s knowledge base, here is a script for copying GREP styles. The original code came from a script found on the Adobe Community forums. Then we added the ability to work with styles that are in style groups, up to 2 levels deep. Enjoy!
//This utility will copy GREP styles into styles that are nested in up to two levels of groups i.e. Main Style Group>Headings Group>Heading 1
//Copy the text below to a text editor like NotePad or TextEdit, then save as a file with a “.js” ending.
//Copy it into the Scripts Panel folder inside the Scripts folder inside the InDesign application folder.
//Create a style at the lowest level of the Paragraph Styles i.e. NOT in a style group.
//Put all the GREP styles you wich to copy into this style.
//Type the style name between quotes in the line below. Then run the script and select the styles to which you want to copy the GREP styles.
var source = 'GREPSourceStyle';
var theDoc = app.activeDocument;
var pStyles = theDoc.allParagraphStyles;
var pStyleStringList = [];
fillpStyleStringList();
var getpStyleIndexinpStyles = selectpStyle(pStyleStringList);
var selectedpStylesByName = getSelectedpStyleNames(getpStyleIndexinpStyles);
l = selectedpStylesByName.length;

while(l--){setGrepStyle([selectedpStylesByName[l][0]],[selectedpStylesByName[l][1]],[selectedpStylesByName[l][2]])}

function fillpStyleStringList(){
  for(i = 0 ; i < pStyles.length; i++){
    if(pStyles[i].parent.parent.toString() === '[object ParagraphStyleGroup]'){
      pStyleStringList.push('Group: ' + pStyles[i].parent.parent.name + ', Subgroup: ' + pStyles[i].parent.name + ', Name: ' + pStyles[i].name);
    }else if(pStyles[i].parent.toString() === '[object ParagraphStyleGroup]'){
      pStyleStringList.push('Subgroup: ' + pStyles[i].parent.name + ', Name: ' + pStyles[i].name);
    }else{
      pStyleStringList.push('Name: ' + pStyles[i].name);
    }
  }
}

function selectpStyle (array){
  var myWindow = new Window ("dialog", "Please select your target paragraph styles.");
  var myInputGroup = myWindow.add ("group");
  var select = myInputGroup.add ("listbox", [0, 0, 300, 300], array, {scrolling: true, multiselect: true});
  var myButtonGroup = myWindow.add ("group");
  myButtonGroup.add ("button", undefined, "OK");
  myButtonGroup.add ("button", undefined, "Cancel");
  if (myWindow.show() == 1){
    var mySelection = select.selection;
    var tmpList = [];
    for(g = 0; g < mySelection.length; g++){
      tmpList.push(mySelection[g].index);
    }
    return tmpList;
    myWindow.close();
  }else{
    exit();
  }
}

function getSelectedpStyleNames(getpStylesIndexinpStyles){
  var currentTargetpStyleName;
  var SelectedNameArray = new Array();
  for(j = 0; j < getpStylesIndexinpStyles.length; j++){
    var tempArray = new Array(2);
    currentTargetpStyleName = pStyles[getpStyleIndexinpStyles[j]].name;
    currentTargetpStyleSubgroup = pStyles[getpStyleIndexinpStyles[j]].parent.name;
    currentTargetpStyleGroup = pStyles[getpStyleIndexinpStyles[j]].parent.parent.name;
    tempArray[0] = currentTargetpStyleGroup;
    tempArray[1] = currentTargetpStyleSubgroup;
    tempArray[2] = currentTargetpStyleName;
    SelectedNameArray[j] = tempArray;
  }
  return SelectedNameArray;
}

function setGrepStyle(targetGroup, targetSubgroup, targetName){
  var target
  error = "";
  basepStyle = theDoc.paragraphStyles.item(source);
  if (!basepStyle.isValid) error = 'Source style does not exist';
  if(targetGroup != "" && targetGroup != theDoc.name && targetGroup != app.name){
    var temptarget = theDoc.paragraphStyleGroups.itemByName(targetGroup.toString());
    target = temptarget.paragraphStyleGroups.itemByName(targetSubgroup.toString()).paragraphStyles.itemByName(targetName.toString());
  }else if(targetSubgroup != "" && targetSubgroup != theDoc.name && targetSubgroup != app.name){
    target = theDoc.paragraphStyleGroups.itemByName(targetSubgroup.toString()).paragraphStyles.itemByName(targetName.toString());
  }else{
    target = theDoc.paragraphStyles.itemByName(targetName.toString());
  }
  if (!target.isValid) error += 'rTarget style does not exist';
  if (error != ""){alert (error); exit()}
    gs = basepStyle.nestedGrepStyles;
  for (i = 0; i < gs.length; i++){
    target.nestedGrepStyles.add (gs[i].properties);
  }
}
Corporate users in marketing and sales departments frequently need to produce complex documents. Proposals and RFQ/RFPs fit into this category. Modular documents make it easier to produce these files, but Microsoft Word is is not modular by nature.
Users need to add and remove sections of the document to increase the relevance to the potential buyer. If you’ve used Microsoft Word for more than a few minutes, you’ve noticed that its documents are not modular in the least. Each section in a document is dependent on information from other sections. Even the trained Word users find it difficult to remove a Word section or set of pages without trashing the whole file.
The wrong path: Trying to use PowerPoint for Modular Documents
For some clients, this leads them down the wrong road. They notice that PowerPoint has great page modularity. You can remove slides, move them around and add new ones without having any effect on the existing ones. So they request that their proposal template be formatted in PowerPoint. Genius brainwave? NOT!
PowerPoint is missing so many long-document functions that this is a terrible solution. What you gain in modularity, you more than lose in productivity. PowerPoint is missing typestyles, automatic tables of contents, page margins, end notes, table styles, cross-referencing, bookmarks and much more. Users can get around all of these by spending more time manually formatting, but isn’t that what the client was trying to avoid in the first place?
There are 2 alternatives for modular documents. Both are better than the PowerPoint “solution”. One is Microsoft Publisher, and the other is good old Word, used in a slightly different way.
Microsoft Publisher for Modular Documents
First, I’ll cover Publisher, because it’s less well known and deserves to be used more. Microsoft Publisher is included with many versions of Office, so it’s likely your client already has it installed. It follows many Microsoft conventions, so the learning curve is not too steep. Publisher is a full-fledged desktop publisher program with an interface similar to Adobe PageMaker, if you’ve been around that long.
Unlike Word, Publisher uses CMYK and Pantone colors, does color separations, has measurements to 1/1000″ and, most germane to our discussion, has Master Pages! This latter feature makes it easy to create a modular document. All pages are completely independent of one another. No section or page breaks to foul up formatting. No pictures anchored to text that move around. The main catch with Publisher is that people don’t know it’s there, so they have to do some learning.
2024 Update: Microsoft has announced that they’re retiring Microsoft Publisher. After October 2026, Publisher will no longer be included with Microsoft 365. This is unfortunate, as Publisher can do things that Word cannot.
There is another way that’s still better than PowerPoint for proposals. Word!
Using Word for Modular Documents
Word is useable for modular documents as long as you know about Master Documents. A Master Document is like a super file that links a number of Word documents. Simply put, you create separate Word files for each section of your long document. Then you use a Master Document to link them for printing. The sub-documents can be edited, moved and deleted with ease. Your client gets flexibility in document structure and only has to learn one new thing!
Word has had this feature for a long time, but it got a bad reputation. This was because users would assemble Master Documents and then try to maintain the large assembly as one entity. Almost inevitably, corruption of the Master Document would ensue and users would have to start over. So what’s changed?
Over the years, Word has gotten more stable. The Master Document feature doesn’t get corrupted as easily. But the deepest secret is that you create a Master Document to print the files, then you throw it away! Trying to preserve it by editing it is what creates the problems, so don’t try to preserve it. A Master Document is a temporary device used only at output time. Remember that and you will never have a problem.
We can help your client with Master Documents. We write tutorials that cover every step of creation, assembly, printing and follow-up. We also write macros that create instant Master Documents from a folder full of sequenced Word files. This is much easier than toiling away with manual formatting in PowerPoint. Give us a call to solve your modular document challenges, or email me at production@brandwares.com.
Word’s default settings hide crucial formatting information. Professional editing of Word docs requires you to change the program’s display parameters.
In effect, paragraph formatting is stored in the paragraph mark and section formatting is stored in the section break after the relevant content. But Microsoft decided users wanted a pretty interface rather than a functional one, so they chose to hide both entities by default. Every hour of every day, thousands of documents are getting mangled because of this design decision.
Likewise, every graphic in a Word document is anchored to a paragraph. Delete the paragraph, poof, graphic gone. Move the text to a new page and the graphic moves with it. But the anchor is invisible! Let’s fix this!
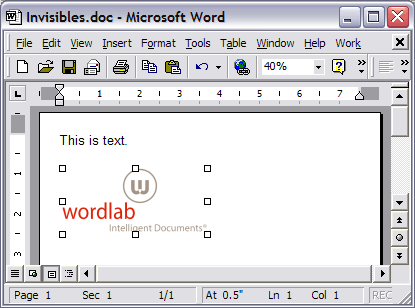
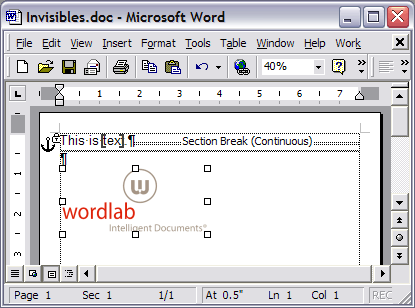
The normal Word view: pretty, but not informative.
Here we can see that the graphic is anchored to the first paragraph and that anchor is locked. The first paragraph is separated from the second by a continuous section break, which means the page formatting could be totally different for the two paragraphs. The word “text” has been bookmarked. We can take care to format this without ruining any of these characters, now that we can see them.
Word’s Useful View
How to Set Up Word for Windows for Professional Editing
The first step to professional editing in Word is to display all the hidden formatting marks. Here’s how to do that in each version:
Word 2003
Choose Tools>Customize>Options.
Uncheck Show full menus after a short delay and
Check Always show full menus. Click on Close.
Choose Tools>Options>View.
In the Show section, check Bookmarks.
In Formatting Marks, check All.
Under Print and Web Layout options, check Object anchors, Text boundaries, White space between pages and Vertical ruler.
Word 2007
Click on the Office button and then on the Word Options button.
Select the Display pane.
Check Show all formatting marks.
By default,Show white space between pages in Print Layout view should already be checked. If not, check it.
Now choose the Advanced pane.
Under the Show document content section, check Show bookmarks and Show text boundaries.
By default, under Display, Show vertical ruler in Print Layout view should already be checked. If not, check it.
Word 2010
Click on the File tab and then the Options button.
Select the Display pane.
Check Show all formatting marks.
By default,Show white space between pages in Print Layout view should already be checked. If not, check it.
Now choose the Advanced pane.
Under the Show document content section, check Show bookmarks and Show text boundaries.
By default, under Display, Show vertical ruler in Print Layout view should already be checked. If not, check it.
Word 2013 and 2016
Click on the FILE tab and then the Options button.
Choose the Display pane.
Check Show all formatting marks.
By default,Show white space between pages in Print Layout view should already be checked. If not, check it.
Now select the Advanced pane.
Under the Show document content section, check Show bookmarks.
By default, under Display, Show vertical ruler in Print Layout view should already be checked. If not, check it.
How to Set Up Word for Mac for Professional Editing
Word 2004, Word 2008 and Word 2011
Choose Word>Preferences>View.
Under Show, check Object anchors, Bookmarks and Text boundaries.
Under Nonprinting characters, check All.
Under Window, Vertical ruler should already be checked. If not, check it.
Word 2016
Choose Word>Preferences>View.
Under Show in Document, check Object anchors and Bookmarks.
Under Show Non-Printing Characters, check All.
Under Show Window Elements, Vertical ruler and White space between pages in Print Layout View should already be checked. If not, check them.
Some Useless Options
Unchecking these options can save your time and sanity:
When selecting, automatically select entire word, to enable per-character formatting and correcting,
Keep track of formatting, so Word will not create a new style for every little formatting change, and
Scale content for A4 or 8.5×11″ paper sizes, so all branding and placed graphics will print undistorted.
Just doing these steps will give you a leg up on 99% of the rest of the world in terms of professional formatting in Word. The great majority of formatting screwups are the result of inadvertently deleting the hidden formatting characters. Next post, we’ll get into more details about how these formatting marks actually work.
2024 Update: Microsoft has announced that they’re retiring Microsoft Publisher. After October 2026, Publisher will no longer be included with Microsoft 365. This is unfortunate, as Publisher can do things that Word cannot.
Is Microsoft Publisher better than Word? For design-intensive documents like newsletters, the answer is YES!
We recently had a request to transcribe a full-scale 16-page magazine layout from InDesign to Word. We recommended using Microsoft Publisher. In addition to the usual Word, PowerPoint and Excel, many versions of Office include Microsoft Publisher, a lightweight but capable desktop publishing program.
MS Publisher is comparable to PageMaker, for those of you that have been in the industry long enough. The interface is similar enough to other Office products that the learning curve is fairly low. But the best part is that it’s free and already installed in most offices. Your client doesn’t have to buy or install anything to get good quality design documents.
Users will find useful features like:
master pages,
Pantone and CMYK color models,
the ability to make color seps and print to a real press,
measurements to 1/1000 of an inch and
many others.
Word doesn’t have any of these.
Microsoft Publisher for Modular Design
But perhaps the greatest advantage lies in a fundamental design choice in Word. Publisher does not link everything to the text stream. Just like InDesign and Quark, pages and graphics exist as independent entities that stay where you put them. In Word, all page breaks, placed graphics, column breaks, etc. are anchored to the text string. When the text is edited, all elements move in relation to it. This isn’t a defect, just the fundamental difference between a word processor and a page layout program.
Designers rarely recommend Publisher simply because they’re unfamiliar with it. It’s a Windows-only product, so they don’t see it in their copy of Mac Office. Microsoft doesn’t advertise it as a feature product. But Publisher is ideal for newsletters, brochures and magazines. Consider it for any document where you need a flexible layout with lots of graphics, photos and articles.
These types of files can be done in Word, but they are always less reliable and more limited. Word is still a better choice for documents that must be editable by anyone at the client’s office. Publisher is not universally installed and does require a little familiarity. For design-intensive Word files, we suggest additional tech support time to help handle the inevitable “I deleted a paragraph and my photo disappeared as well!” questions.
Microsoft Publisher Case Study
New York University needed a flexible ask brochure to help raise construction funds from donors. They required an electronic document that could have pages added and removed at will (not a strong point of Word!). They also needed to customize the brochure with each donor’s name and information before printing it out on a color copier. Publisher met their needs for handling large linked graphics and color consistency using Pantone specs. Here’s what the cover looked like:
Cover of NYU ask brochure in Microsoft Publisher
Do you have a client newsletter project coming up? Give us a call at +1 201 664 6007 to discuss whether Microsoft Publisher might suit your client better.