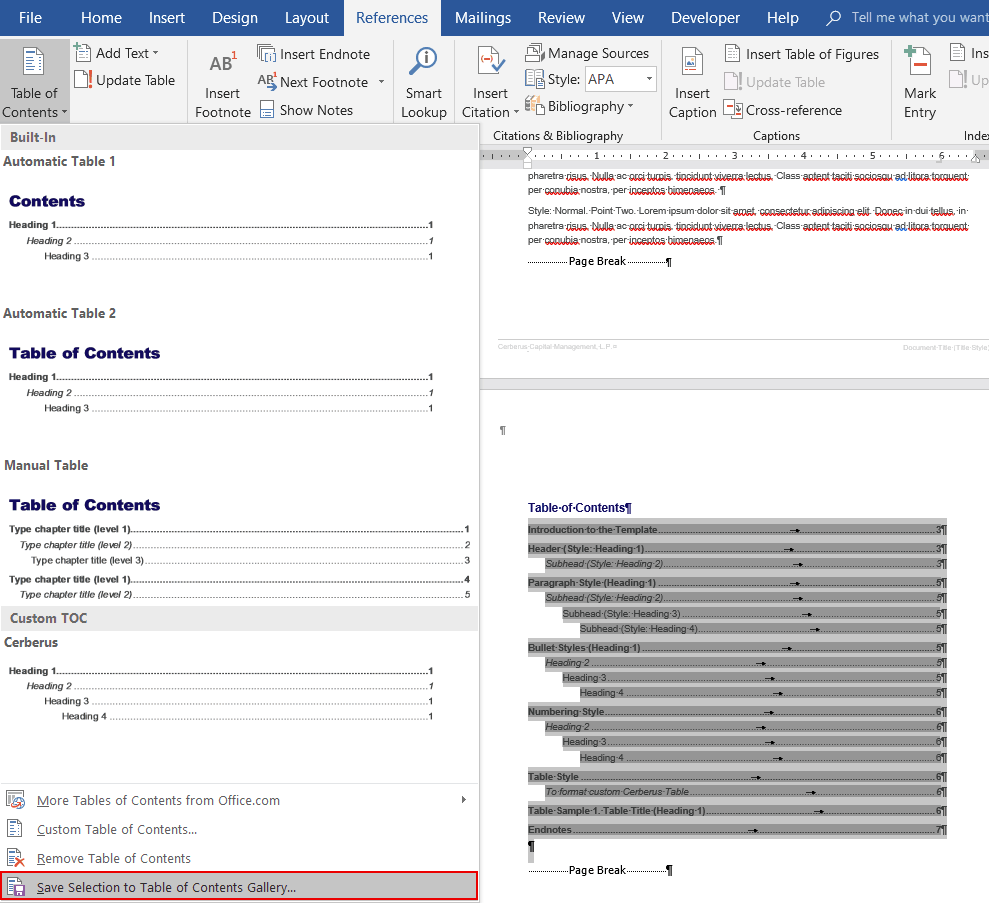
Using the Word for Windows program interface, you can select custom content, then add it to an AutoText gallery. As an example, select a Table of Contents and then add it to the TOC Gallery using References>Table of Contents>Save Selection to Table of Contents Gallery (highlighted in red below):

Unfortunately, Mac versions of Word do not share this feature. But it’s a simple hack. If you are new to XML editing, please read XML Hacking: An Introduction. MacOS users should also read XML Hacking: Editing in macOS to avoid a couple of Mac-specific XML issues. The latter article now mentions the free XML editing plugin for the Chrome browser in the July 2018 update.
This hack will add content to other Word Galleries, like the Cover Page Gallery. Please see the last section of this article for the details.
If This is For Your Own AutoText Gallery
The directions below assume you’re adding AutoText to a template for a client. What if it’s just for yourself? In that case, you would be adding AutoText to your Normal.dotm template.
Normal.dotm is stored in your user Library folder. To find it:
- Hold down the Option key, while clicking on the Go menu (macOS menu bar) and choose Library. A window opens showing your user Library.
- Open ~/Library/Group Containers/UBF8T346G9.Office/User Content/Templates.
- Make a copy! If your Normal template contains any macros, other AutoText or styles, you don’t want to lose them all by making an XML editing mistake.
Add a Table of Contents to the TOC Gallery – The Steps
Make sure you’re working on a template rather than a document. We’ll be using AutoText, and AutoText is saved to the template. If you’re working on a document, the AutoText would get saved to the template attached to the document, not the document itself.
- Start by making the invisible characters visible, using Word>Preferences…>View and checking All in the Show Non-Printing Characters section.
- Now select the custom Table of Contents, making sure to include the paragraph mark just below it.
- Choose Insert>AutoText>AutoText….
- Set the Look in: dropdown to the name of the template you’re working on.
- In the Enter AutoText entries here: field, give the AutoText entry a sensible name like Clientname Custom TOC.
- Click on the Add button and save the template. Close Word.
- Open the template file in your text editor or Chrome browser with the OOXML plugin.
- Navigate to word/glossary and open document.xml, the home of all AutoText.
- Search for the name you gave the TOC AutoText entry. The first few lines should look something like this:
  <w:docParts>
    <w:docPart>
      <w:docPartPr>
        <w:name w:val="Brandwares Custom TOC"/>
        <w:style w:val="TOC 2"/>
        <w:category>
          <w:name w:val="General"/>
          <w:gallery w:val="docParts"/>
        </w:category>
        <w:behaviors>
          <w:behavior w:val="content"/>
        </w:behaviors>
        <w:guid w:val="{DBD01F60-383F-C040-9417-745701ADCDFD}"/>
      </w:docPartPr>
- Make 2 changes in the <w:category> section:
1. Change the w:name value from General to a more meaningful name like Custom TOC. This will display as the heading under which your custom TOC appears.
2. Change the w:gallery value from docParts to tblOfContents. This is the crucial step that makes the TOC appear in the TOC Gallery.
  <w:docParts>
    <w:docPart>
      <w:docPartPr>
        <w:name w:val="Brandwares Custom TOC"/>
        <w:style w:val="TOC 2"/>
        <w:category>
          <w:name w:val="Custom TOC"/>
          <w:gallery w:val="tblOfContents"/>
        </w:category>
        <w:behaviors>
          <w:behavior w:val="content"/>
        </w:behaviors>
        <w:guid w:val="{DBD01F60-383F-C040-9417-745701ADCDFD}"/>
      </w:docPartPr>
- Resave the template file, close the editor and open it in Word.
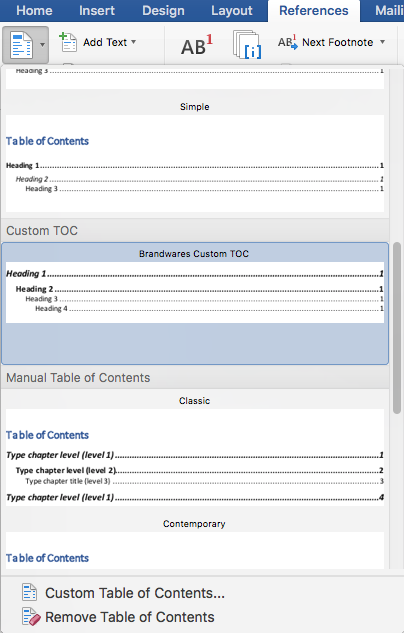
- Choose References>Table of Contents, scroll down to the Custom TOC section and choose your custom TOC.

Add Content to a Different AutoText Gallery
You can use exactly the same steps to add a custom cover to the Cover Gallery. Just change the w:category w:name value to Custom Covers and the w:gallery value to coverPg. Use the table below to find the values used for other gallery type.
Please note, the category names are Microsoft defaults, and yes, they are inconsistent whether they spell it Built-in or Built-In. Using these will group your entry with them. If you want your own category, just use a different word or phrase and Word will add it on the fly. To make the category pop to the top of a list, include a space in front of the name (Thanks to Timothy Rylatt for the suggestion):
| Gallery Type |
w:category w:name Values |
w:gallery Value |
| Bibliographies |
Built-In |
bib |
| Cover Pages |
Built-In |
coverPg |
| Equations |
Built-In |
eq |
| Footers |
Built-in |
ftrs |
| Headers |
Built-In |
hdrs |
| Page Numbers |
Page X, Page X of Y, Plain Number, Plain Text, With Shapes |
pgNum |
| Page Numbers (Bottom of Page) |
Page X, Page X of Y, Plain Number, Simple, With Shapes |
pgNumB |
| Page Numbers (Margins) |
Page X, Plain Number, With Shapes |
pgNumMargins |
| Page Numbers (Top of Page) |
Page X, Page X of Y, Plain Number, Simple, With Shapes |
pgNumT |
| Placeholders |
General |
placeholder |
| Table of Contents |
Built-In |
tblOfContents |
| Tables |
Built-In |
tbls |
| Text Boxes |
Built-in |
txtBox |
| Watermarks |
Confidential, Disclaimers, Urgent |
watermarks |
If this looks too geeky for you, we’re glad to help! Brandwares is full-service template creation service specializing in working with graphic designers and corporations. Contact me at production@brandwares.com.

To ensure that custom entries in any of the Building Block / Quick Part galleries appear before the built-in entries start the Category name with a space. Best practice is to name the category “ Client Name”.
Good point, thanks!
Hi John,
I think you mean “above,” rather than” below,” in “If This is For Your Own AutoText Gallery
”
“The directions below”