Most of the time, the Microsoft-supplied Table of Contents samples will work for Word documents. But sometimes a client needs a custom Table of Contents added to their template. This article shows you how to save a custom Table of Contents and ensure that is displayed prominently, so users pick the right one.
The most obvious use case for customization is to create a non-standard TOC that uses the client’s branding. In addition, sometimes a TOC needs to work differently as well as having a distinct appearance.
An example of this might be if a template uses both heading styles (which need to appear in the TOC) and outline numbering styles (which should not be included in the TOC). A default Microsoft TOC will display both sets of styles, so a custom TOC is required.
How Does a Table of Contents Work?
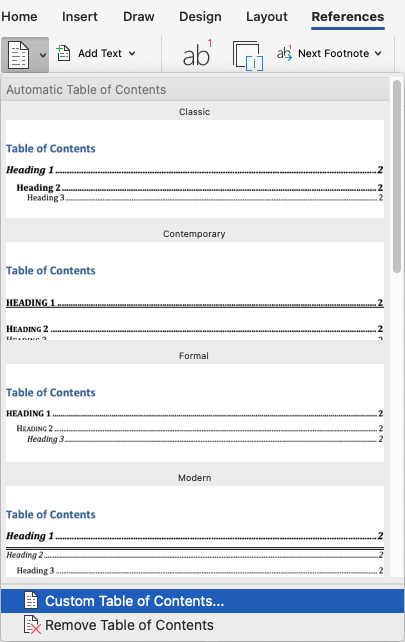
A standard TOC is a collection of hyperlink fields inside a TOC field. If you insert one of the Microsoft-supplied TOC samples, those fields are embedded in a Content Control. This content control is not particularly useful. It gives you a way to change to a different style of Microsoft TOC (not helpful in branded documents) and a slightly more convenient way to update the TOC. You can create a TOC without a content control if you use the Custom Table of Contents command (highlighted in blue) to create it:

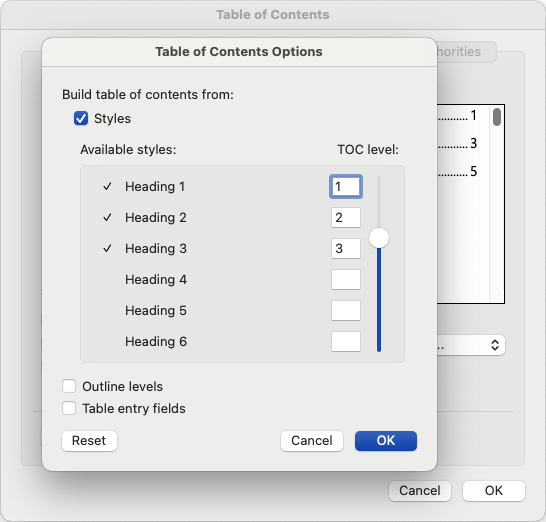
Tables of Contents usually get their text from text that is formatted with heading styles. The Microsoft TOCs grab all headings that are levels 1, 2 or 3, which is why they are a problem with outline numbering. When you create a custom Table of Contents, it can refer to specific heading styles, like Heading 1. Then, no other styles will be included in the TOC.
Most often, a template that has a custom TOC will have it added to the document already. Since there’s a sample in the file, users don’t need to add one. The sample has the required formatting, the user only needs to add text to the document before updating the TOC.
Create a New Custom Table of Contents
Here at Brandwares, we never use the Microsoft-supplied TOC styles. Instead, we create each TOC from scratch using References>Table of Contents>Custom Table of Contents. Then we click on the Options button and uncheck Outline levels. That prevents other styles that use outline numbering from displaying in the TOC. Finally, we select the specific styles that are supposed to appear.
If the TOC is to have a heading above with the text “Table of Contents”, you’ll want it to look like one of the document headings styles. But you don’t want it to actually apply that style to the heading: then the first entry to appear in the TOC would be a repeat of the heading directly above it! Fortunately, Word has a built-in styles called TOC Heading that solves this problem. It repeats the appearance of Heading 1, but it’s outline level is set to Body Text, so it will not repeat in the TOC.
Customize Existing TOC Appearance
The look of a table of contents is determined by the styles that are used in it. There are 9 built-in styles called TOC 1, TOC 2, etc. up to TOC 9. Since there are 9 styles, you can create up to 9 levels in a Table of Contents. Or a document can have setup like a Table of Contents, a Table of Figures and a Table of Tables, each of which use three different TOC styles. Each of these styles can have different amounts of indentation, different types of dot leaders between the text and the page number, different line spacing, etc. All the visual formatting will be set in these TOC styles.
Customize how a Table of Contents Works
Besides the visual appearance, you can control how the Table of Contents operates. To do this, you change the field code that tells Word how to display the TOC. To revise the TOC field code, you need to be able to see it:
In Word for Windows, choose File>Options>Advanced. Scroll down to the Show document content section and check the option for Show field codes instead of their values. OK out.
In Word for Mac, select Word>Preferences>View and check the option Field codes instead of values, then close the prefs panel.
The TOC changes to something like this:
{ TOC \o "1-3" \h \z \u }
The brackets are not ordinary curly brackets: they are special characters that begin and end Word fields. So you can’t just type them in on your keyboard. The contents of the field are editable from the keyboard, just not the brackets. At the beginning of the field is the name of the field type, in this case TOC for Table of Contents.
After that are a set of switches (the letters after backslashes). Each switch makes the TOC behave differently. The sample from Microsoft use the \o switch followed by “1-3”. This combinations grabs all text that is set in the built-in styles Heading 1, Heading 2 and Heading 3. After that, the \h switch creates hyperlinks from each TOC entry to the heading that it refers to. The \z switch hides the dot leaders and page numbers if the document is in Web View. And the \u switch gets all text that is set to outline levels 1, 2 or 3. It’s this switch that creates problems when you also have outline numbered lists, since they use the same text levels as heading styles do.
To make a TOC display only Heading 1, 2 or 3, just delete the \u switch. If the heading styles have custom names, then delete the \o switch and the “1-3” text. Instead, use the \t switch. That switch specifies styles name, followed by the TOC level that the style should use. Here’s a TOC field that uses three custom heading styles:
{ TOC \t "Custom Heading 1,1, Custom Subhead 2,2, Custom Subsubhead 3,3" \h \z }
Pro Tip to Display the TOC Field
Select the Table of Contents, plus the paragraph mark immediately below it. Then right-click on the selection and choose Toggle Field Codes. Or just press the combination of Shift + F9. This shows the field codes for the selected area instead of the whole document. If you see a field code for a Hyperlink instead of a TOC, it means you forgot to select the paragraph mark below the Table of Contents.
Word for Windows Insertable Custom Table of Contents
If the TOC is not to appear in the template as a sample, then the user must have a way to insert it when needed. The simplest way to do this is to add the TOC to the template as AutoText. AutoText entries travel with the template, so they are always available in any document created from that template.
The first wrinkle to overcome is that if you simply select the TOC and add it to AutoText, it can be stored with all of the current displayed text. This will be misleading to the user. To prevent this, switch the document or the selected TOC to show the field codes first. Then select the field code and add that to AutoText.
In Word for Windows, follow these steps:
- Select the TOC heading, plus the TOC field code and the paragraph mark immediately following.
- Choose Insert>Quick Parts>AutoText>Save Selection to AutoText Gallery.
- In the Create New Building Block dialog, edit the Name field. It’s usually a good idea to include the client name, so their users know this is the TOC they should pick.
- Change the Gallery dropdown to Table of Contents.
- In the Category dropdown, choose Create New Category.
- In the Create New Category dialog, type in a name like _Client Name. The underscore preceding the name makes the entry pop to the top of the list
.
- Double check that the Save in dropdown is the name of the template to which you’re adding this TOC. OK out and save the template.
- On the References tab, click on the Table of Contents dropdown and you should see something like this:

Word for Mac Insertable Custom Table of Contents
You can achieve the same result with Word for Mac, but Microsoft makes it more difficult, since they omitted the Create New Building Block dialog. I’ve written previously about hacking AutoText entries to place them in the correct AutoText Gallery. But here’s an easier way, using a VBA macro.
Here’s the macro listing:
Sub AddTOC2Gallery()
    Dim oTemplate As Template
    Dim oBlock As BuildingBlock

    Set oTemplate = ActiveDocument.AttachedTemplate

    Set oBlock = oTemplate.BuildingBlockEntries.Add( _
        Name:="Client Name TOC", _
        Type:=wdTypeTableOfContents, _
        Category:="_Client Name", _
        Range:=Selection.Range)
End Sub
This macro will work with the template that will contain the TOC, or a document attached to that template. Yes, we did test this in macOS and Windows, so if you have problems running it, the issues are at your end.
Switch the document or the selected TOC to show the field codes first. Then in Word for Mac, follow these steps:
- Edit the macro, changing the text in double quotes to suit your client.
- Select the TOC heading, plus the TOC field code and the paragraph mark immediately following.
- Run the macro.
- Save the template.
- On the References tab, click on the Table of Contents dropdown and you should see something like this:
Further Reading
For more detailed pages about Word TOCs, please see Generating Table of Contents in Word. It’s also worth reading Susan Barnhill’s TOC Tips and Tricks and TOC Switches. Though the Barnhill articles are old, they contain obscure information that is still relevant, like how to set up a TOC that doesn’t depend on styles or outline levels.