Unlike PowerPoint, Microsoft Word has a utility to create custom Word table styles. You might think this makes life a lot easier, but you would be wrong. The Word utility has quirks and bugs, and Word tables don’t work the same way as PowerPoint’s. Using the Table Style dialog is not intuitive. To get a Word table style to work exactly to the way it should, you may have to hack the OOXML.
To start, let’s clarify that a table style is one of 4 styles that you can create in Word. The others are paragraph, character and list styles. A well-constructed table style does not need to have paragraph styles applied to it later. That’s because it already contains paragraph styles, though these don’t have the conventional names that you’re familiar with. Here’s how to get the best possible results.
Start with a similar table style
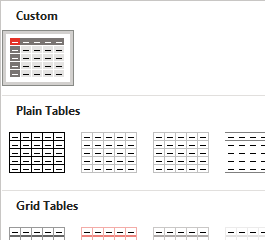
The first step in creating a custom table style is to insert a table, so the Table Design tab appears. By default, a new table will use the Table Grid style, which is very plain. If your final table style requires design options like a distinctive first column or a total Row, Table Grid is a poor place to start. It doesn’t include any of those options, and adding them back in is difficult. Switch the style to a Microsoft default that already has similar features.
Next, expand the table style gallery dropdown again and select New Table Style at the bottom. This ensures that your table style will appear in a new Custom row right at the top of the styles gallery. By contrast, starting with Modify Table Style lumps your style in with all the Microsoft defaults.
Base the new style on the chosen one
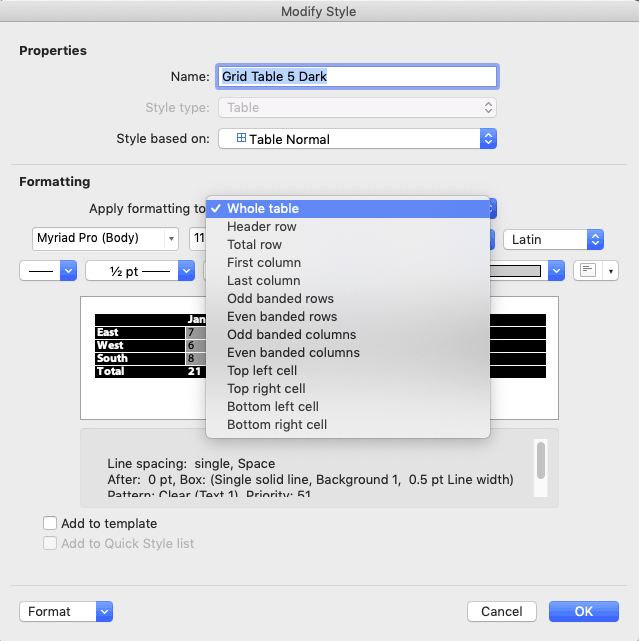
When you choose Table Design>Table Styles>New Table Style, Word sets the Style based on dropdown to Table Normal, not the style you chose. If you originally chose Grid Table 5 Dark, then set Style based on to the Grid Table 5 Dark. (Current versions of Word for Mac have a display bug whereby choosing a different table style does not update the preview in the dialog. Choose the style, OK out, then choose Modify Table Style to see a corrected preview.)
Start with Whole table
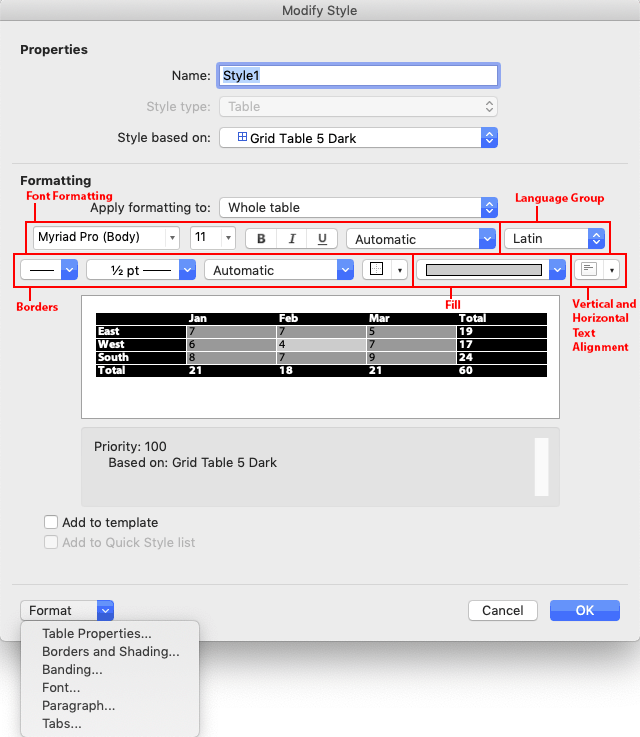
Start with the Whole table choice in the Apply formatting to dropdown. This is the default cell formatting that will appear when no other Table Style Options are applied. The formatting controls are condensed, here’s a breakdown of which control does what:
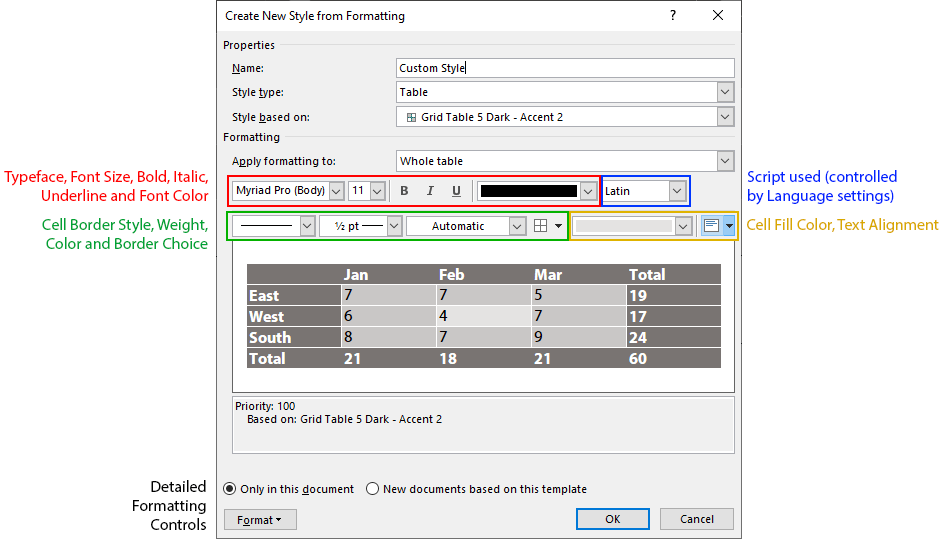
If the formatting control you need doesn’t appear in the dialog, use the Format dropdown in the lower left corner to access more of them.
Move on to Header row
After you’ve set the default cell style, choose Header row from the Apply formatting to dropdown. This is where the dialog gets buggy. Many of the controls will retain their value from whatever table part you were previously editing! The controls will sometimes, but not always, display the values used in the new table part you have just selected (in this case, Header row)! So it’s up to you to keep track of what the correct values are for the table part you’re formatting, and apply each in turn.
Format each table part in order
Because of the dialog display inconsistencies, it’s easiest to format each table part in the order they show in the Apply formatting to dropdown.
As you format each table part, Word creates, in effect, a separate paragraph style for each table part. But you don’t apply these styles by choosing a style name. Instead, you check a box in the Table Style Options group of the Table Design tab. Checking the Header Row option automatically applies the Header Row style to the top row of the selected table. When you’re creating a table style for a client, this means many design options can be included in one table style, and you don’t have to include elaborate instructions about which style to manually apply to which table part.
What about the corner cells?
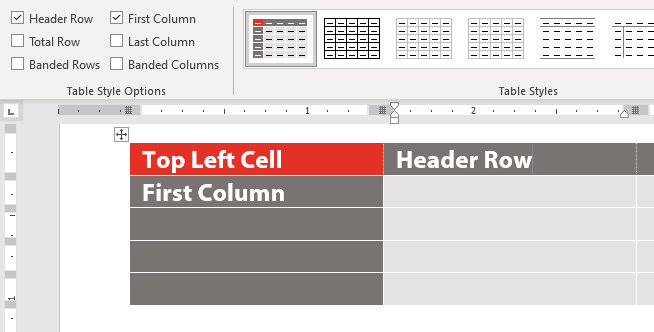
The last 4 items on the Apply formatting to dropdown are to format the top left, top right, bottom left and bottom right corner cells. But there is no Table Style Option to turn these on and off directly. The way Word handles this is that if both the Header Row and First Column options are checked, then the formatting for the top left corner cell is turned on. This formatting can be different from either the header row or the first column. Header Row plus Last Column will turn on the upper right cell. You get the idea.
FWIW, PowerPoint table styles can also have corner cell formatting and the cell formatting is applied in the same way, by using pairs of style options.
Word Table Style Quirks
There are some oddities about Word table styles, and a few bugs. One oddity is that table text is based on the Normal style in relationship to Word’s Default Text settings. If Normal has been set to any color other than Automatic, applying different text colors to different table parts will have no effect. The text will remain the color set for Normal. You then have to apply new paragraph styles to the table parts after creating the table.
Another weird result of the dependency on Normal is that Word expects to have the default line spacing for your version of Word. As I write, Word 365’s default Normal style has a Line spacing of Multiple at 1.08 with Space After of 8 points. In a table style, this gets automatically reinterpreted as Single with 0 before and after. Centered vertical spacing then works as expected. If you change the Normal line spacing to a larger or smaller value, text that is nominally vertically centered will actually sit higher or lower in the cell. If you add 12pt after, the table text will jump from being vertically centered to having 12 pt after, a huge difference. Microsoft doesn’t publish any of this information. Surprise!
This is one of the reasons why Word experts recommend that Normal style should stay as is and not be actually used in a document unless the default formatting matches the needs of the design. Better to format all text as Body Text style and give that style the custom color and line spacing.
But what if you’re given a template that already has a non-standard Normal, and the client asks for a table style? All is not lost. Table styles can still work as designed if you are using Word for Windows (sorry, Mac people). The trick here is to set the document text defaults to the same values as the revised Normal style. (Thanks to MVP Stefan Blom for this tip.) Here’s how to do this:
- With the document or template open in Word, click on the Styles pane dialog opener below the Quick Styles gallery, or press Alt + Ctrl + Shift + s at the same time. The Style pane opens.
- Click on the Manage Style button at the bottom.
- Select the Set Defaults tab.
- Set the defaults to the same values as Normal style: same font, size, color and paragraph settings. OK out.
You’ll know you got it right when you insert a table in the new style and it automatically has the correct styling for header row, first column and the other table style options. It is no longer necessary to apply text styles to the table, you can simply turn the Table Design>Table Style Options on and off to affect the related table area.
Word Table Style Bugs
Lousy User Interface Design
In the table style dialog, color dropdowns remain set at the color last chosen, even if that was for a different table part. The dropdown should update to the color currently in use for the table part that has been selected. This is just common-sense UI design.
The interface for setting border styles is pretty bad. It’s almost impossible to set one color for vertical borders and a different one for horizontal borders. All borders switch to the last selected color. But we can fix this with an OOXML hack (see below).
Defective Override Capabilities
Subsequent parts can’t always override the XML of earlier parts. As an example, set the Whole table to have internal vertical rules. Then set the first column to have no rule on the right. This should make the vertical rule separating the first column from the second column disappear, but it doesn’t. The rule has to be manually removed after the table is created.
Non-Functional OOXML Tags
The Paragraph Properties (w:pPr) element for each table part has a pStyle attribute that is supposed to set the paragraph style for that part. It does nothing. As mentioned above, the style is always derived from Normal style.
Format the Word table style options in order.
Start by formatting the Whole table section with the defaults for cell in the middle of the preview. Most of the time, this will include the font size and color, and the table background color and any rules that are to appear if banded rows are turned off. If you can’t get the formatting you need from the few controls on the dialog, click on the Format dropdown to find detailed access to Table Properties, Borders and Shading, Banding, Font and Paragraph attributes. Under Windows, you’ll also see a Text Effects choice, which is of dubious value in a table.
Then move on to Header Row formatting, the next item on the Apply formatting to dropdown. Format each item on that dropdown until you have set all the properties you need. After you get all formatting set, apply the custom style to the sample table you created at the beginning. Then use Modify Table Style for any tweaks required.
Word Table Style Hacks
Default style formatting is hardcoded in Word. So the styles that get stored in a Word file are only styles that have been modified or newly created in the document. All of the style exceptions and new style definitions are stored in the word/styles.xml part. Here’s the OOXML for a full table style. First, the section that formats the whole table. Pr stands for Property. tbl is Table, tc is Table Cell, p is Paragraph and r is Run (any length of text less that a paragraph).
<w:style w:type="table" w:customStyle="1" w:styleId="SampleTableStyle">
  <w:name w:val="Sample Table Style"/>
  <w:basedOn w:val="GridTable3"/>
  <w:uiPriority w:val="99"/>
  <w:rsid w:val="00264468"/>
  <w:rPr>
    <w:color w:val="282828" w:themeColor="text1"/>
    <w:sz w:val="18"/>
    <w:szCs w:val="20"/>
    <w:lang w:val="en-US"/>
  </w:rPr>
  <w:tblPr>
    <w:tblBorders>
      <w:top w:val="none" w:sz="0" w:space="0" w:color="auto"/>
      <w:left w:val="none" w:sz="0" w:space="0" w:color="auto"/>
      <w:bottom w:val="none" w:sz="0" w:space="0" w:color="auto"/>
      <w:right w:val="none" w:sz="0" w:space="0" w:color="auto"/>
      <w:insideH w:val="single" w:sz="6" w:space="0" w:color="BFBFBF"/>
      <w:insideV w:val="single" w:sz="6" w:space="0" w:color="282828"/>
    </w:tblBorders>
  </w:tblPr>
  <w:tcPr>
    <w:vAlign w:val="center"/>
  </w:tcPr>
(Above) The w:rPr section sets the default text while w:tblPr sets the borders. This table is transparent when all design options are turned off, so there is no fill. Note the entries for w:insideH and w:insideV. I had to hack this XML to get different colors for the inside horizontal and inside vertical borders.
(Below) Next is the formatting for the header row. w:rPr sets the text as bold and white, while w:tcPr sets the cell borders to nothing and the fill to Accent 2.
  <w:tblStylePr w:type="firstRow">
    <w:pPr>
      <w:jc w:val="left"/>
    </w:pPr>
    <w:rPr>
      <w:b/>
      <w:color w:val="FFFFFF" w:themeColor="background1"/>
    </w:rPr>
    <w:tblPr/>
    <w:tcPr>
      <w:tcBorders>
        <w:top w:val="nil"/>
        <w:left w:val="nil"/>
        <w:bottom w:val="nil"/>
        <w:right w:val="nil"/>
        <w:insideH w:val="nil"/>
        <w:insideV w:val="nil"/>
      </w:tcBorders>
      <w:shd w:val="clear" w:color="auto" w:fill="346577" w:themeFill="accent2"/>
    </w:tcPr>
  </w:tblStylePr>
  <w:tblStylePr w:type="lastRow">
    <w:pPr>
      <w:jc w:val="left"/>
    </w:pPr>
    <w:rPr>
      <w:b/>
    </w:rPr>
    <w:tblPr/>
    <w:tcPr>
      <w:tcBorders>
        <w:left w:val="nil"/>
        <w:bottom w:val="nil"/>
        <w:right w:val="nil"/>
        <w:insideH w:val="nil"/>
        <w:insideV w:val="nil"/>
      </w:tcBorders>
      <w:shd w:val="clear" w:color="auto" w:fill="auto"/>
    </w:tcPr>
  </w:tblStylePr>
(Above) The previous section formats the Total Row, removing the borders. There’s another hack here: the w:shd illustrates how to set the fill as No Color, with both w:color and w:fill set to auto.
(Below) Next up is the First Column formatting. w:pPr sets the text flush right, w:rPr makes it bold and w:tcPr removes the borders and keeps the fill No Color. Oddly, while w:insideH successfully overrides the internal horizontal rules set in the Whole Table section, neither w:right nor w:insideV are able to remove the internal vertical rule to the right of the column. This works as expected in a PowerPoint table style, but is broken in Word.
  <w:tblStylePr w:type="firstCol">
    <w:pPr>
      <w:jc w:val="right"/>
    </w:pPr>
    <w:rPr>
      <w:b/>
    </w:rPr>
    <w:tblPr/>
    <w:tcPr>
      <w:tcBorders>
        <w:top w:val="nil"/>
        <w:left w:val="nil"/>
        <w:bottom w:val="nil"/>
        <w:right w:val="nil"/>
        <w:insideH w:val="nil"/>
        <w:insideV w:val="nil"/>
      </w:tcBorders>
      <w:shd w:val="clear" w:color="auto" w:fill="auto"/>
    </w:tcPr>
  </w:tblStylePr>
  <w:tblStylePr w:type="lastCol">
    <w:rPr>
      <w:b/>
    </w:rPr>
    <w:tblPr/>
    <w:tcPr>
      <w:tcBorders>
        <w:top w:val="nil"/>
        <w:left w:val="nil"/>
        <w:bottom w:val="nil"/>
        <w:right w:val="nil"/>
        <w:insideH w:val="nil"/>
        <w:insideV w:val="nil"/>
      </w:tcBorders>
      <w:shd w:val="clear" w:color="auto" w:fill="auto"/>
    </w:tcPr>
  </w:tblStylePr>
(Above) The right-most table column is formatted with no borders and no fill.
(Below) If your design includes banded columns, the table style will include a section like this. There is just a definition for odd columns: even columns would be formatted with the defaults from the Whole Table section. If the First Column option is turned off, odd columns start at the left-most column. If First Column is turned on, all columns shift and the column just to the right of the first column takes on odd column formatting.
  <w:tblStylePr w:type="band1Vert">
    <w:tblPr/>
    <w:tcPr>
      <w:shd w:val="clear" w:color="auto" w:fill="D4D4D4" w:themeFill="text1" w:themeFillTint="33"/>
    </w:tcPr>
  </w:tblStylePr>
  <w:tblStylePr w:type="band1Horz">
    <w:tblPr/>
    <w:tcPr>
      <w:tcBorders>
        <w:left w:val="nil"/>
        <w:right w:val="nil"/>
        <w:insideH w:val="nil"/>
        <w:insideV w:val="single" w:sz="6" w:space="0" w:color="282828" w:themeColor="text1"/>
      </w:tcBorders>
      <w:shd w:val="clear" w:color="auto" w:fill="F2F2F2" w:themeFill="background1" w:themeFillShade="F2"/>
    </w:tcPr>
  </w:tblStylePr>
(Above) Odd Row and (Below) Even Row formatting.
  <w:tblStylePr w:type="band2Horz">
    <w:tblPr/>
    <w:tcPr>
      <w:tcBorders>
        <w:left w:val="nil"/>
        <w:right w:val="nil"/>
        <w:insideH w:val="nil"/>
        <w:insideV w:val="single" w:sz="6" w:space="0" w:color="282828" w:themeColor="text1"/>
      </w:tcBorders>
      <w:shd w:val="clear" w:color="auto" w:fill="D9D9D9" w:themeFill="background1" w:themeFillShade="D9"/>
    </w:tcPr>
  </w:tblStylePr>
(Below) Formatting for the 4 corner cells. These are only activated when both options that affect the cell are turned on. As an example, if the table has both a Header Row and a First Column, then the nwCell formatting is turned on. In the formatting for nwCell below, the text becomes flush right when both options are used.
  <w:tblStylePr w:type="neCell">
    <w:pPr>
      <w:wordWrap/>
      <w:jc w:val="left"/>
    </w:pPr>
    <w:tblPr/>
    <w:tcPr>
      <w:tcBorders>
        <w:bottom w:val="nil"/>
      </w:tcBorders>
    </w:tcPr>
  </w:tblStylePr>
  <w:tblStylePr w:type="nwCell">
    <w:pPr>
      <w:wordWrap/>
      <w:jc w:val="right"/>
    </w:pPr>
    <w:tblPr/>
    <w:tcPr>
      <w:tcBorders>
        <w:bottom w:val="nil"/>
      </w:tcBorders>
    </w:tcPr>
  </w:tblStylePr>
  <w:tblStylePr w:type="seCell">
    <w:tblPr/>
    <w:tcPr>
      <w:tcBorders>
        <w:top w:val="nil"/>
      </w:tcBorders>
      <w:shd w:val="clear" w:color="auto" w:fill="auto"/>
    </w:tcPr>
  </w:tblStylePr>
  <w:tblStylePr w:type="swCell">
    <w:tblPr/>
    <w:tcPr>
      <w:tcBorders>
        <w:top w:val="nil"/>
      </w:tcBorders>
      <w:shd w:val="clear" w:color="auto" w:fill="auto"/>
    </w:tcPr>
  </w:tblStylePr>
</w:style>
If you base your Word table styles on a table other than Table Normal, that table style will be included in styles.xml. If that table style includes formatting that you don’t want to included in your table style, then delete the section in the style it’s based on. As an example, this style was based on Grid Table 3, which includes a last column and a total row. To remove all last column and total row formatting from your style, delete the corresponding XML sections in both your custom style and in the style on which it’s based. You’ll know when you’re succesful when turning the Last Column and Total Row Design Options on and off in Word has no visual effect on a sample table.
Too complicated? Shoot me a message and we’ll create custom Word table styles for your document or template.

Hello,
I found your webpage and I have been trying to figure out how to make a table style to color the background of the last column in a table blue. It seems like my tables already have the code taken out of the table to allow the last column color to be formatted, as the color is not changing when I apply the style.
I don’t have experience changing the styles.xml file, so I was wondering if you could assist me in adding the code instead of removing it like you show here. Which part is for the last column and what should I be adding to it?
The lastCol section goes after firstCol and before band1Vert. w:shd sets the fill color. In this example, it is set to accent1. w:fill shows the hexadecimal value of accent1.
Hi John,
Thanks for the reply. Where do I find the ooxlm file to enter this code? Is it the word file itself, or somewhere in the office 365 directory?
All styles are contained in the styles.xml part in the word directory of the file.
Hello John,
This is really a very informative website aside from my usual OOXML reference sites. I just want to ask, would you also recommend adding new styles in the styles.xml file? I’m actually building a reportgenerator (docx file) using OOXML and its quiet tedious and challenging but I think I’m past that area now.
Although there is already an existing default table template in styles.xml, I just want to initially configure a table style where the general style elements of the table are already added and all I have to do is call on the table style name and populate the table.
I find this as my option to limit the number of xml tags I have to define when building the document.xml file.
Thanks for your kind words.
Using styles in Word is always a better idea than programming local formatting (the automated equivalent of selecting text and applying font or paragraph attributes). Word table styles are based on an existing Microsoft style. When you create a new table style in styles.xml, you’ll also have to bring the table style on which its based. It also gets added to styles.xml.
Hello John,
Got any articles on page numbering in OOXML? I’m having difficulty figuring out with page numbers. Thanks!
OOXML hacking isn’t needed to use page numbers. The program interface has everything you need to create and revise page numbering. Here’s a tutorial I found with a search, it may be helpful to you: How to Work with Page Numbers in Microsoft Word.
Thank you for this very detailed article. It helped me a lot to create my first custom table style. Tables now follow the Corporate Identity of my client.
But one small element is still missing: The client uses a lot of rounded corners, for example in their logo. And therefore they would like to have rounded corners in tables, too. In PowerPoint there is the tag cap=”round” for this. I tried to insert a w:cap (after w:sz) in my Word table, but it seems to have no effect at all.
Is it possible to have rounded line joints in Word tables?
Unlike PowerPoint, Word table borders don’t include an end cap parameter. You can only create square-cornered table borders.
Thank you for this informattion on end caps. My client will not like it, but at least I do not have to search any longer.
And one more question: In PowerPoint I can use a gradient or an image as fill for a cell. Is this possible in Word? The Ribbon only offers solid colors. Is there a hidden OOXML tag?
Sorry, no gradient fills in Word. You can set a background color, as you’ve noticed. In addition, in the XML, you can spec a foreground color and a pattern. This gives the same look as filling a shape with a Pattern Fill. That’s all that’s available for table cell formatting. In a table style, the XML will look like this:
The visual effect looks like this:
I’ve never had to hack a table style before, as i thought i could do everything in Word, but it turns out you can’t add horizontal lines in the table header row, which i need when i have a multiple row table header. Your explanation here enabled me to edit the style successfully.
Thank you!
As a technical writer I really expected that Table Styles would save me time, but so far I’ve not managed to get them to work.
In the Word Table Styles Bug section you wrote:
The Paragraph Properties (w:pPr) element for each table part has a pStyle attribute that is supposed to set the paragraph style for that part. It does nothing. As mentioned above, the style is always derived from Normal style.
If I understand correctly, this means that all table cells will have the default Normal style font. At least, that’s what I’ve been experiencing. If that’s the case, Table Styles are more or less useless to me, and I’m better off copying existing tables that are formatted more or less the way I want, and changing the content. Or I can save a formatted table as an Auto Text entry.
I have looked for ways to save a current formatted table as a Table Style, but that does not seem to be possible.
Any advice?
Thanks
It’s true that the pStyle part should allow the inclusion of paragraph styles. But when a table style is correctly set up, it’s not necessary to apply or include paragraph styles in it. Though they don’t have names, a table style can include sub-styles for the whole table, header and total rows, first and last columns, banded rows and columns and the 4 corner cells. The table style parts are based on a default style, but do not have to stick to that: you can set a different font, size, bolding, color, etc.
Creating a style from a sample table would be a great convenience feature, but many sample tables are not formatted in a simple and consistent way that could easily be converted.
Hi John! I want to confirm, there’s no possible way to disconnect the “normal” font from the table styles? Not even in the document.xml, fonttable.xml, etc… ?
Sorry, there isn’t. That’s hard-coded into the program.
Hello, I have a question. Is it possible to establish a style with one font and color for the first row and another for the rest of the text in the table? I have a lot of problems because users modify colors by applying a font color directly from the Font menu. When applying my custom table style those colors are not changed to the color defined in the table style. Is there any way to do this? Thank you so much
Yes, you can set the header row of a table style to use a different font and font color
When a user selects text, then chooses Home>Font to change the color, that is local formatting. In general, Office programs are designed to honor local formatting when applying styles. In other words, the style will not reformat any text that has been locally formatted.
As a workaround, set your table style as the default style. Do this by right-clicking on the style in the Table Style Gallery and choosing Set as Default. Then, whenever they create a table, the formatting is already correct. You’ll just have to tell them not to monkey with it.