After 15 years, I got tired of waiting for Microsoft to provide Content Controls in Word for Mac. So I wrote a VBA add-in to do it. The Word for Mac Content Control Add-in is free if you subscribe to this blog. There’s no installer (Apple’s sandbox requirements for automatic installation are onerous.), but I provide installation instructions.
Content Controls are a superior way of creating forms, easier to create and use then the Legacy Form Fields that are built into Word for Mac. In a previous post, I’ve written about how you can insert content controls using VBA: Content Controls for macOS – Cool Code. But using VBA requires more technical ability than the average Word user has. So writing an add-in makes these controls available to a much wider group of users.
The new content controls appear on Word’s Developer tab:
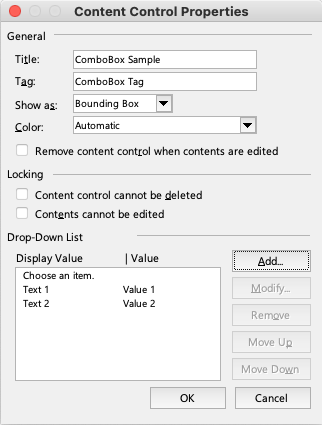
The Properties button opens a dialog that allows you to set the items relevant to that type of control:
Current issues with this Content Control add-in:
In Word for Windows, you can set a separate character style for the control. The VBA commands for sorting styles don’t do the same thing as the Word interface, so I haven’t been able to make this work the same as in Windows. Using my Content Control add-in, the content controls currently take on the style of the paragraph in which they are inserted, except for the Date Picker which displays Times New Roman (?!) when a date is selected.
The color for a control can be set to the same colors as in Windows, but there isn’t a custom color input yet.
If and when Microsoft gets around to adding content controls, the checkbox will probably select checked and unchecked characters from the macOS Emoji & Symbols dialog. Unfortunately, that dialog includes many system fonts that can’t be embedded in a file (this is a big problem with choosing bullets in PowerPoint, but that’s material for a different article). So I’ve created a subset of checked and unchecked symbols that can be used in checkboxes. These characters will work as expected and can be embedded in a template or document.
The properties dialog in the Content Control add-in can’t preview the checkbox characters, because there is no way for VBA to retrieve the symbols currently used by a checkbox.
The date picker should be able to use a world-wide variety of locales and calendar types. I haven’t been able to program the system calls to macOS to get this information yet. The date picker currently uses U.S. defaults for date formatting. Using Microsoft date formatting codes (dd-mm-yyyy, etc.), you should be able to set up dates for other languages based on a Latin (Western) script. This is one of the items that needs testing in other languages.
A known error occurs if you try to insert a Content Control into an old Word file in .doc format. You’ll see an error like Run-time error 445: Object doesn’t support this action. Update the file to .docx format to fix the issue.
A few users get error messages when trying to modify existing content controls. To date, we have not been able to reproduce, and thus solve, this bug. If you get an error, please post a comment including your processor info (Intel or Apple chip), macOS version and Office edition.
You can get a free copy of the add-in by subscribing to this blog. If you’re already a subscriber, please write to me at the email in the right-hand column, and I’ll send it to you. Please note, we do not send to disposable email addresses.
As Apple and Microsoft release new operating systems, it’s no longer possible to install the latest version of Office on your old computer. Here’s is a list of the most recent Office you can run for the operating system you have, plus where to find it.
Most Recent Office You Can Run on macOS (Updated for 2024)
Rant alert! Microsoft supports the last three operating systems in both Windows and Mac. Unfortunately, Apple has a policy of releasing a new operating system every year, whether we need it or not. The result of these two business decisions is that there are rafts of perfectly serviceable Macs out there that can no longer install the current version of Office. It looks like Apple intends us to toss them and buy new ones. Another case of lip service to environmental sustainability. Rant over
If you buy or subscribe to Office for Mac today, you’ll only find the current versions of Microsoft 365 (the subscription version) and Office 2024 (the retail edition) to be easily available. But Microsoft maintains a page of older installers at Update history for Office for Mac. All of them can be activated under a current Microsoft 365 subscription or Office 2024 license.
Please note that all of these are final releases: there will be no security updates to follow. Be careful when downloading Office files from the interweb.
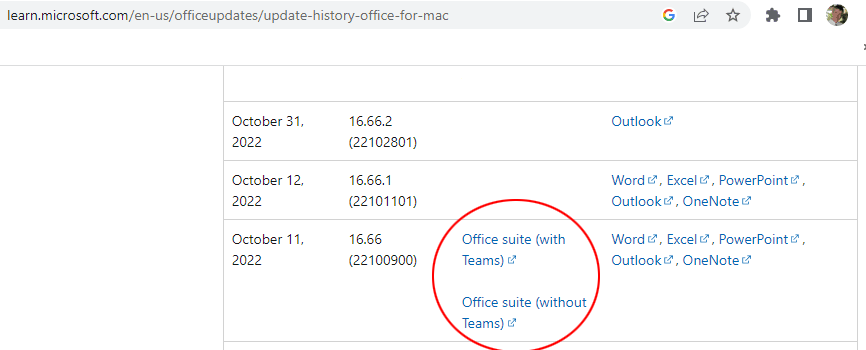
As of October 2024, the current crop of obsolete Macs are those that can only run Monterey (macOS 12). These are machines that are around 10 years old, but are completely useable for applications like Office. The last Office version that Monterey can run is 16.89.1. At the History page, look for the Office Suite Installer, with or without Teams, dated September 17, 2024. Do not download the updaters for individual programs! Download the Office Suite installer!
Then run the downloaded installer. After installing, normally Microsoft AutoUpdate fires up and installs the final 16.89.2 version for Outlook. Wait until it finishes, then open Applications and run one of the Office apps.
You’ll see a dialog prompting you to sign into your account. Enter your name and password.
If you’re a Microsoft 365 subscriber, that should be the end of the process. Your software will be activated and you’re good to go.
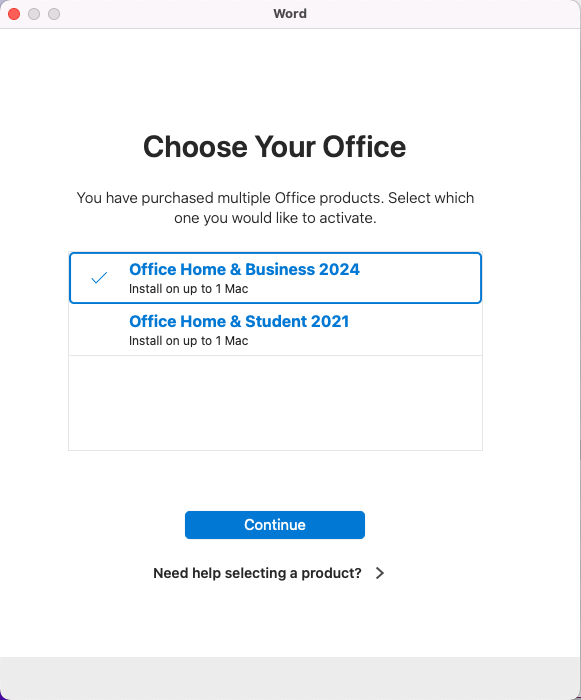
If you have purchased multiple permanent license editions, you’ll see a dialog asking to to choose which license to apply. Office 2019, 2021 and 2024 no longer have separate licenses for Mac and Windows, so at this point it possible to switch Office 2021 (for example) from Windows to macOS or vice versa.
Older Editions of macOS
Big Sur (macOS 11) can run Office 16.77. At the History page, look for the Office Suite Installer, with or without Teams, dated September 12, 2023. Reminder: Do not download the updaters for individual programs! Download the Office Suite installer!
Catalina (macOS 10.15) can run Office 16.66. At the History page, look for the Office Suite Installer, with or without Teams, dated October 11, 2022. Reminder: Do not download the updaters for individual programs! Download the Office Suite installer!
Catalina was the first OS to require 64-bit software. This requirement made Office 2011 obsolete, since it’s 32-bit. But Office 2011 is still a useful edition in macOS. It can still do things that were permanently removed from later versions of Office. So you might want to stick with Mojave and install the newer Office that goes with it. (There’s no problem in having Office 2011 and a later version installed on the same computer.) In this scenario, download and install the 16.54 version dated October 12, 2021.
One of my favorite Macs is my 17″ MacBook Pro. It’s the machine that travels with me, but it’s 12 years old and can run only High Sierra. The most recent Office you can run on this computer is 16.43, dated November 10, 2020.
There’s a pattern here: Apple releases new operating systems in the fall, usually in September or October. The Office version that Microsoft releases the same month is the last one for the fourth-oldest macOS. I don’t have any machines running Sierra, but if I did, I would try the October 15, 2019 edition of Office 16.30.
As I mentioned earlier, you can run an older version of Office on an older computer. Since Office 2008, the file format has remained pretty constant, so the software can still be useful. You can install Office 2011 under Mojave or earlier, while Office 2008 can be installed under El Capitan and earlier. These versions can co-exist on a Mac with a newer version (or with each other), though Microsoft’s History page only goes back to 16.27 from July, 2019.
Updating macOS on Older Machines
As an alternative to instaling an old version of Office, you might consider updating macOS. Here at Brandwares we’re testing Open Core Legacy Patcher. This open-source project allows new versions of macOS to run on old Macs that Apple no longer supports. So far, the results are quite encouraging and we haven’t seen many problems. Our suggestion is to install the next-to-newest version, as each new edition of macOS causes issues that take time for the Open Core project contributors to patch. As an example, at the time of writing, Sequoia has been released, but we installed Sonoma on our test machines. This has allowed us to update these computers to the current version of Office.
Most Recent Office You Can Run on Windows
Under Windows, the situation is easier, as Microsoft waits about 3 years between operating systems. Plus Windows isn’t as finicky about the hardware it runs on. I have an old Mac Pro from 2006 that can only run OS X Lion and Office 2011, but under Boot Camp it does either Windows Vista and Office 2010, or Windows 7 and Office 2016. Windows 8 is likewise limited to Office 2016, while Windows 10 (now 9 years old!) can run the current version of Office 2021 and Microsoft 365. You have to have a really old Windows computer to be unable to run a useable copy of Office.
Years ago, Ken Puls of the excellent Excelguru site published an Excel add-in that displays the icons built into Excel. This reference is useful for any programmer wanting to repurpose built-in icons to use with their own code. Here’s where you can download the original: Office 2007 Icon Gallery. His version has gradually become outdated as Microsoft has added more icons to the software, and there was no version for PowerPoint. The latter isn’t such a big deal, because Excel, Word and PowerPoint share a common library of icons.
With Ken’s gracious permission, I’ve created an updated PowerPoint version of this add-in. This displays all the icons in current versions of Office, and it runs under PowerPoint for Windows and for Mac.
This is version 2. If you downloaded this prior to January 24, 2023, please download and install this improved version. I haven’t created an installer for this, but here are the instructions for manual installation:
The download is a zip file that holds a single Icon Gallery.ppam file. Expand the zip and copy the .ppam file to your desktop or other easy-to-find location. Here’s how to make it appear in PowerPoint for Windows:
In PowerPoint, choose File>Options>Add-ins.
Change the Manage dropdown to PowerPoint Add-ins, then click on the Go button. The Add-ins dialog opens.
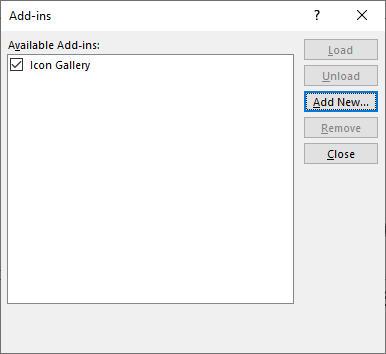
Click on the Add New button. Navigate to the location where you saved the .ppam file, select it and click on OK. The Add-ins dialog should look like this, displaying the add-in name with a check mark beside it:
Click on the Close button.
In PowerPoint, select the View tab. At the right end, you should see a new group called Office Icons:
macOS Installation
In PowerPoint, choose Tools>PowerPoint Add-ins from the macOS menu bar. The Add-ins dialog opens.
Click on the Plus (+) sign. Navigate to the location where you saved the .ppam file, select it and click on OK.
PowerPoint will pop up a macro warning. Click on the Enable Macros button.
Then PowerPoint will pop up this dialog, astoundingly badly worded, even for Microsoft: It sounds like you’re turning off macro protection completely, right? Well you’re not. This just turns it off for this file, and it has no effect on the macro virus protection settings, so there’s nothing to even turn on again! Click on Turn Off.
The Add-ins dialog should look like this, displaying the add-in name with a check mark beside it:
Click on the OK button.
In PowerPoint, select the View tab. At the right end, you should see a new group called Office Icons:
Using the PowerPoint Icon Gallery
Windows Useage
Click on one of the galleries to see a group of icons. Here are the first 256:
Hover over an icon to see its idMso command name.
Click on an icon to open a dialog that shows the command name for use with idMso or imageMso commands. Click on the Copy to Clipboard button to copy the command name. Then paste the name into your XML or other code. Due to a bug in File Explorer, all Explorer windows must be closed for this to work as expected.
macOS Useage
Click on one of the galleries to see a group of icons: Note the grey spinning icons: Those are objects that exist in the Windows version, but not in macOS. One of the drawbacks of trying to develop for both platforms is that Microsoft has only done half the job in Office for Mac. Avoid these icons for cross-platform macros.
Hover over an icon to see its idMso command name.
Click on an icon to open a dialog that shows the command name for use with idMso or imageMso commands. Click on the Copy to Clipboard button to copy the command name. Then paste the name into your XML or other code.
Uninstalling the PowerPoint Icon Gallery
Windows Uninstall
In PowerPoint, choose File>Options>Add-ins.
Change the Manage dropdown to PowerPoint Add-ins, then click on Go.
Select the add-in, then click on the Remove button. Close the dialog. The icon gallery disappears from the View tab.
macOS Uninstall
In PowerPoint, choose Tools>PowerPoint Add-ins (on the macOS menu bar).
Select the add-in, then click on the Minus sign (-). Close the dialog. The icon gallery disappears from the View tab.
Notes
Wouldn’t it make more sense to have this on the Developer tab? Well, yes, it would, that’s where the Icon Gallery appears in Ken Puls’ original add-in. But I made one file to work on both Windows and macOS. PowerPoint for macOS is missing the Developer tab. So I put this on the View tab as a second-best location.
Why no icon preview, as in Ken’s original add-in? Previewing icons in VBA relies on the CommandBars.GetImageMso command. This has been deprecated and in recent versions of Office, does not deliver an accurate icon preview. The command is not available at all on Macs, so I removed the preview. But you can see the 32 x 32 version of the icon in the gallery dropdown, not much has been lost.
Chart Templates allow you to capture and reproduce the appearance of sample charts. This avoids having to include sample charts for users to copy and paste. Here’s how to use them:
Installing
Chart templates must installed to a particular folder so Office can find them.
Windows Installation
Open a File Explorer window.
In the address field, paste in: %appdata%\Microsoft\Templates.
If there isn’t a Charts folder there, create one.
Copy the chart template(s) into it.
macOS Installation
While holding down the Option key, click on the macOS menu bar. Choose Go, then Library. The hidden user Library folder opens.
Open ~/Library/Group Containers/UBF8T346G9.Office/User Content/Chart Templates.
Copy the chart template(s) into it.
Using Chart Templates
Chart templates can be used in Word, Excel and PowerPoint. Here’s how to access them:
Windows Usage
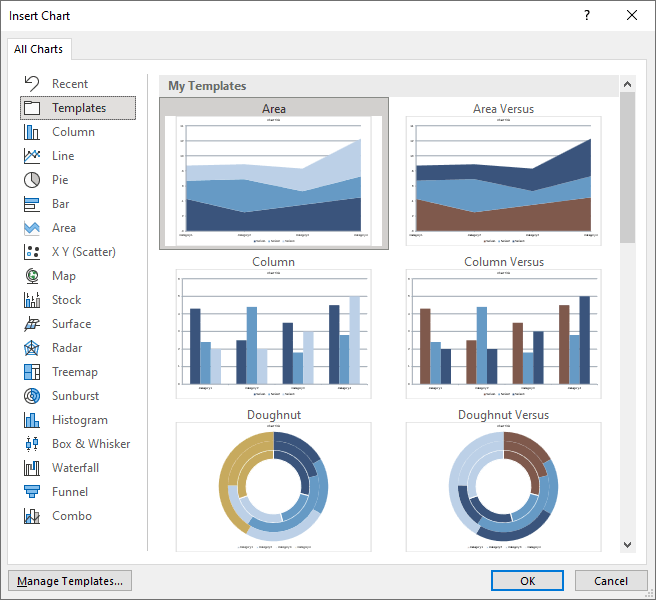
In the Office program, choose Insert>Chart.
In the Insert Chart dialog, click on the Templates icon.
Select the chart template in the right-hand pane, then click on OK. A chart is inserted in your document.
macOS Usage
On the Insert tab, choose Charts>Templates and select the template from the pop-up list. A chart is inserted in your document.
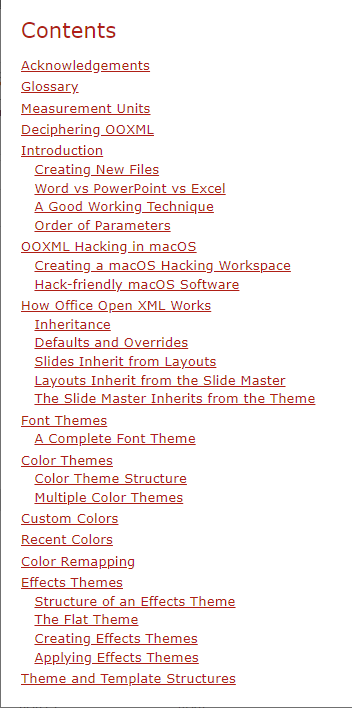
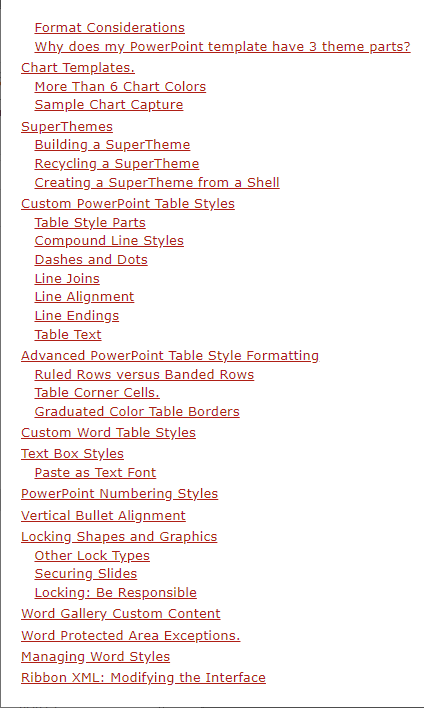
The ebook version of OOXML Hacking has been released. The last three years have gone into adding the equivalent of 40 pages of new information. This is in addition to the trove of unique techniques that already appeared in the print version. Here are screen shots of the table of contents, to give you an idea of the topics covered in this publication:
Barnes & Noble distributes only in the U.S., so use Kobo.com if you’re from another country.
As always, all techniques are covered in both Windows and Mac, where possible. The book contains a link to a downloadable text file of all listings in the book, so you don’t have to re-key text from the screen. The book is currently available on Kobo.com and Barnes & Noble. Barnes & Noble distributes only in the U.S., so use Kobo.com if you’re from another country.
Please note, this e-book has digital rights management applied. All code listings are available in a downloadable text file, so you don’t have to re-key anything. If you have any problems, please contact us at this address
Brandwares provides top-quality, bulletproof templates to a world-wide clientele. We have the Client List to prove it. But you can get your Office questions answered for free (or cheap)!
I also answer questions at Experts Exchange, where I’ve been awarded a Distinguished Expert award for 2021.
This site isn’t free, but it is jam-packed with expertise. There’s a 7-day free trial, if you want to check it out. Tag your post with Microsoft PowerPoint, Microsoft Word, VBA and/or Fonts Typography to ensure your Office questions are answered.
The vast majority of presentations are created using the default templates that comes with Microsoft PowerPoint. All Microsoft-compatible PowerPoint templates have a uniform structure, and the result is that you can copy and paste slides between any deck and the paste works as expected: the content comes across perfectly, and the formatting is updated.
But in almost all corporate presentations with custom templates, this no longer works. Slides pasted from Microsoft-based presentations always need to be reformatted manually, because the custom template haven’t been created to be Microsoft-compatible.
It doesn’t have to be this way. Here’s how to create custom templates that will be both Microsoft-compatible and have a look and feel that is brand-compatible with the organization.
What’s in a Microsoft-Compatible PowerPoint Template?
Most designers create presentation templates incorrectly for the purpose of importing of slides created with Microsoft templates. Almost universal infractions include deleting or renaming the default slide layouts, and deleting or adding placeholders on whatever default slide layouts are left. Less common methods that designers use to wreck templates include deleting all placeholders on the master slide, and deleting all default layouts, then trying to replace them
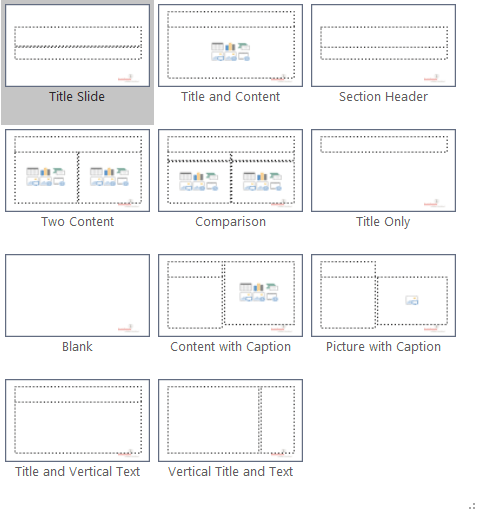
To understand why these actions could cause problems, we need to understand the PowerPoint file structure. All new blank PowerPoint files contain the following:
1 Master Slide (in Slide Master view, the larger slide at the very top of the left-hand thumbnail list). The parent to all the layouts, to which the slide layouts are children. All text formatting is inherited from this slide. Deleting placeholders here will cripple the template.
11 default slide layouts, which inherit the formatting set in the master slide. These 11 comprise:
Title Slide, for the presentation title.
Title and Content, for the bulk of the presentation content.
Section Header, to divide the deck into relevant sections.
Two Content, with 2 content areas.
Comparison, similar to Two Content, but each content area also has a corresponding heading placeholder.
Title Only, displaying only a Title field, with the rest of the slide blank.
Blank, with not even a Title field.
Content with Caption, a little-used layout the includes a Title, Text and Content placeholder.
Picture with Caption, similar to Content with Caption, but with a Picture placeholder replacing the Content one.
Title and Vertical Text This layout is intended for Asian language use and is only displayed as a choice if your operating system has an Asian language set up.
Vertical Title and Text Similar to the previous layout, only visible on computers with Asian language input enabled in the operating system.
Each of these layouts has a specific layout type, set in XML and not alterable in the program interface. You can create the correct placeholder types by generating a new, blank PowerPoint file. Each of these layouts contains placeholders for the date and slide number, plus a footer field. All but 1 have a title placeholder.
Here’s the second line of a default Microsoft layout. In this example, obj is the XML type for a Title and Content layout:
If a slide layout has been created by the user from the Insert Layout command, that layout will not have a type. Instead, the second line of the XML will include userDrawn=”1″:
PowerPoint reads the userDrawn property and will not treat your layout as a default layout no matter what you do to it. It will never be Microsoft-compatible.
If you have deleted a default slide layout, you can restore it by creating a new blank presentation, then copying and pasting the layout under the slide master of the deck to be repaired. You can also restore a default layout by running this VBA:
Sub RestoreLayout()
  With ActivePresentation.Slides
    .Add(.Count + 1, ppLayoutObject).Delete
  End With
End Sub
The example above restores a deleted Title and Content layout. Just change ppLayoutObject to the type you need from this list:
Layout Type
VBA Parameter
Title Slide
ppLayoutTitle
Title and Content
ppLayoutObject
Section Header
ppLayoutSectionHeader
Two Content
ppLayoutTwoObjects
Comparison
ppLayoutComparison
Title Only
ppLayoutTitleOnly
Blank
ppLayoutBlank
Content with Caption
ppLayoutContentWithCaption
Picture with Caption
ppLayoutPictureWithCaption
Title and Vertical Text
ppLayoutVerticalText
Vertical Title and Text
ppLayoutVerticalTitleAndText
Here are the recommendations that Microsoft should have published with the release of PowerPoint 2007: All new PowerPoint templates should include all default slide layouts and placeholders. That would have saved so much grief! Every file would be a Microsoft-compatible PowerPoint template or theme.
Please note, I am not suggesting that you restrict your design to only these layouts and placeholders. As long as you have the default layouts with the default placeholders, the rest of the master slide view can be filled with all kinds of special-purpose layouts with any number of placeholders. Just remember, whatever you create today must be supported in the future, if the slides are to remain paste-compatible. For more details, please see my article about best practices for reusing old (legacy) slides: Legacy Slides – Best Practices
I’m adding a plea for sanity on behalf of users everwhere: restraint in slide layout numbers is best for your client’s users. Too many layouts and they just don’t know which one to pick! Don’t confuse them more than they already are. Consider a limit of 25 layouts maximum.
We have years of expertise in this area and can assess your template for Microsoft compatibility, or create a template or theme for you that will work seamlessly with decks based on Microsoft templates. We’re here to help! Contact me at production@brandwares.com.
Chart templates solve the old problem of having to send out copy-and-paste samples of graphs. But they only display the first 6 of the chart template colors you designed.
Adding More Colors
The most common application of chart templates is to overcome the design limitation of having only a 6-color palette to work with. I wrote about this problem years ago: Office Charts: 6 Colors Maximum! – Best Practices. After a chart uses Accents 1 to 6, it starts recycling those same 6 colors with automatically generated darker and lighter variations. Banks and wealth management clients often need many more than 6 data series in their charts, but still want to have colors that are on-brand and designed.
To create a wider range of data series colors, create a chart with the maximum number of data series that the client requires. Our record is 25 colors! Then right-click on the chart edge and choose Save as Template. This captures the formatting of the sample that you’ve created.
Your template will work just fine on charts that have already been created. Select the chart, choose Change Chart Type (yes, even if it’s the right type already), click on the Templates icon, select the chart template and click on Apply. Easy peasy, job done!
The New Chart Problem
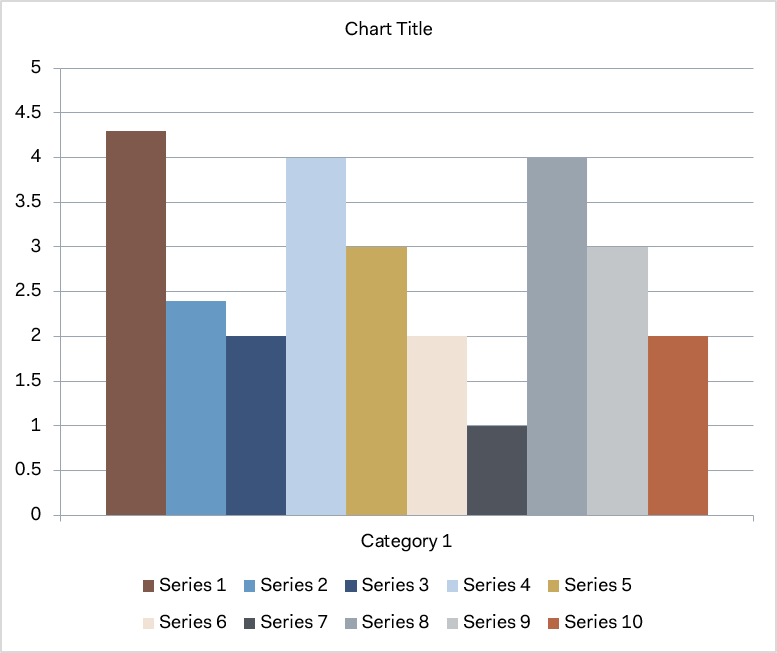
But this process breaks down if you try to create a new chart from that template. Choose Insert>Chart, click on Templates, and select the chart type. Then start inputting data. As soon as you get past the 6th color, Office starts using those damn Microsoft default darker and lighter variations instead of the colors you set! This is Authoritarian Helpfulness at its worst!
What You DesignedWhat Office Gives You
Yes, you can fix this. Reapply the template by choosing Change Chart Type>Templates and reselecting the template. The colors are corrected to the design specs. But you shouldn’t have to do this! And now that you’ve found this article, you don’t have to.
Understanding Chart Template Colors
Let me back up a bit, and explain how chart templates are structured. The top level of the XML consists of [Content_Types].xml, a _rels folder for documenting the relationships of XML parts and a chart folder holding the good bits.
Inside the chart folder, we find chart.xml, which holds most of the formatting that we created when we made the custom chart. Chart.xml contains definitions that contain the intended series color. The colors in chart.xml get set when you save the file as a chart template, and they get used when you apply the template to an existing table. But they are not used when you create a new chart.
Each series is numbered starting with 0, so this is the series for the 7th color. For the first six, the color is set to an accent color. Starting with the 7th, the color fills are in RGB/hexadecimal. Here’s a sample:
In addition, there are subfolders for charts, media, theme, and _rels. The media folder only holds a BMP file that is used for thumbnail display in Office 2007 and 2010, but not in later versions. The _rels folder is for relationships of XML parts. The theme folder contains themeOverride1.xml. As the name suggests, this is a theme that overrides the theme of an Office file that hosts it. This allows you to use a chart template in any Office document while retaining the original design appearance. Finally, we have the charts folder, which has the XML part we’re looking for.
This folder contains 2 files: style1.xml, containing the formatting for all the chart parts and colors1.xml, with a list of default fill colors and transforms fo apply to those colors. Colors1.xml is the file that supplies the colors when a new chart is created from the template. Here’s what colors1.xml looks like:
On a newly inserted chart, an Office program will use the 6 colors in turn. Then it will cycle through them again, applying the a:lumMod val=”60000″ transform. LumMod modifies the luminance, turning each accent color to a dark version. The chart will follow this pattern instead of using the colors you designed for the extra data series. If you reapply the chart type to the chart, then it will update with your designed colors from chart.xml
Fixing Chart Template Colors
My first step was to read the Microsoft specs for cs:colorStyle. Under section 2.8.3.2 CT_ColorStyle, it reads: “The total set of colors is all contained colors repeated each time with each variation applied. A color style can contain 6 colors and 7 variations. This yields a total of 42 colors with the first 6 having the first variation applied, the second 6 having the second variation applied and so on.” Not promising, we really need more than 6 colors here.
After many fruitless experiments, I decided to see if I could add extra colors anyway:
To my astonishment, it worked! I could create a new chart and insert 10 dataseries with each displaying the designed color. No need to reapply the template! Who would ever have dreamt that Microsoft documentation has a mistake in it! ;-D
The takeaway is that to create a many-colored chart template that works as expected under all circumstances, you need to set the extra color values manually in colors1.xml.
Unlike PowerPoint, Microsoft Word has a utility to create custom Word table styles. You might think this makes life a lot easier, but you would be wrong. The Word utility has quirks and bugs, and Word tables don’t work the same way as PowerPoint’s. Using the Table Style dialog is not intuitive. To get a Word table style to work exactly to the way it should, you may have to hack the OOXML.
To start, let’s clarify that a table style is one of 4 styles that you can create in Word. The others are paragraph, character and list styles. A well-constructed table style does not need to have paragraph styles applied to it later. That’s because it already contains paragraph styles, though these don’t have the conventional names that you’re familiar with. Here’s how to get the best possible results.
Start with a similar table style
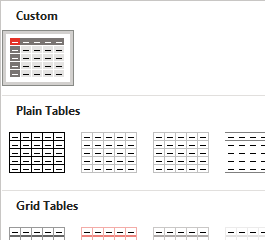
The first step in creating a custom table style is to insert a table, so the Table Design tab appears. By default, a new table will use the Table Grid style, which is very plain. If your final table style requires design options like a distinctive first column or a total Row, Table Grid is a poor place to start. It doesn’t include any of those options, and adding them back in is difficult. Switch the style to a Microsoft default that already has similar features.
Next, expand the table style gallery dropdown again and select New Table Style at the bottom. This ensures that your table style will appear in a new Custom row right at the top of the styles gallery. By contrast, starting with Modify Table Style lumps your style in with all the Microsoft defaults.
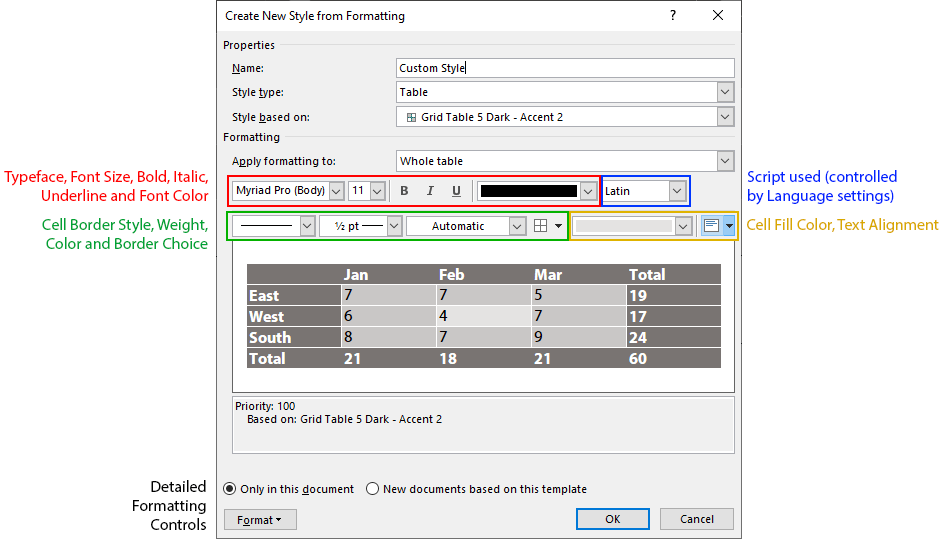
Base the new style on the chosen one
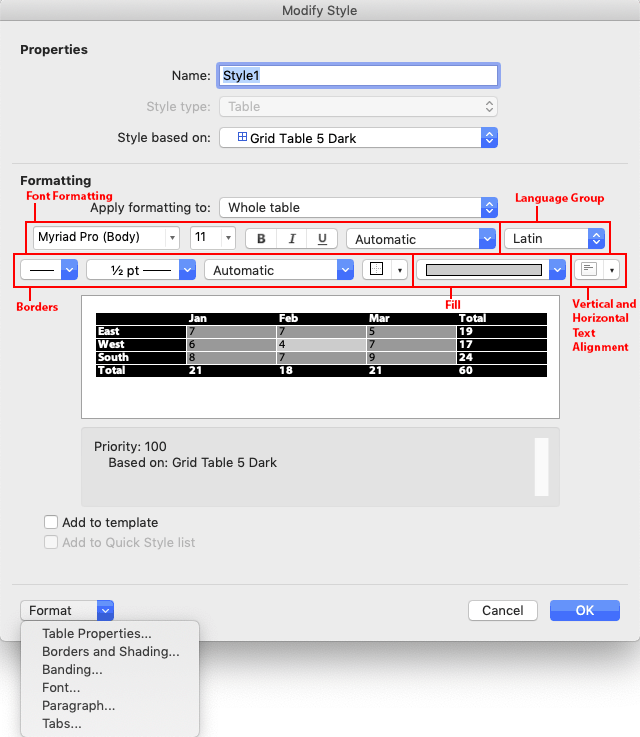
When you choose Table Design>Table Styles>New Table Style, Word sets the Style based on dropdown to Table Normal, not the style you chose. If you originally chose Grid Table 5 Dark, then set Style based on to the Grid Table 5 Dark. (Current versions of Word for Mac have a display bug whereby choosing a different table style does not update the preview in the dialog. Choose the style, OK out, then choose Modify Table Style to see a corrected preview.)
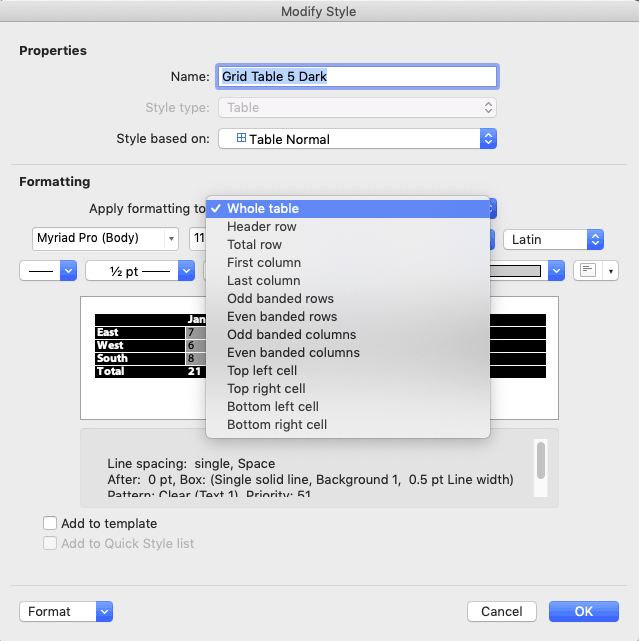
Start with Whole table
Start with the Whole table choice in the Apply formatting to dropdown. This is the default cell formatting that will appear when no other Table Style Options are applied. The formatting controls are condensed, here’s a breakdown of which control does what:
If the formatting control you need doesn’t appear in the dialog, use the Format dropdown in the lower left corner to access more of them.
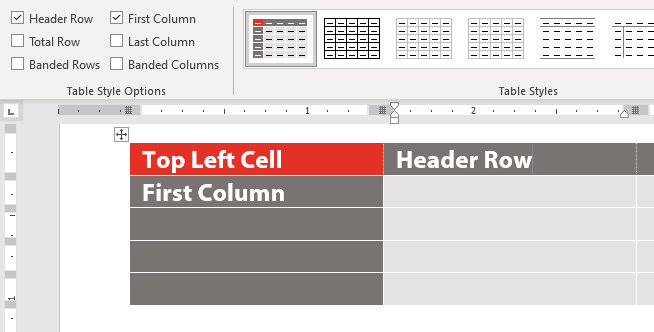
Move on to Header row
After you’ve set the default cell style, choose Header row from the Apply formatting to dropdown. This is where the dialog gets buggy. Many of the controls will retain their value from whatever table part you were previously editing! The controls will sometimes, but not always, display the values used in the new table part you have just selected (in this case, Header row)! So it’s up to you to keep track of what the correct values are for the table part you’re formatting, and apply each in turn.
Format each table part in order
Because of the dialog display inconsistencies, it’s easiest to format each table part in the order they show in the Apply formatting to dropdown.
As you format each table part, Word creates, in effect, a separate paragraph style for each table part. But you don’t apply these styles by choosing a style name. Instead, you check a box in the Table Style Options group of the Table Design tab. Checking the Header Row option automatically applies the Header Row style to the top row of the selected table. When you’re creating a table style for a client, this means many design options can be included in one table style, and you don’t have to include elaborate instructions about which style to manually apply to which table part.
What about the corner cells?
The last 4 items on the Apply formatting to dropdown are to format the top left, top right, bottom left and bottom right corner cells. But there is no Table Style Option to turn these on and off directly. The way Word handles this is that if both the Header Row and First Column options are checked, then the formatting for the top left corner cell is turned on. This formatting can be different from either the header row or the first column. Header Row plus Last Column will turn on the upper right cell. You get the idea.
FWIW, PowerPoint table styles can also have corner cell formatting and the cell formatting is applied in the same way, by using pairs of style options.
Word Table Style Quirks
There are some oddities about Word table styles, and a few bugs. One oddity is that table text is based on the Normal style in relationship to Word’s Default Text settings. If Normal has been set to any color other than Automatic, applying different text colors to different table parts will have no effect. The text will remain the color set for Normal. You then have to apply new paragraph styles to the table parts after creating the table.
Another weird result of the dependency on Normal is that Word expects to have the default line spacing for your version of Word. As I write, Word 365’s default Normal style has a Line spacing of Multiple at 1.08 with Space After of 8 points. In a table style, this gets automatically reinterpreted as Single with 0 before and after. Centered vertical spacing then works as expected. If you change the Normal line spacing to a larger or smaller value, text that is nominally vertically centered will actually sit higher or lower in the cell. If you add 12pt after, the table text will jump from being vertically centered to having 12 pt after, a huge difference. Microsoft doesn’t publish any of this information. Surprise!
This is one of the reasons why Word experts recommend that Normal style should stay as is and not be actually used in a document unless the default formatting matches the needs of the design. Better to format all text as Body Text style and give that style the custom color and line spacing.
But what if you’re given a template that already has a non-standard Normal, and the client asks for a table style? All is not lost. Table styles can still work as designed if you are using Word for Windows (sorry, Mac people). The trick here is to set the document text defaults to the same values as the revised Normal style. (Thanks to MVP Stefan Blom for this tip.) Here’s how to do this:
With the document or template open in Word, click on the Styles pane dialog opener below the Quick Styles gallery, or press Alt + Ctrl + Shift + s at the same time. The Style pane opens.
Click on the Manage Style button at the bottom.
Select the Set Defaults tab.
Set the defaults to the same values as Normal style: same font, size, color and paragraph settings. OK out.
You’ll know you got it right when you insert a table in the new style and it automatically has the correct styling for header row, first column and the other table style options. It is no longer necessary to apply text styles to the table, you can simply turn the Table Design>Table Style Options on and off to affect the related table area.
Word Table Style Bugs
Lousy User Interface Design
In the table style dialog, color dropdowns remain set at the color last chosen, even if that was for a different table part. The dropdown should update to the color currently in use for the table part that has been selected. This is just common-sense UI design.
The interface for setting border styles is pretty bad. It’s almost impossible to set one color for vertical borders and a different one for horizontal borders. All borders switch to the last selected color. But we can fix this with an OOXML hack (see below).
Defective Override Capabilities
Subsequent parts can’t always override the XML of earlier parts. As an example, set the Whole table to have internal vertical rules. Then set the first column to have no rule on the right. This should make the vertical rule separating the first column from the second column disappear, but it doesn’t. The rule has to be manually removed after the table is created.
Non-Functional OOXML Tags
The Paragraph Properties (w:pPr) element for each table part has a pStyle attribute that is supposed to set the paragraph style for that part. It does nothing. As mentioned above, the style is always derived from Normal style.
Format the Word table style options in order.
Start by formatting the Whole table section with the defaults for cell in the middle of the preview. Most of the time, this will include the font size and color, and the table background color and any rules that are to appear if banded rows are turned off. If you can’t get the formatting you need from the few controls on the dialog, click on the Format dropdown to find detailed access to Table Properties, Borders and Shading, Banding, Font and Paragraph attributes. Under Windows, you’ll also see a Text Effects choice, which is of dubious value in a table.
Then move on to Header Row formatting, the next item on the Apply formatting to dropdown. Format each item on that dropdown until you have set all the properties you need. After you get all formatting set, apply the custom style to the sample table you created at the beginning. Then use Modify Table Style for any tweaks required.
Word Table Style Hacks
Default style formatting is hardcoded in Word. So the styles that get stored in a Word file are only styles that have been modified or newly created in the document. All of the style exceptions and new style definitions are stored in the word/styles.xml part. Here’s the OOXML for a full table style. First, the section that formats the whole table. Pr stands for Property. tbl is Table, tc is Table Cell, p is Paragraph and r is Run (any length of text less that a paragraph).
(Above) The w:rPr section sets the default text while w:tblPr sets the borders. This table is transparent when all design options are turned off, so there is no fill. Note the entries for w:insideH and w:insideV. I had to hack this XML to get different colors for the inside horizontal and inside vertical borders.
(Below) Next is the formatting for the header row. w:rPr sets the text as bold and white, while w:tcPr sets the cell borders to nothing and the fill to Accent 2.
(Above) The previous section formats the Total Row, removing the borders. There’s another hack here: the w:shd illustrates how to set the fill as No Color, with both w:color and w:fill set to auto.
(Below) Next up is the First Column formatting. w:pPr sets the text flush right, w:rPr makes it bold and w:tcPr removes the borders and keeps the fill No Color. Oddly, while w:insideH successfully overrides the internal horizontal rules set in the Whole Table section, neither w:right nor w:insideV are able to remove the internal vertical rule to the right of the column. This works as expected in a PowerPoint table style, but is broken in Word.
(Above) The right-most table column is formatted with no borders and no fill.
(Below) If your design includes banded columns, the table style will include a section like this. There is just a definition for odd columns: even columns would be formatted with the defaults from the Whole Table section. If the First Column option is turned off, odd columns start at the left-most column. If First Column is turned on, all columns shift and the column just to the right of the first column takes on odd column formatting.
(Below) Formatting for the 4 corner cells. These are only activated when both options that affect the cell are turned on. As an example, if the table has both a Header Row and a First Column, then the nwCell formatting is turned on. In the formatting for nwCell below, the text becomes flush right when both options are used.
If you base your Word table styles on a table other than Table Normal, that table style will be included in styles.xml. If that table style includes formatting that you don’t want to included in your table style, then delete the section in the style it’s based on. As an example, this style was based on Grid Table 3, which includes a last column and a total row. To remove all last column and total row formatting from your style, delete the corresponding XML sections in both your custom style and in the style on which it’s based. You’ll know when you’re succesful when turning the Last Column and Total Row Design Options on and off in Word has no visual effect on a sample table.
Too complicated? Shoot me a message and we’ll create custom Word table styles for your document or template.
Free Control Control Add-in for Word for Mac
Subscribe to the Best Practices blog and get a free copy of our new Control Control add-in. This is the easiest way to create the same modern form controls that are in Word for Windows. Enter your real email and hit Subscribe in the right-hand column of this page. You’ll receive the add-in and installation instructions within 3 days.