Category Archives: MS Office
Office Automation with AppleScript Reference – Cool Code
For Office for Mac users, AppleScript remains a useful tool in scripting Office documents. VBA for Mac has poor links to the operating suystem. In Windows, a programmer can easily make system calls to the OS. In macOS, the analogous system calls are not documented by either Apple or Microsoft. A few intrepid programmers have posted about macOS equivalents, but the information is sporadic and very hard to find. macOS’s built-in AppleScript can solve many of these issues, so I’m posting the best available Office AppleScript Reference.
This is old Microsoft documentation from 2008 that they’ve removed from their site. I don’t guarantee this, or offer support, I’m just posting it to make it available to interested programmers.
Office AppleScript Reference: MacScript vs AppleScriptTask
Ron de Bruin is a European programmer and MVP (Microsoft Valued Professional) who has written lots of good information about programming Office on a Mac. While he writes mostly about Excel, VBA is so similar across Office that most of the information also applies to Word and PowerPoint. Here’s his page on using the AppleScriptTask command in Office 2016 and later to call AppleScripts from a VBA macro: AppleScriptTask in Mac Office 2016 or higher.
Office AppleScript Reference: Conditional Compilation
To create a macro that can run on different versions of Office for Mac, or on both Windows and Mac, you’ll need to use conditional compilation. This uses #If – #Else – #End if statements to run a set of commands only in certain conditions. Here is Microsoft’s page on conditional statements for different Mac versions: Differentiate between Office for Mac versions at compile time. This MS reference page shows all available conditional compiler constants: Compiler constants.
Click here to download: Office AppleScript Reference.
Another useful reference for AppleScript automation of Office is the online article Moving from Microsoft Office VBA to AppleScript by Paul Berkowitz. This is a full-length book with comparisons between VBA and AppleScript, plus many real-world example scripts. It was originally published in 2007, in anticipation of Office 2008. Unfortunately, the downloadable PDF they promise is no longer available.
Text Effects? Don’t! – Best Practices
The Best Practice is to NOT use Text Effects in Office. Ever.
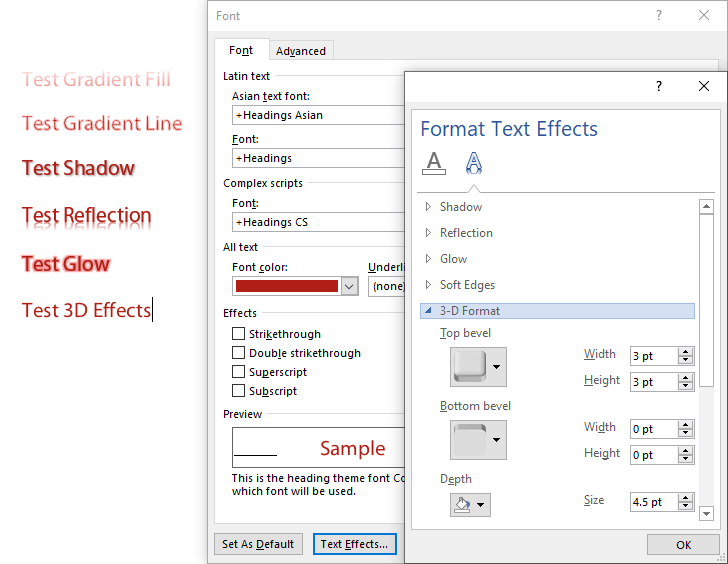
That could have been my shortest article ever, but I guess I should explain the reasons. I’m referring to the graduated fills and lines, the glows, reflections, shadows and 3-D effects you can add to text. In the past these effects have caused some problems with ordinary shapes, but with text, they’re a disaster.
Clearly, it’s not enough for most users that these effects are visually hideous. That just a natural result of the low value we assign to arts education. In many years of working with competent graphic artists, I’ve never been asked to create any template that uses these effects. Designers understand the need for restraint, users don’t. And so we get the appalling appearance of most Word and PowerPoint documents.
But the functional problem with these effects is how they affect PDFs created from Word, PowerPoint and Excel. Microsoft has no clue how to export true PostScript of the fancy effects. So they adopt a simplistic approach: flatten them to graphics. Unfortunately, this means the text vanishes, leaving behind only a pretty picture. Well, not even that. All kinds of PDF functions are impaired: Text to speech is impossible, accessibility goes right out the window, reimporting the PDF to Office is brain-dead.
I tested PDFs created in 3 ways: saving to PDF in Office, printing to Acrobat and printing to the Microsoft Print to PDF print driver that comes with Windows 10. When saving to PDF, all text with applied effects was flattened. When printing to either Acrobat or Microsoft Print to PDF, Gradient Fills, Gradient Lines and 3D Effects were flattened, while Shadows, Reflections and Glows remained as live text.
The moral is clear: when the client asks for Text Effects, just say NO!
Every AutoShape – Cool Code
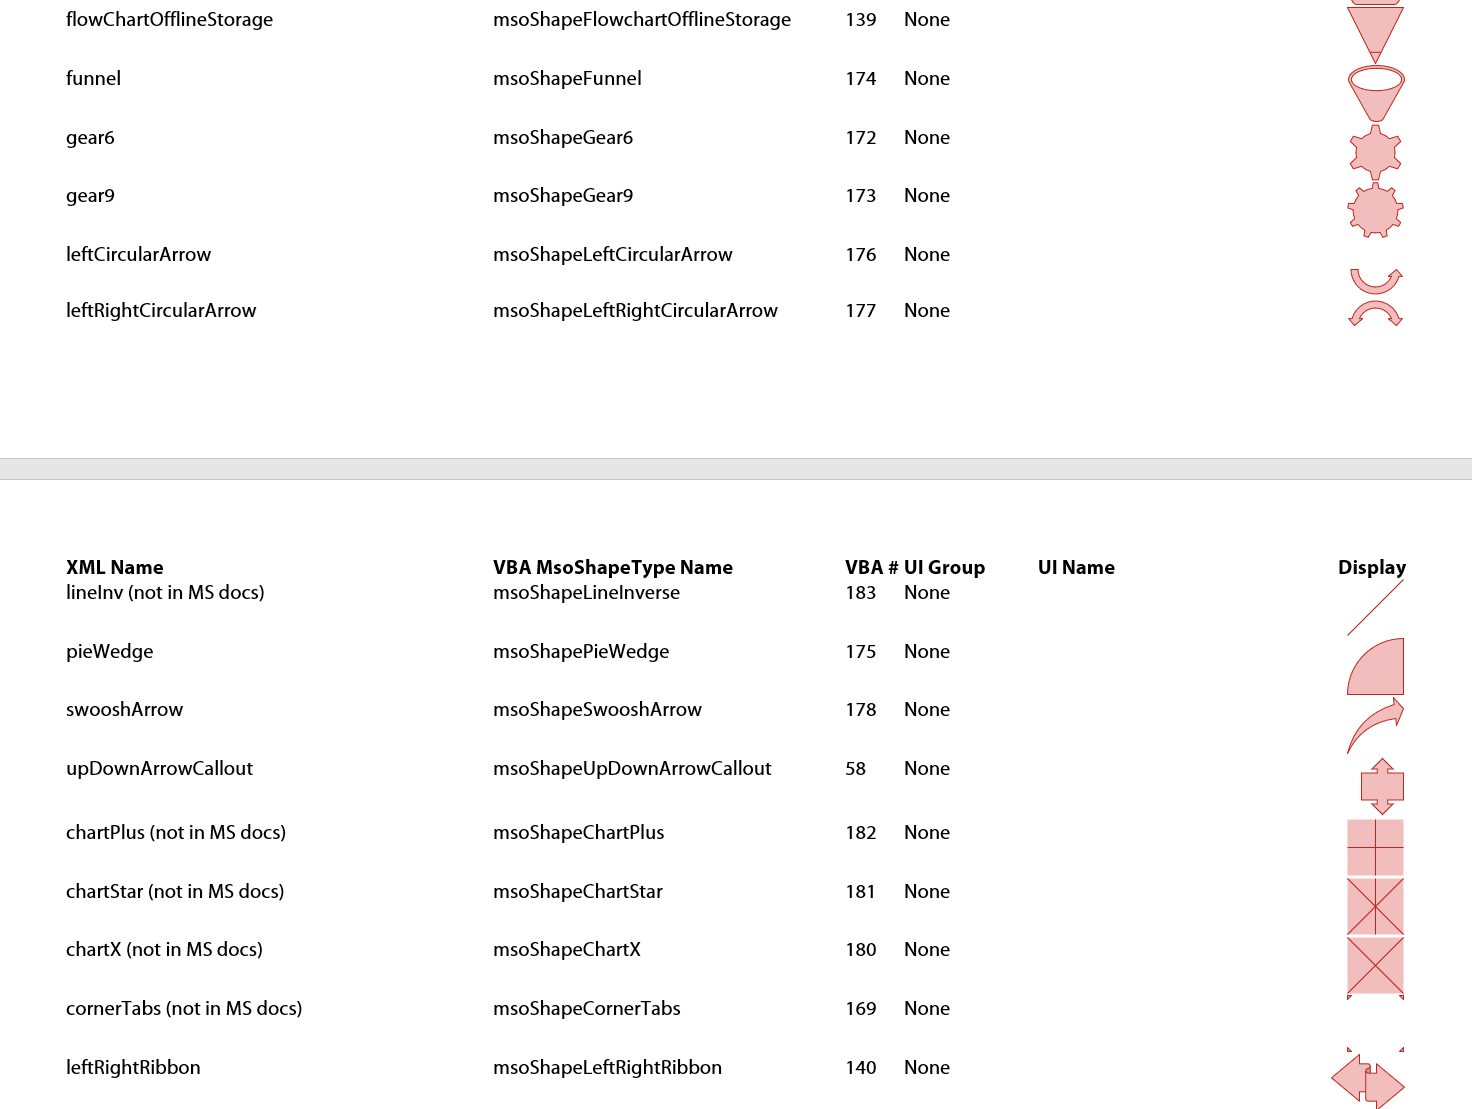
There are more AutoShapes in Office than appear in the user interface. Over time, Microsoft has quietly added to the collection stored in Office. Many of the more recent shapes are used in SmartArt files, while others have no current use that I can detect. But for anyone who hacks XML or codes VBA will find this week’s download or every autoshape a useful reference.
These are all the shapes that can be used in a piece of SmartArt. This is a deep topic: SmartArt XML is a programming language with a Frankenstein syntax. But the starting point for any language is to get the names right. SmartArt and VBA both reference the AutoShapes collection in Office, but they use different names for the same objects. Many of the same shapes are seen in the Shapes dropdown of Office programs, but those names are also different. The main source of the VBA names are from this page: MsoAutoShapeType enumeration (Office), while the XML names come from this out-of-date listing: SmartArt AutoShapes.
So, for my own sanity, I created a Word document showing an example of each shape, along with it’s name in XML, in VBA and in the user interface. This has smoothed out my workflow, and it may help you as well.
For any non-interface shapes, you can insert them into a document with code analogous to this. For PowerPoint:
Sub MakeShape()
  ActivePresentation.Slides(1).Shapes.AddShape msoShapeTrapezoid, 24, 24, 144, 144
End Sub
Change the bolded word to the shape name in the VBA MsoShapeType Name column.
Some shapes have specialized VBA commands, like callouts:
Sub MakeShape()
  ActivePresentation.Slides(1).Shapes.AddCallout msoCalloutTwo, 24, 24, 144, 144
End Sub
Callouts led me to a discovery about legacy versions. msoCalloutOne gives exactly the same result as msoCalloutTwo in current versions of Office.That seemed odd, so I ran the same macro in PowerPoint 2003 (I still have it installed for its macro recorder). In that version, msoCalloutOne creates a callout with a vertical leading line that can be moved up and down, but not at an angle. Presumably, MS found that useless and deprecated it.
Download the Word document showing every autoshape here.
OOXML Hacking: Open XML Explained
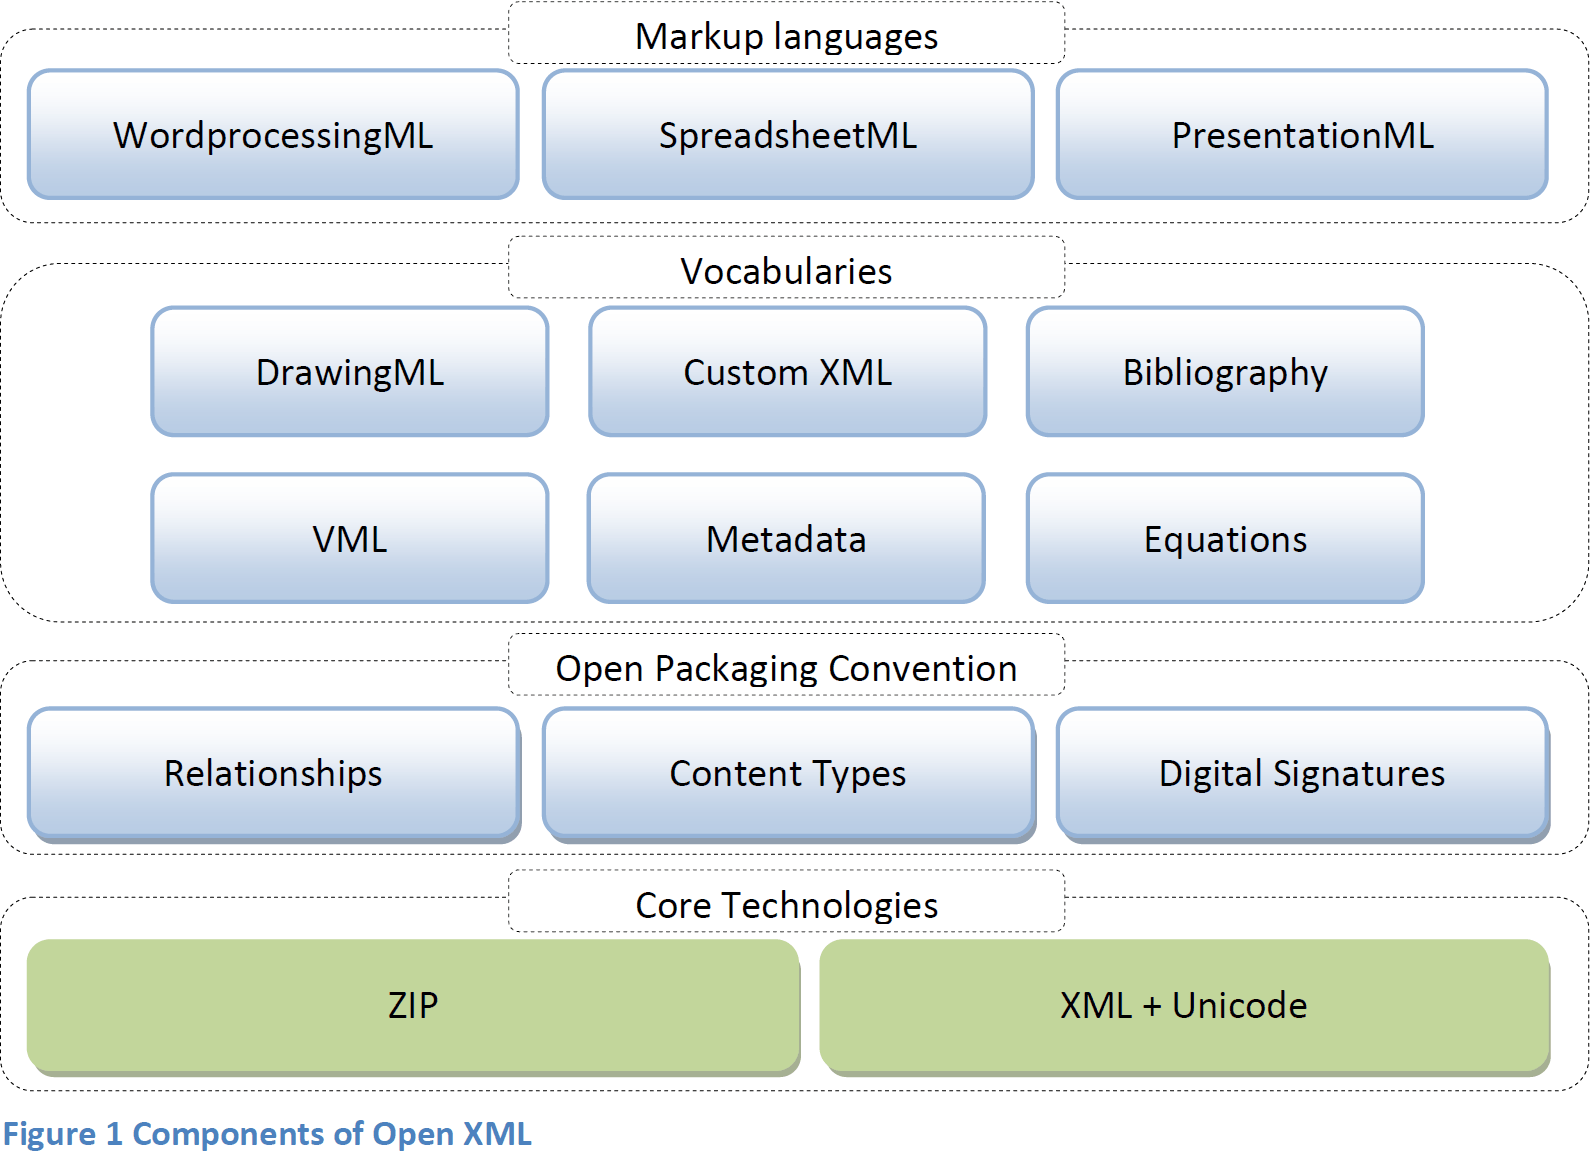
We’re proud to be hosting a free e-book Open XML Explained. Finding readable explanations of how Office Open XML works isn’t easy. Outside of the very dense published ECMA standards, most of the information exists only on the web in help pages and blog posts. Back in 2007, a developer in the Netherlands, Wouter van Vugt, published a well written PDF that goes into details about the XML formats used in Word, Excel and PowerPoint. This was originally posted on the openxmldeveloper.org website run by OOXML genius Eric White.
Eric’s site closed down some years ago and much of the content disappeared. But I’ve been able to track down a copy of Wouter’s book and have his permission to give it a new home here at Brandwares. Download Open XML Explained.
The e-book covers Excel, Word and PowerPoint in depth, covering otherwise obscure topics like table formatting, bullets and charts. It’s an excellent companion to my book, covering the theory behind my practical techniques. OOXML hackers will appreciate the explanations of all the major XML parts in an Office file, while coders will find this a useful resource in learning how to programmatically create and modify documents, workbooks and presentations.
I should note that Open XML Explained was written in 2007, so while it covers all the OOXML basics, it doesn’t have any information about newer features like the Backstage or SuperThemes. Reader David Wiggins was kind enough to find the sample files that accomapied the book. The download page has a link to them as well. Enjoy!
OOXML Hacking: Buy the Book
SOLD OUT! The paper copies of the book are all gone, but the ebook version (with an additional 40 pages of new content) is available here.
After years of original research, you can finally buy the book! Filled with unique information not found anywhere else, online or in print, this manual shows you how to build SuperThemes 3 different ways, how to create custom Effects Themes, how to edit the Ribbon in macOS, and much more!
The book expands on many of the brief articles on this site, putting them in logical order and expanding the number of examples. Author John Korchok explains how Office Open XML files work, shows you where to find each XML part and how each part can be modified. With these tools, you can provide unique services to your clients or users that you can’t find at the average Office template service bureau. To give you a better idea of what it covers, here is the Table of Contents:
All techniques are covered in both Windows and macOS. The book includes a link to a downloadable text file with all the hyperlinks, XML and VBA listings, so you don’t have to retype anything from the printed page. At this time, only print copies are available, ebook versions will be here in several months. To buy the book, click here.
Uniform Rounded Corners – Cool Code
A client sent a design for a Word template that had lots of boxes and photos with uniform rounded corners. Not an unreasonable request, but Office doesn’t do that well. In PowerPoint, Word and Excel, rounded corners are proportional to the size of the shape. Making them uniform manually is picky and time-consuming. But with a dash of VBA, we can make the job easy.
The Math
As a round-cornered shape gets larger, the corner radius increases as well, in proportion to the length of the shortest side of the shape. Since we want to keep the radius the same size, we need to create a formula that makes a smaller number as the shorter side increases. We need an inverse number! We can create this by dividing the preferred corner radius by the short side size. And you thought you’d never need that high school math!
Here’s VBA code that will work in Excel, Word and PowerPoint on selected round-cornered boxes. Thanks to the Rembrandt Kuipers and Ernst Mathys who have commented below, this macro has been improved since it was originally published. Replace the number after sngRadius with your desired radius size in points.
Sub RoundedCornersFixedRadius()
    Dim oShape As Shape
    Dim sngRadius As Single
    sngRadius = 8.50394 'Radius size in points. 8.50394pt is equal to 3mm.

    For Each oShape In ActiveWindow.Selection.ShapeRange
        With oShape
            If .AutoShapeType = msoShapeRoundedRectangle Then
                LengthOfShortSide = IIf(.Width > .Height, .Height, .Width)
                .Adjustments(1) = sngRadius / LengthOfShortSide
            End If
        End With
    Next oShape
End Sub
To set rounded corners on a PowerPoint placeholder, open Slide Master view, select the placeholder and run the above macro.
Uniform Rounded Corners for the Whole Document
To run this on a whole presentation, document or workbook, we need to customize the routine for each Office program. Here’s the Excel version:
Sub RoundAllXLCorners()
    Dim oWorksheet As Worksheet, oShape As Shape, sngRadius As Single
    sngRadius = 8.50394 'Radius size in points.

    For Each oWorksheet In ActiveWorkbook.Worksheets
        For Each oShape In oWorksheet.Shapes
            With oShape
                If .AutoShapeType = msoShapeRoundedRectangle Then
                    LengthOfShortSide = IIf(.Width > .Height, .Height, .Width)
                    .Adjustments(1) = sngRadius / LengthOfShortSide
                End If
            End With
        Next oShape
    Next oWorksheet
End Sub
To do the same in PowerPoint
Sub RoundAllPPCorners()
    Dim oSlide As Slide, oShape As Shape, sngRadius As Single
    sngRadius = 8.50394 'Radius size in points.

    For Each oSlide In ActivePresentation.Slides
        For Each oShape In oSlide.Shapes
            With oShape
                If .AutoShapeType = msoShapeRoundedRectangle Then
                    LengthOfShortSide = IIf(.Width > .Height, .Height, .Width)
                    .Adjustments(1) = sngRadius / LengthOfShortSide
                End If
            End With
        Next oShape
    Next oSlide
End Sub
And finally, for Word
Sub RoundAllWDCorners()
    Dim oShape As Shape, sngRadius As Single
    sngRadius = 8.50394 'Radius size in points.

    For Each oShape In ActiveDocument.Shapes
        With oShape
            If .AutoShapeType = msoShapeRoundedRectangle Then
                LengthOfShortSide = IIf(.Width > .Height, .Height, .Width)
                .Adjustments(1) = sngRadius / LengthOfShortSide
            End If
        End With
    Next oShape
End Sub

The Word version is a little simpler because a Word document is one big object, while Excel and PowerPoint both have multiple objects for each worksheet and slide, respectively. But the similarites point out that when you’re searching online for VBA code, finding something for a different program and modifying it can be a huge time-saver. By far, Excel has way more code written for it, so Excel VBA sites can be a fruitful source for Word and PowerPoint code ideas.

These macros have been tested under both Windows and macOS and work well under both.
To use these macros with other shapes, please see my article Every AutoShape – Cool Code for a downloadable reference file showing all AutoShapes along with their XML and VBA names. Then replace msoShapeRoundedRectangle with the mso shape name you need.
Content Controls for macOS – Cool Code
June 2023 Update: I’ve created a VBA add-in for Word for Mac that allows you to more easily add Content Controls in Word documents, with an interface similar to the Windows version. I’m looking for beta testers for this add-in. If you have time to test, please email me (my address is in the Meet the Author sidebar).
Content Controls are an improved form of fillable form field, but the Word for Mac user interface doesn’t include Content Controls for macOS. I show you how to sidestep this limitation to be able to create superior fillable forms.
Microsoft Word for Windows has three different types of fields to use for fillable forms. The oldest of these are Legacy Form Fields, which exist in every version of Word, Windows and Mac, but not DOS, back to the dawn of time. Legacy form fields require the document to be protected for forms, which closes down many formatting options even on unprotected sections. These are the only form fields available in the Mac program interface. Windows version also have ActiveX controls. These generally have a crude appearance. They don’t work at all on Mac versions of Word.
Finally, we have the newest type of form fields, Content Controls. These were introduced on Windows in Word 2007. The collection of controls was expanded a little in 2010 and a little more in 2013. Word 2008 and 2011 can’t use or create them, but in Word 2016 for Mac, the program started honoring Content Controls created in Windows, so they work as expected on both platforms. Unfortunately, the tools to add and modify them are still not in the program.
Please note: A known error occurs if you try to insert a Content Control into an old Word file in .doc format. You’ll see an error like Run-time error 445: Object doesn’t support this action. Update the file to .docx format to fix the issue.
Content Controls for macOS: What Are They?
While Legacy Form Fields have only 3 types (Text field, Checkbox and Dropdown), there are 9 (or 10, depending on how you count) types of Content Controls. Here’s a look at each type:
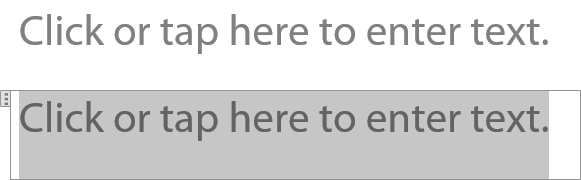
These look identical on the screen. The screen shot shows what they look like unselected (top) and selected (bottom). The Plain Text control is most similar to the Legacy Text form field. All the text has the same formatting and you can’t include other types of content other than text. By comparision, the Rich Text control allows selected text to be bold or italic or a different font. You can insert tables and pictures and even other Content Controls into Rich Text controls.
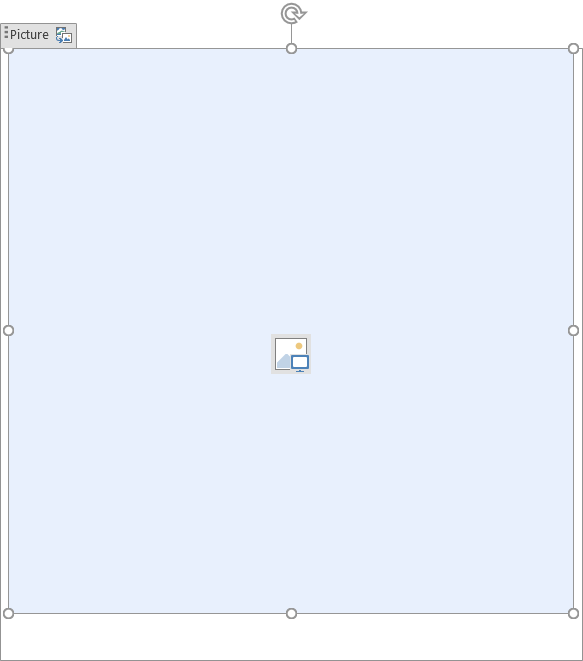
Finally! A true picture placeholder for Word! The picture can be set when the control is created. There are options to allow the user to replace it or not. Or it can be left blank (as shown) for the user to add a picture later. You can change the shape from a square using Picture Format>Picture Styles. This choice can also add a soft edge or other visual effects to a photo that the user inserts later.
It’s worth noting that Picture Content Controls only work as inline pictures. To float them and wrap text around them, you need to place the CC in a table cell or frame or some other object that allows text wrapping. These controls come in at 2″ square, but you can set numeric dimensions on the Picture Format tab. (Thanks to Timothy Rylatt for the tips!)
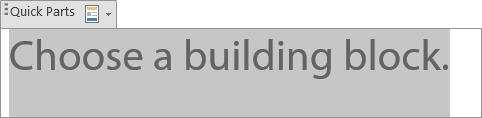
This is the only Content Control that doesn’t work yet on a Mac. While Building Blocks in the Windows version of Word is the same technology as AutoText on the Mac, Microsoft hasn’t gone the extra mile to make it work on a Mac. The macro further down the page sets the control to work with AutoText (as you almost always should if your template is being distributed to others). But when you click on the control’s AutoText tab, a dropdown list of AutoText entries doesn’t appear like it does in the Windows version.
At least if your Windows client needs it in their template, you can create it on a Mac. AutoText works by grabbing content from the active document’s attached template. If you’re sending a template with AutoText content, the Content Control will find that. If you’re sending a document instead of a template, the Content Control will grab AutoText from the user’s Normal.dotm file.

Similar to the Legacy Check Box form field, but with the added advantage that the filled symbol can be set to other symbols than an X. This control was added in Word 2010, so don’t include one for a client using 2007.
But still no radio buttons? Give me a break, Microsoft! Using elaborate VBA kludges, it’s possible to make a set of checkboxes operate like radio buttons with both Legacy and Content Control versions. But it shouldn’t be so hard!
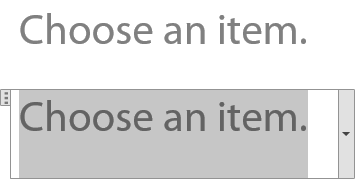
Another similar pair of controls. The Drop-Down is most similar to the Legacy Drop-Down (which MS often refers to as a Combo Box, just to confuse everyone). The Drop-Down restricts users to choosing an item on the list, while a Combo Box allows a user to enter a value that is not on the list.
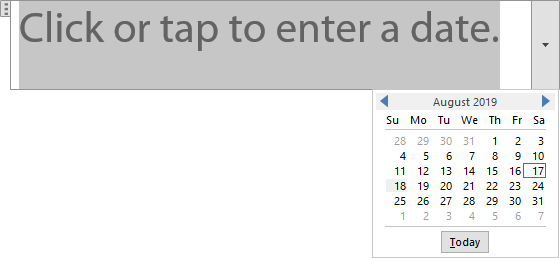
While Legacy Text fields have a date option, it’s only to enforce date formatting after a user tries to enter a date. The Date Picker Content Control is way cooler, it’s pops a little calendar for the user to choose a date visually. Handy!
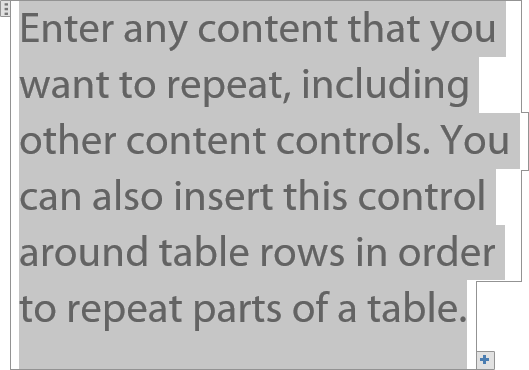
…And the prize for longest prompt text goes to this control. Added to Word 2013, so it won’t work for 2007 and 2010 clients. Clicking on the plus sign in the bottom right corner duplicates the content. There are already a couple of ways to do this, so I think this is strictly for user convenience. Unlike the others, this control spans the page by default, probably because of the long prompt.
No screen capture for this one, because it’s more of an operation than a control. Applying this to a selected set of Content Controls will group them together, so they can be copied as a unit. You can’t include a Rich Text control, which can also be used as a group. If you select controls, then get an error when grouping that a control is “partially covered”, it will usually be about the topmost control. Add a carriage return before, include it when you select, then run the Group macro.
Simple Controls from Keyboard shortcuts
Fortunately, the VBA object model for Word 2016 and 2019 for Mac includes Content Controls. If you’re creating forms for your own use, there is a simple way to create basic Content Controls on your Mac:
- In Word, choose Tools>Customize Keyboard
- Scroll Categories and pick All Commands
- Scroll Commands and pick ContentControlCheckBox
- Click inside the Press new keyboard shortcut field and type a key combination. Word will inform you if that combination is already in use. If there is no conflict, or an insignificant conflict, click on the Assign button. Finally, click on OK. The Control key is a good modifier, because all existing keyboard shortcuts with Control are duplicates of ones that also use the Command key.
- Click on your document where you would like to see a checkbox, then use the keyboard shortcut. Viola! Instant checkbox!
Repeat the steps for the other Content Control commands. It’s not a bad idea to make a sample document with Content Controls and their shortcuts, for later reference. BTW, keyboard shortcuts are the only customization that can access Content Controls. Equivalent commands for the QAT and Ribbon haven’t been added as of this writing.
Content Controls for macOS: Complex Controls for Clients
The keyboard shortcuts are fine for plain vanilla controls. But they’re so basic, some are useless. Sure you can insert a Drop-Down or Combo Box, but they don’t have any items in the list and there’s no easy way to add them. What we need is more fine-grained control so we can set all the same options that a Windows user can. This is possible by inserting them using VBA.
If you never used macros in Word, start by making the Developer tab visible on the Ribbon. Choose Word>Preferences>View and check Show developer tab. The tab becomes visible when you close the Prefs panel.
On the Developer tab, click on the Visual Basic button (Word doesn’t run Visual Basic, but a very similar language called Visual Basic for Applications. This is VBA, not VB, but why would MS care about an accurate button title?). The VBA Editor opens. In the top left corner is a windows called Projects. If you have a fresh installation, you’ll only see Normal here. If you have Add-ins installed, there will be other project names. Select Normal.
From the macOS menu, choose Insert>Module. Call it ContentControls. A new module page is opened where you can insert macro code. Copy and paste the following code onto that page:
Sub AddRichTextCC()
  Dim oCC As ContentControl
  Set oCC = ActiveDocument.ContentControls.Add(wdContentControlRichText, Selection.Range)
  Set oCC = Nothing
End Sub

Sub AddPlainTextCC()
  Dim oCC As ContentControl
  Set oCC = ActiveDocument.ContentControls.Add(wdContentControlText, Selection.Range)
  With oCC
    .MultiLine = True
  End With
  Set oCC = Nothing
End Sub

Sub AddPictureCC()
  Dim oCC As ContentControl
  Set oCC = ActiveDocument.ContentControls.Add(wdContentControlPicture, Selection.Range)
  Set oCC = Nothing
End Sub

Sub AddBuildingBlockCC()
  Dim oCC As ContentControl
  Set oCC = ActiveDocument.ContentControls.Add(wdContentControlBuildingBlockGallery, Selection.Range)
  With oCC
    .BuildingBlockType = wdTypeAutoText
    .BuildingBlockCategory = "General"
  End With
  Set oCC = Nothing
End Sub
Sub AddCheckBoxCC()
  Dim oCC As ContentControl
  Set oCC = ActiveDocument.ContentControls.Add(wdContentControlCheckBox, Selection.Range)
  With oCC
    .Checked = False
    .SetCheckedSymbol CharacterNumber:=&HFE, Font:="Wingdings"
    .SetUncheckedSymbol CharacterNumber:=&HA8, Font:="Wingdings"
  End With
  Set oCC = Nothing
End Sub

Sub AddComboBoxCC()
  Dim oCC As ContentControl
  Set oCC = ActiveDocument.ContentControls.Add(wdContentControlComboBox, Selection.Range)
  With oCC
    .DropdownListEntries.Add "Choose an item.", value:=""
    .DropdownListEntries.Add "Item 1"
    .DropdownListEntries.Add "Item 2"
  End With
  Set oCC = Nothing
End Sub

Sub AddDropDownCC()
  Dim oCC As ContentControl
  Set oCC = ActiveDocument.ContentControls.Add(wdContentControlDropdownList, Selection.Range)
  With oCC
    .DropdownListEntries.Add "Choose an item.", value:=""
    .DropdownListEntries.Add "Item 1"
    .DropdownListEntries.Add "Item 2"
  End With
  Set oCC = Nothing
End Sub
Sub AddDatePickerCC()
  Dim oCC As ContentControl
  Set oCC = ActiveDocument.ContentControls.Add(wdContentControlDate, Selection.Range)
  With oCC
    .DateDisplayFormat = "MMMM d, yyyy"
    .DateDisplayLocale = wdEnglishUS
    .DateCalendarType = wdCalendarWestern
  End With
  Set oCC = Nothing
End Sub

Sub AddRepeatingSectionCC()
  Dim oCC As ContentControl
  Set oCC = ActiveDocument.ContentControls.Add(wdContentControlRepeatingSection, Selection.Range)
  With oCC
    .AllowInsertDeleteSection = True
    .RepeatingSectionItemTitle = "Repeating Section Item"
  End With
  Set oCC = Nothing
End Sub

Sub AddGroupCC()
  Dim oCC As ContentControl
  Set oCC = ActiveDocument.ContentControls.Add(wdContentControlGroup, Selection.Range)
  Set oCC = Nothing
End Sub
Use the Tools>Customize Keyboard command to assign these macros keyboard shortcuts. You can also add them to the Quick Access Toolbar. If you subscribe to Office 365 or have Office 2019, you can also add them to the Ribbon.
If you take a close look at the code, you’ll see there are additional lines on some that allow you to set options for that type of control. As one example, the Date Picker includes options for the calendar type, date format and date language. In use, you would alter these options to suit the client, then run the macro to add a control with those options set.
Content Controls for macOS: Setting the Options
Here’s where you can really customize the Content Controls. These are generic options that can be set for all Content Controls. Rather than bulk up each individual macro, here’s one macro to set the extra options. Set the options in code, select a Content Control that you’ve already inserted, then run the macro. If you’re inserting many controls that have a common setting, like .LockControl = True, add that line to the code for inserting the control to avoid extra steps.
Sub SetOptions()
  If Selection.Information(wdInContentControl) Then
    With Selection.ParentContentControl
      'Sets the appearance to the original bounding box look. For the newer tags look, use wdContentControlTags
      'If you don't need to change a setting, comment it out before running the macro
      .Appearance = wdContentControlBoundingBox

      'Sets the color of the control to a preset color
      .Color = wdColorWhite

      'Sets the Word Character style to use for the text formatting. This will fail if you use a Paragraph style or forget to create the style before running this. This does _not_ change the placeholder text appearance, just the entered text that replaces it.
      .DefaultTextStyle = "Big"

      'Sets whether the Content Control can be deleted or not. If the control has had .Temporary = True applied, you must reverse that property to True before applying this.
      .LockContentControl = True

      'Sets whether the contents of the Content Control can be deleted or not.
      .LockContents = False

      'Sets the placeholder text or prompt for the control
      .SetPlaceholderText , , "Default Text"

      'Sets the Content Control tag property
      .Tag = "Tag"

      'If this is set to true, the Content Control will be removed when the contents are edited.
      .Temporary = False

      'Sets the title of the Content Control. This appears on a tab above the control when it is activated.
      .Title = "Title"
    End With
  Else
    MsgBox "Please select a Content Control to change its options."
  End If
End Sub
Perhaps you need to create a date picker in a different language. Starting with the macro above for U.S. English dates, you can modify it to create a French date picker:
Sub AddFrenchDatePickerCC()
  Dim oCC As ContentControl
  Set oCC = ActiveDocument.ContentControls.Add(wdContentControlDate, Selection.Range)
  With oCC
    .DateCalendarType = wdCalendarWestern
    .DateDisplayFormat = "d MMMM yyyy"
    .DateDisplayLocale = wdFrench
  End With
  Set oCC = Nothing
End Sub
Utility Macros
The following macros perform essential functions that may only be occasionally required. First, a pair to toggle all Content Controls between the older Bounding Box appearance and the newer Tags look. The only control that currently displays as a tag in macOS is the Group Content Control. All others appear as plain text in a mysterious field. As a consequence, don’t use this setting for forms to be used on a Mac. Save it for Windows clients:
Sub BoundingBoxAppearance() 'Sets all Content Controls in the document to a bounding box appearance
  Dim oCC As ContentControl
  For Each oCC In ActiveDocument.ContentControls
    oCC.Appearance = wdContentControlBoundingBox
  Next oCC
  Set oCC = Nothing
End Sub

Sub TagAppearance() 'Sets all Content Controls in the document to the tag appearance.
  Dim oCC As ContentControl
  For Each oCC In ActiveDocument.ContentControls
    oCC.Appearance = wdContentControlTags
  Next oCC
  Set oCC = Nothing
End Sub
This macro deletes the existing list of a Combo Box or Drop-Down and replaces it with a new list.
Sub ReviseComboBoxOrDropDownList()
  If Selection.Information(wdInContentControl) Then
    If Selection.ParentContentControl.Type = wdContentControlComboBox Or Selection.ParentContentControl.Type = wdContentControlDropdownList Then
      With Selection.ParentContentControl
        .DropdownListEntries.Clear
        .DropdownListEntries.Add "Choose an item.", value:=""
        .DropdownListEntries.Add Text:="List Item 1", value:="1"
        .DropdownListEntries.Add Text:="List Item 2", value:="2"
      End With
    End If
  Else
    MsgBox "Please select a Combo Box or Drop-Down Content Control to change its list."
  End If
End Sub
Finally, one to ungroup a Group Content Control. Switch to Tag view to see Groups, they’re invisble in Bounding Box view. Don’t try to select all group items before ungrouping, it will generate an error. Instead, single-click anywhere inside the group:
Sub UnGroupCC() 'Ungroups a group control
  If Selection.Information(wdInContentControl) Then
    Selection.ParentContentControl.Ungroup
  End If
End Sub
For more in-depth reference on these macros, please see Microsoft’s documentation.
Now you’re equipped to send your client top-quality fillable forms with the latest technology. So when your client asks if you can create Content Controls, instead of saying “Huh?”, you can reply confidently “No problem!”
Shared Workgroup Templates – Best Practices
Groups of workers usually use the same templates. But it can be time-consuming to keep everyone updated when templates are installed separately on each desktop. Instead, you can implement shared workgroup templates with a feature already built into Office.
Shared Workgroup Templates – Multiple Uses
Every desktop version of Office, Mac and Windows, includes a Workgroup templates option that allows you to set a network share as a templates folder. Templates on this share are instantly available to all users, making updates and revisions a breeze. Automatically, everyone in the office is using the same version. As long as template names remain identical, then old Word documents automatically attach themselves to the new template.
While you can only set the Workgroup Templates location in Word, once you make the change there, it also applies to PowerPoint and Excel.
The Workgroup templates network share can serve more that just templates. With some additional subfolders, it can be a source for Document Themes, including custom SuperThemes, it can hold collection of Font and Color themes. These additional files don’t show in the File>New dialog. Theme files display under the Themes dropdown, theme colors under the Colors dropdown and theme fonts under the Fonts dropdown.
Shared Workgroup Templates – Setup
To set up shared workgroup templates, first create the network location and ensure it’s accessible to all in the office without a signin. Each computer should connect to the share automatically on restart, so users don’t have to remember to manually connect before creating a new document. Create subfolders with the following names for othe file types you want to support. Document Themes for themes, with subfolders for Theme Colors and Theme Fonts. All versions of Office expect exactly the same file structure.
If the office uses Group Policies to install and configure software, you can use that feature to add the Workgroup Template location to each user installation. If you’re using “sneakernet” for configuration, here’s how to do it manually. All Office suites use a setting in Word to set the location for all the other programs
Office 2010, 2013, 2016 and 2019 for Windows
- In Word, choose File>Options>Advanced.
- Scroll down to the General section of Advanced and click on the File Locations… button.
- Select the Workgroup templates line, then click on the Modify button.
- In the dialog that opens, enter the path to the network share in the Folder name field, or use the window controls to navigate to the folder. Select the folder and click on OK. OK all the way out and close Word
Office 2007 for Windows
- In Word, click on the Office button, then on Word Options, then on Advanced..
- Scroll down to the General section of Advanced and click on the File Locations… button.
- Select the Workgroup templates line, then click on the Modify button.
- In the dialog that opens, enter the path to the network share in the Folder name field, or use the window controls to navigate to the folder. Select the folder and click on OK. OK all the way out and close Word.
Office 2003 and earlier for Windows
- In Word, choose Tools>Options and click on the File Locations tab.
- Select the Workgroup templates line, then click on the Modify button.
- In the dialog that opens, enter the path to the network share in the Folder name field, or use the window controls to navigate to the folder. Select the folder and click on OK. OK all the way out and close Word.
Office 2016 and 2019 for Mac
- In Word, choose Word>Preferences>File Locations.
- Select the Workgroup templates line, then click on the Modify button.
- In the dialog that opens, use the window controls to navigate to the folder. Select the folder and click on Open. OK out and close Word
Office 2011 and earlier for Mac
- In Word, choose Word>Preferences>File Locations.
- Select the Workgroup templates line, then click on the Modify button.
- In the dialog that opens, use the window controls to navigate to the folder. Select the folder and click on Choose. OK out and close Word
Shared Workgroup Templates in Use
Here’s how to access Workgroup templates in Office programs
Office 2016 and 2019 for Windows
- Choose File>New.
- Click on Custom.
- Click on Workgroup Templates, select a template, then click on Create.
Office 2013 for Windows
- Choose FILE>New.
- Click on SHARED.
- Click on a template.
Office 2010 for Windows
- Choose File>New>My Templates.
- On the Personal Templates tab, select a template, then click on OK. This tab also shows local templates on the user’s computer.
Office 2007 for Windows
- Click on the Office button, then on New.
- Click on My templates…
- Select the My Templates tab. Workgroup templates are displayed along with local templates in the same pane.
Office 2003 and earlier for Windows
- Click on File>New. The New Document pane opens at the side of the window.
- On the New Document pane, click on On my computer…
- Select a template from the General pane and click on OK. This pane shows a mix of local and workgroup templates.
Office 2016 and 2019 for Mac
- Choose File>New from Template…. The Document Gallery opens
- In the upper left corner, click on the Work link. This link only appears when you have a Workgroup Templates location set in Preferences.
- Select a template, then click on Create.
Office 2011 for Mac
- Choose File>New from Template. The Document Gallery opens.
- Click on Workgroup Templates in the left-hand TEMPLATES list..
- Select a template and click on Choose.
Office 2008 for Mac
- Choose File>Project Gallery. The Project Gallery opens.
- Click on My Templates in the left-hand Category list..
- Select a template and click on Open. This window will show a mix of Workgroup and local templates.
Shared Workgroup Templates – Shortcomings
In addition to templates and themes, a local templates folder also serves custom Chart and SmartArt templates. Neither of these formats is supported by Workgroup Templates, so those templates must still be installed locally on each user’s computer.
The Flat Theme – Best Practices

I’m writing an article or two about Office Effects Themes and how you can modify them. As an example, I created the Brandwares Flat Theme, which will be of use to designers as is. This theme file gets rid of the bulgy 3-D shapes, glows and hokey shadows of the standard Microsoft themes and relies only on tints, shades and outline variations. You can use this example in 2 ways: as a theme file that you can modify and send as your own, and as an Effects Theme file that can be installed in Office for Windows to provide access to flat shapes in all other themes.
Here you can download the Flat Theme. It’s also available on our Downloads page. After downloading, you can open it in PowerPoint, create new font and color themes, apply them, then resave as a new theme. The flat shapes will travel with the theme and be automatically applied to any deck that uses the theme. If you’re an Office for Mac user, you’ll have to create a font theme using this article: XML Hacking: Font Themes.
The Flat Theme – Specs
There are 7 variants in each row of the the Shape Styles dialog, each showing the dk1 color as a background plus the 6 Accent colors. The first 2 rows feature a 0.5pt outline on the shape in a darker variant of the accent color, with the first row showing a white shape background and the second row the relevant accent color.
The third row is the one I choose most of the time: a flat shape with no outline.
The fourth row has a 50% screened-back background color with black text.
The fills for the 5th and 6th rows are 2 progressively darker shades of the accent colors. The 5th row shows a 50% shade of the color, while the 6th is a two-layer multiplier fill with a 50% shade overlaying a 50% tint. I’ve written at length about effects themes and their construction in my book about OOXML Hacking.
Users of Office 2016 for Windows and for Mac will see an additional group of Presets below the theme shape styles. Except for the stroke weight in row 2, these fills are generated automatically by the program and cannot be modified by XML.
The Flat Theme – Installing as Effects Theme
You can also use the Flat Theme as a new effects theme in Windows versions of Excel, PowerPoint or Word (Office for Mac will display effects themes embedded in a theme or template, but there is no support in the program interface for applying a different effects theme). Then it will appear in the Theme Effects dropdown of Office for Windows along with the standard Microsoft themes. Here are the steps to do that:
- Download the Flat Theme from the link above and unzip it.
- Change the file name from BrandwaresFlatShapes.thmx to Flat.eftx. The first part of the name can be something other than Flat, but the ending must be .eftx. No other change to the theme file is needed.
- Close all Office programs.
- Copy the file to the same folder as the Microsoft Theme Effects files:
32-bit Office 2007: C:\Program Files (x86)\Microsoft Office\Document Themes 12\Theme Effects
64-bit Office 2007: C:\Program Files\Microsoft Office\Document Themes 12\Theme Effects
32-bit Office 2010: C:\Program Files (x86)\Microsoft Office\Document Themes 14\Theme Effects
64-bit Office 2010: C:\Program Files\Microsoft Office\Document Themes 14\Theme Effects
32-bit Office 2013: C:\Program Files (x86)\Microsoft Office\root\Document Themes 15\Theme Effects
64-bit Office 2013: C:\Program Files\Microsoft Office\root\Document Themes 15\Theme Effects
32-bit Office 2016, 2019, 2021 and Microsoft 365: C:\Program Files (x86)\Microsoft Office\root\Document Themes 16\Theme Effects
64-bit Office 2016, 2019, 2021 and Microsoft 365: C:\Program Files\Microsoft Office\root\Document Themes 16\Theme Effects
With Office 2013 and 2016, there may not be a root folder, but then the Document Themes folder will be inside Microsoft Office, eliminating one level.
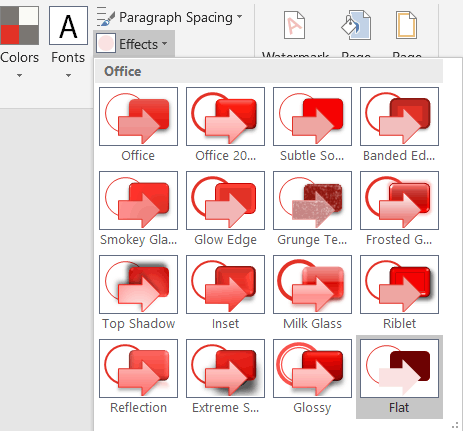
Restart an Office program and you’ll see a new addition to the Effects dropdown:
Please note, repairing Office in Windows will normally delete all non-Microsoft effects themes, so re-installation will be necessary.

