Lines or rules on a PowerPoint design are such a pain. If you place a simple line shape on a slide layout, it is static content. A slide made from that layout will show the line, but it will not be editable or deletable. So most presentation designers use sample slides that have rules added, so they can be moved or deleted. Clunky! If only there was a way to create editable lines on layouts…
Editable Lines on Layouts – Cool code
Manually Adding Editable Lines on Layouts
This article came from an email I received from Jacob Liao, who sent a sample showing a rule placed on the layout that could be changed on the slide created from that layout. Here are the steps to create this effect using only the user interface in PowerPoint:
- On the slide layout, create a new placeholder using Slide Master>Insert Placeholder. You could use any type, but I tend to use Media placeholders, since they don’t pull in photos that are added to a slide. As a convenience, make the placeholder the width (or height) of the rule that is to appear.
- Format the placeholder with a border matching the line or rule you want, giving it the correct color and rule width. Delete the default placeholder text and any bullet.
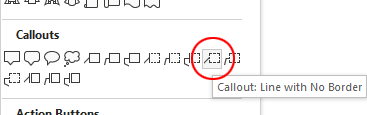
- With the placeholder still selected, choose Shape Format>Edit Shape>Change Shape and choose Callout: Line with No Border.

The placeholder border disappears, but the callout line appears beside the shape, formatted with the shape’s border color and weight. - Drag each end of the callout line to align with the edge of the placeholder. This can be a bit fiddly to get it exact.
- Give the placeholder a fill of No Fill and set the height (or width, for a vertical rule) to 0.
- Close the Slide Master view, create a new slide from the layout and test your new editable line.
Adding Horizontal Editable Lines on Layouts with VBA
You can really speed up this process by creating these rules with macros. For horizontal rules, start by adding a placeholder that is the width of the rule, with the top edge of the placeholder where the rule should be placed. With the placeholder selected, run this macro:
Sub EditableHorizontalLine()
    Dim oShape As shape

    For Each oShape In ActiveWindow.Selection.ShapeRange
        With oShape
            With .Fill
                .Visible = msoFalse
                .Transparency = 1#
            End With
            .AutoShapeType = msoShapeLineCallout2NoBorder
            .Adjustments(1) = 0
            .Adjustments(2) = 0
            .Adjustments(3) = 0
            .Adjustments(4) = 1
            .Height = 0
						.Decorative = msoTrue
        End With
    Next oShape
End Sub
Adding Editable Vertical Rules with VBA
It’s much the same for vertical rules. Create a placeholder that is the same height as the rule will be, with the left edge of the placeholder at the rule position. With the placeholder selected, run this macro:
Sub EditableVerticalLine()
    Dim oShape As shape

    For Each oShape In ActiveWindow.Selection.ShapeRange
        With oShape
            With .Fill
                .Visible = msoFalse
                .Transparency = 1#
            End With
            .AutoShapeType = msoShapeLineCallout2NoBorder
            .Adjustments(1) = 1
            .Adjustments(2) = 0
            .Adjustments(3) = 0
            .Adjustments(4) = 0
            .Width = 0
						.Decorative = msoTrue
        End With
    Next oShape
End Sub
Doug Popovich wrote about the code above, asking if there was a way to mark the shape as decorative, since it contains no text. So I added the line .Decorative – msoTrue, which does exactly that, saving you the trouble of manually marking the line in accessible decks.
Editable lines on layouts separate you from the competition. If any of this seems too complex, Brandwares is here to help. Message me to consult on your most demanding presentation issues.