OOXML Hacking: Buy the Book

SOLD OUT! The paper copies of the book are all gone, but the ebook version (with an additional 40 pages of new content) is available here.

After years of original research, you can finally buy the book! Filled with unique information not found anywhere else, online or in print, this manual shows you how to build SuperThemes 3 different ways, how to create custom Effects Themes, how to edit the Ribbon in macOS, and much more!

OOXML Hacking: buy the book

The book expands on many of the brief articles on this site, putting them in logical order and expanding the number of examples. Author John Korchok explains how Office Open XML files work, shows you where to find each XML part and how each part can be modified. With these tools, you can provide unique services to your clients or users that you can’t find at the average Office template service bureau. To give you a better idea of what it covers, here is the Table of Contents:

Table of Contents 1
Table of Contents 2
Table of Contents 3

All techniques are covered in both Windows and macOS. The book includes a link to a downloadable text file with all the hyperlinks, XML and VBA listings, so you don’t have to retype anything from the printed page. At this time, only print copies are available, ebook versions will be here in several months. To buy the book, click here.

OOXML Hacking: Notes Page Repair

A bug in PowerPoint Online can wreck presentations edited there. This article describes the symptoms and how to do a notes page repair – if you use Windows. Mac users cannot fix this issue because of sloppy Microsoft programming in the macOS version.

PowerPoint Online can resize the Notes Master page of a presentation. It can also resize elements on the Notes Master, leading to a really wacky combination of large and small placeholders. Almost always, the page size is made much smaller, often into a thin but tall rectangle. The exact cause hasn’t been determined yet, but it may be caused by editing Notes. PowerPoint Online can’t display either the Notes Page or the Notes Master for a presentation, so this problem goes undetected until the presentation is downloaded and viewed in the desktop version. Do a quick Google search on notes page wrong size site:microsoft.com to see lots of examples.

There are three steps to a notes page repair, and it starts with an XML hack. Open up the presentation in BBEdit or OOXML Tools (macOS) or unzip it (Windows). Find the presentation.xml part. In human-readable form, the 13th line will be the Notes Master page size. This example shows the normal values:

<p:notesSz cx="6858000" cy="9144000"/>

The hack involves resetting these values to normal, then saving and closing, or rezipping the files. But that’s just 1 of 3 steps. The next 2 steps can be done in the program.

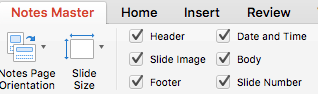
Open the presentation in PowerPoint, then choose View>Notes Master. Very likely there will be wrong-size shapes or missing elements. To fix this, uncheck, then recheck each of the 6 elements (Header, Slide image, Footer, Date and Time, Body and Slide Number). This restores them to the designed co-ordinates.

Uncheck and Recheck

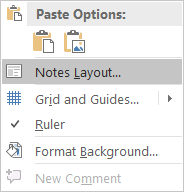
The third step notes page repair is to reset each Notes Page to follow the Notes Master. This is where the Mac version runs into trouble. In the Windows version of PowerPoint, open the Notes Page for each slide and right-click on the background. This is the context-aware menu you’ll see:

Notes Page Context Menu in Windows

Click on Notes Layout, then on Reapply master. The Notes Page reverts to correct formatting.

Now let’s look at the same operation on a Mac. Right-click on the Notes Page and what do we see?

Notes Page Context Menu in MacOS

This is not a “context-aware” menu. This is exactly the same menu that you get if you right-click on a slide. The available commands make sense for a slide, not for a notes page. There is no option to reset the page to the Notes master. The Mac programming team got lazy and just reused the same menu.

As a result, Mac users can’t complete a notes page repair. They can’t reset the page back to the original format.

But wait! What’s that? I hear you say, you read about a macro that can reapply the Notes master. Yup, it’s here on Steve Rindsberg’s awesome PPTFAQ site: Reapply the Notes Master to each Notes Page in a presentation. Except that macro raises an error on Mac version of PowerPoint, because the control ID can’t be found.

Microsoft has f***ed this one badly. First, through the PowerPoint Online bug that creates this, and remains unfixed until the date of this post. Second, because of the sloppy “context-aware” menu programming. And third because they can’t provide PowerPoint for Mac with a complete list of controls in the VBA object model.

As a last resort, create a new blank presentation from the same template as was used for the original file. Then copy and paste the slides from the damaged deck into it. Thanks to Christa Barnes for this suggestion in the comments.

Since I first wrote this article, John Wilson in the UK has written a pair of Windows-only repair utilities to fix this problem. Here’s the page where you can download both, one to fix the Notes Master and another to reapply the master to the Notes Pages. Give them a try, it’s a little easier than revising the XML.

As always, if you’re new to this topic, please review the page about editing OOXML files. Mac users should also read XML Hacking: Editing in macOS. I value your feedback, please leave a comment about any concerns or questions.

OOXML Hacking: Vertical Bullet Alignment

Bad design decisions haunt our lives. One poor choice was Microsoft’s selection of the text baseline for vertical bullet alignment in PowerPoint. Bigger bullets move up, smaller bullets move down, without any control in the user interface. I’m sure you’ve seen this effect as you change bullet size relative to text:

Bad Vertical Bullet Alignment


Fixing Vertical Bullet Alignment with VBA

There are a couple of ways to fix this issue. One is to download and install this free Add-in by John Wilson of PowerPoint Alchemy: Bullets Move Up and Down. The VBA code behind this add-in looks something like this:

Sub fixBulletAlignment()
  Dim oDes As Design
  Dim oMast As Master
  Dim L As Long
  Dim oCust As CustomLayout
  Dim oshp As Shape
  For Each oDes In ActivePresentation.Designs
    For Each oCust In oDes.SlideMaster.CustomLayouts
      For Each oshp In oCust.Shapes
        If oshp.Type = msoPlaceholder Then
          Select Case oshp.PlaceholderFormat.Type
          Case Is = ppPlaceholderBody, ppPlaceholderVerticalBody, ppPlaceholderObject
            For L = 1 To oshp.TextFrame.TextRange.Paragraphs.Count
              With oshp.TextFrame.TextRange.Paragraphs(L).ParagraphFormat
                .BaseLineAlignment = ppBaselineAlignCenter
              End With
            Next L
          End Select
        End If
      Next oshp
    Next oCust
  Next oDes
  MsgBox "Masters and layouts fixed", vbInformation, "PowerPoint Alchemy"
End Sub

When this runs, it adds an over-ride to the text level definitions on each slide layout that has multi-level text (any layout containing a Content or Text placeholder).

<a:lstStyle>
  <a:lvl1pPr fontAlgn="ctr">
    <a:defRPr/>
  </a:lvl1pPr>
  <a:lvl2pPr fontAlgn="ctr">
    <a:defRPr/>
  </a:lvl2pPr>
  <a:lvl3pPr fontAlgn="ctr">
    <a:defRPr/>
  </a:lvl3pPr>
  <a:lvl4pPr fontAlgn="ctr">
    <a:defRPr/>
  </a:lvl4pPr>
  <a:lvl5pPr fontAlgn="ctr">
    <a:defRPr/>
  </a:lvl5pPr>
</a:lstStyle>

This is adequate for most purposes. With correctly aligned bullets, we now get this effect when we change the bullet size:

Good Vertical Bullet Alignment

There are a couple of downsides to the VBA approach:

  • You have to remember to apply it to each presentation or template.
  • If you add a new layout, or add a new text or content placeholder to an existing layout, you’ll have to re-run the macro.
  • Table text and text box text does not benefit, their bullets will still be wonky.

Fixing Vertical Bullet Alignment with XML Hacking

With XML hacking, we can fix this problem once and never have to think about it again. Start by unzipping a new blank template, then editing ppt\slideMasters\slideMaster1.xml. There are 3 sections to be edited: p:titleStyle (for all title placeholders), p:bodyStyle (for all text or content placeholders) and p:otherStyle (for table text).

The editing is the same for all sections: for each a:lvlXpPr section, where X is the level number, add fontAlgn=”ctr” to the definition. Here’s what it looks like before…

<a:lvl1pPr marL="0" indent="0" algn="l" defTabSz="914400" rtl="0" eaLnBrk="1" latinLnBrk="0" hangingPunct="1">

…and after editing:

<a:lvl1pPr fontAlgn="ctr" marL="0" indent="0" algn="l" defTabSz="914400" rtl="0" eaLnBrk="1" latinLnBrk="0" hangingPunct="1">

There are 19 level definitions in slideMaster1.xml to change. When you’re done that, open ppt\presentation.xml and make the same edit to the 9 levels of the p:defaultTextStyle section that controls formatting for text boxes and notes and handout pages.

When you’re done, rezip the XML files and rename the template blank.potx. Place it so it works as your default template, here’s an article from Steve Rindsberg with the details for each Office version. For PowerPoint 2016 and 2019 for Windows, follow the PowerPoint 2013 directions. For 2019 for Mac, use the Mac 2016 directions: Create your own default presentation.

Now that this is set in your default template, every new file created when PowerPoint opens will have the correct vertical bullet alignment. Please note that in PowerPoint for Windows, if you choose File>New>Blank Presentation, this autogenerates a new file that is not based on your default template. Such a file will have incorrect vertical bullet alignment.

OOXML Hacking: Layout Color Variations for Visual Interest

Having worked with many great designers, I see that they try to create variety in chart appearance rather than uniformity. So what if there was a way to have make a chart layout with the colors in a different order? This could give you layout color variations while sticking to the branding guidelines. Well, I have a solution for you, but you’re gonna have to hack some XML!

If you’re an XML newby, please read my article XML Hacking: An Introduction. macOS users will live longer lives if they take a look at XML Hacking: Editing in macOS.

Normally, every layout under a slide master has only 1 color theme. You’re mostly stuck with those 10 colors in a fixed order. In my earlier article about Great Color Themes, I explained how the sequence of colors determines the color order of charts.

But during some recent research, I started reading about the <p:clrMapOvr> XML element. This can be applied to a slide layout to rearrange the color theme. With Accents 1 to 6 in a different order, charts can acquire a whole new look. Here’s how it works.


Layout Color Variations with clrMapOvr

Before Layout Color Variations

At the end of most layouts, you may have seen this XML:

  <p:clrMapOvr>
    <a:masterClrMapping/>
  </p:clrMapOvr>

This tells the layout that it should use the standard color mapping as defined in the theme. We would think of this as the default or normal set of colors. But what if we want to alter this sequence? We can assign each color theme value to a different task. If you import a PowerPoint 2003 or older deck, this gets generated automatically to keep the deck looking as expected.

Here’s an alternate mapping of the same colors:

  <p:clrMapOvr>
    <a:overrideClrMapping bg1="lt1" tx1="dk1" bg2="lt2" tx2="dk2" accent1="accent6" accent2="accent5" accent3="accent4" accent4="accent3" accent5="accent2" accent6="accent1" hlink="hlink" folHlink="folHlink"/>
  </p:clrMapOvr>

This reverses the order of accent colors from the master, giving charts, fills and shapes a whole new look for the slides based on this layout.

After Layout Color Variations

We used to tell clients “Sorry, we have to set the color order to match only one of your designed charts.” Now we have a different message: “Different chart color sequences? No problem. Just use a different layout!”

If XML hacking doesn’t interest you, Brandwares can do it for you. We’re a full-service template creation service for all Office programs. Email me at production@brandwares.com with your project details.

OOXML Hacking: Fix Broken PowerPoint Links

Please note: Microsoft has modified the nature of OLE links. It’s no longer possible to maintain relative OLE links (linked Excel and Word) in current versions of Office. The directions below will allow you to re-establish a broken link, but when you update the linked file, PowerPoint will write an abolute path. If you’re relinking other object types, like images, audio or video, this article will allow you to create permanent relative, semi-relative and absolute paths.

Someone sends you a presentation linked to an Excel file. The links don’t work and you can’t fix them without redoing them. Here’s how to fix broken PowerPoint links with a one minute of XML Hacking.

This article is really just for PowerPoint for Mac users. If you have the Windows version, you can fix broken links by choosing File>Info, then clicking on Edit Links to Files in the right-hand column under Related Documents. (Please note, the Edit Links option only appears if you actually have a link in the open presentation.) Word and Excel for Mac already have utilities to fix links.

If you haven’t hacked XML before, please read XML Hacking: An Introduction and XML Hacking: Editing in macOS. This article mentions Excel, which I’ve used as an example, but the same advice is true for Word files linked to PowerPoint. OLE Links to other formats, like PDF, are simply not supported on macOS.

In Office, links to documents include the complete path. Of course, when you move those linked files to a new computer, the path is always different, so the links must be corrected. The symptoms of a broken link depends on the type of link that was created. If the file creator selected a workbook section or chart, then used Paste Special to paste in a link, you’ll see this message when you double-click on the Excel excerpt:

Fix Broken PowerPoint Links - Paste Special

But the creator may have used Insert>Object instead, and chosen to link rather than embed the file. Then you’ll see this when you try to edit:

Fix Broken PowerPoint Links - Inserted Object

Then after dismissing that dialog, you’ll see the first one about the server error.


Fix Broken PowerPoint Links – The Steps

The issue is that a path is embedded in the PowerPoint file, and that path must be edited. Open the file in BBEdit.

The XML we need to change is associated with the slide(s) on which the Excel item is placed. So lets look. In the left-hand window, click on ppt. Then select slides then the _rels folder. Rels is short for relationships, and it’s the mechanism in every OOXML folder that tells PowerPoint where to find the objects in use.

The _rels folder has a .rels file for each slide in the presentation. Open the file for the slide containing the linked Excel. If the link was inserted using Paste Special, it will look like this (Pay attention to the third line and scroll all the way to the right. The path to be edited is in bold):

<?xml version="1.0" encoding="UTF-8" standalone="yes"?>
<Relationships xmlns="http://schemas.openxmlformats.org/package/2006/relationships">
  <Relationship Id="rId3" Type="http://schemas.openxmlformats.org/officeDocument/2006/relationships/oleObject" Target="file:///\\192.168.1.250\Dockets\Test\Excel\Link2PowerPoint.xlsx!Sheet1!R1C1:R1C4" TargetMode="External"/>
  <Relationship Id="rId2" Type="http://schemas.openxmlformats.org/officeDocument/2006/relationships/slideLayout" Target="../slideLayouts/slideLayout7.xml"/>
  <Relationship Id="rId1" Type="http://schemas.openxmlformats.org/officeDocument/2006/relationships/vmlDrawing" Target="../drawings/vmlDrawing1.vml"/>
  <Relationship Id="rId4" Type="http://schemas.openxmlformats.org/officeDocument/2006/relationships/image" Target="../media/image1.emf"/>
</Relationships>

If the Excel file has been inserted as an linked object, it won’t include a range of cells, just the workbook name:

<?xml version="1.0" encoding="UTF-8" standalone="yes"?>
<Relationships xmlns="http://schemas.openxmlformats.org/package/2006/relationships">
  <Relationship Id="rId3" Type="http://schemas.openxmlformats.org/officeDocument/2006/relationships/oleObject" Target="file:///\\192.168.1.250\Dockets\Test\Excel\Link2PowerPoint.xlsx" TargetMode="External"/>
  <Relationship Id="rId2" Type="http://schemas.openxmlformats.org/officeDocument/2006/relationships/slideLayout" Target="../slideLayouts/slideLayout7.xml"/>
  <Relationship Id="rId1" Type="http://schemas.openxmlformats.org/officeDocument/2006/relationships/vmlDrawing" Target="../drawings/vmlDrawing2.vml"/>
  <Relationship Id="rId4" Type="http://schemas.openxmlformats.org/officeDocument/2006/relationships/image" Target="../media/image2.emf"/>
</Relationships>

Since the Excel item was inserted on a Windows computer, the path uses backslashes instead of forward slashes. There are two path syntaxes that are acceptable. If both the file linked to and the presentation containing the link are in your User folder, you can use a relative path and the linked file will open up immediately. If the file linked to is on a network share or somewhere on your disk outside your user folder, you will have to use an absolute path and you will get a challenge from Office when you open the link.

Let’s do the relative path first. In this example, the Excel file is in my user Documents folder and the PowerPoint is in my user Downloads folder. So I edit:

Target="file:///\\192.168.1.250\Dockets\Test\Excel\Link2PowerPoint.xlsx"

to:

Target="file:///../Documents/Test/Excel/Link2PowerPoint.xlsx"

In Unix/DOS speak, the 2 dots mean “go up one level”, out of the Downloads folder where the presentation is into the main user folder. Then the slashes lead you down into the Documents folder and subfolders to the Excel location. Once you set a relative path, you must leave the PowerPoint file in the same folder. Moving it will break the path.


Fix Broken PowerPoint Links – The Best Relative Path

For a linked file that you know will be moved from desktop to desktop, the best strategy is to place both files in the same folder. Then use this path:

Target="file:///Link2PowerPoint.xlsx"

Now even if you move it back to Windows, the linked Excel file will open as expected. As I noted above, when you open or update the linked Excel (or Word) file, PowerPoint will replace your relative path with an absolute one. This only happens with OLE links. For picture, audio, video and other file types, the relative link will remain unless you manually update.


Fix Broken PowerPoint Links – Absolute Paths

If the file to be linked to is on another disk, use an absolute path. With an absolute path, you can move the PowerPoint file anywhere on your computer or to other machines and it will still be able to find the linked file. Here’s what an absolute path looks like:

Target="file:///Volumes/TheNameOfYourHardDisk/Users/YourUserName/Documents/Test/Excel/Link2PowerPoint.xlsx"

Important! A macOS absolute path must begin with Volumes, followed by a slash and the name of the disk. If your network is set up for different operating systems, you’ll probably use an IP address instead, as shown in the original file path. Consult with your IT department.

Office 2016 for Mac applications are sandboxed applications, so when you first open an Office file linked with an absolute path, you’ll see a warning:


Fix Broken PowerPoint Links - Absolute Path Warning 1

Click on Select…, then you’ll see:

Fix Broken PowerPoint Links - Absolute Path Warning 1

Select the correct file if it isn’t already selected, then click on Grant Access. Now double-click on the linked Excel item to edit and you’ll see this again:

Fix Broken PowerPoint Links - Edit Warning

OK, that’s something of a hassle, but the good thing is that you won’t see those warnings again as long as the linked file says in the same place with the same name. You also only get warned once per placed file, even if there are multiple uses of that file in your presentation.

Linked files are a huge benefit when you have a data source that is constantly being updated. Using them means your presentation can always be up to date. Now that you know how to fix the links, you have a very useful new tool.

OOXML Hacking: Custom Content in AutoText Gallery

Using the Word for Windows program interface, you can select custom content, then add it to an AutoText gallery. As an example, select a Table of Contents and then add it to the TOC Gallery using References>Table of Contents>Save Selection to Table of Contents Gallery (highlighted in red below):

Add a Table of Contents to the TOC Gallery

Unfortunately, Mac versions of Word do not share this feature. But it’s a simple hack. If you are new to XML editing, please read XML Hacking: An Introduction. MacOS users should also read XML Hacking: Editing in macOS to avoid a couple of Mac-specific XML issues. The latter article now mentions the free XML editing plugin for the Chrome browser in the July 2018 update.

This hack will add content to other Word Galleries, like the Cover Page Gallery. Please see the last section of this article for the details.

If This is For Your Own AutoText Gallery

The directions below assume you’re adding AutoText to a template for a client. What if it’s just for yourself? In that case, you would be adding AutoText to your Normal.dotm template.

Normal.dotm is stored in your user Library folder. To find it:

  1. Hold down the Option key, while clicking on the Go menu (macOS menu bar) and choose Library. A window opens showing your user Library.
  2. Open ~/Library/Group Containers/UBF8T346G9.Office/User Content/Templates.
  3. Make a copy! If your Normal template contains any macros, other AutoText or styles, you don’t want to lose them all by making an XML editing mistake.

Add a Table of Contents to the TOC Gallery – The Steps

Make sure you’re working on a template rather than a document. We’ll be using AutoText, and AutoText is saved to the template. If you’re working on a document, the AutoText would get saved to the template attached to the document, not the document itself.

  • Start by making the invisible characters visible, using Word>Preferences…>View and checking All in the Show Non-Printing Characters section.
  • Now select the custom Table of Contents, making sure to include the paragraph mark just below it.
  • Choose Insert>AutoText>AutoText….
  • Set the Look in: dropdown to the name of the template you’re working on.
  • In the Enter AutoText entries here: field, give the AutoText entry a sensible name like Clientname Custom TOC.
  • Click on the Add button and save the template. Close Word.
  • Open the template file in your text editor or Chrome browser with the OOXML plugin.
  • Navigate to word/glossary and open document.xml, the home of all AutoText.
  • Search for the name you gave the TOC AutoText entry. The first few lines should look something like this:
  <w:docParts>
    <w:docPart>
      <w:docPartPr>
        <w:name w:val="Brandwares Custom TOC"/>
        <w:style w:val="TOC 2"/>
        <w:category>
          <w:name w:val="General"/>
          <w:gallery w:val="docParts"/>
        </w:category>
        <w:behaviors>
          <w:behavior w:val="content"/>
        </w:behaviors>
        <w:guid w:val="{DBD01F60-383F-C040-9417-745701ADCDFD}"/>
      </w:docPartPr>
  • Make 2 changes in the <w:category> section:
    1. Change the w:name value from General to a more meaningful name like Custom TOC. This will display as the heading under which your custom TOC appears.
    2. Change the w:gallery value from docParts to tblOfContents. This is the crucial step that makes the TOC appear in the TOC Gallery.
  <w:docParts>
    <w:docPart>
      <w:docPartPr>
        <w:name w:val="Brandwares Custom TOC"/>
        <w:style w:val="TOC 2"/>
        <w:category>
          <w:name w:val="Custom TOC"/>
          <w:gallery w:val="tblOfContents"/>
        </w:category>
        <w:behaviors>
          <w:behavior w:val="content"/>
        </w:behaviors>
        <w:guid w:val="{DBD01F60-383F-C040-9417-745701ADCDFD}"/>
      </w:docPartPr>
  • Resave the template file, close the editor and open it in Word.
  • Choose References>Table of Contents, scroll down to the Custom TOC section and choose your custom TOC.

Final Custom TOC in TOC Gallery


Add Content to a Different AutoText Gallery

You can use exactly the same steps to add a custom cover to the Cover Gallery. Just change the w:category w:name value to Custom Covers and the w:gallery value to coverPg. Use the table below to find the values used for other gallery type.

Please note, the category names are Microsoft defaults, and yes, they are inconsistent whether they spell it Built-in or Built-In. Using these will group your entry with them. If you want your own category, just use a different word or phrase and Word will add it on the fly. To make the category pop to the top of a list, include a space in front of the name (Thanks to Timothy Rylatt for the suggestion):

Gallery Type w:category w:name Values w:gallery Value
Bibliographies Built-In bib
Cover Pages Built-In coverPg
Equations Built-In eq
Footers Built-in ftrs
Headers Built-In hdrs
Page Numbers Page X, Page X of Y, Plain Number, Plain Text, With Shapes pgNum
Page Numbers (Bottom of Page) Page X, Page X of Y, Plain Number, Simple, With Shapes pgNumB
Page Numbers (Margins) Page X, Plain Number, With Shapes pgNumMargins
Page Numbers (Top of Page) Page X, Page X of Y, Plain Number, Simple, With Shapes pgNumT
Placeholders General placeholder
Table of Contents Built-In tblOfContents
Tables Built-In tbls
Text Boxes Built-in txtBox
Watermarks Confidential, Disclaimers, Urgent watermarks

If this looks too geeky for you, we’re glad to help! Brandwares is full-service template creation service specializing in working with graphic designers and corporations. Contact me at production@brandwares.com.

OOXML Hacking: Repairing Color Themes

Last time, I wrote about how to make great color themes. But what about if you (or your client) have discovered that an existing color theme has a problem. If you catch them early, most issues with color themes can be corrected using PowerPoint’s user interface. Say you’ve created a theme or template, but some of the tests in the last article show problems. Repairing color themes requires rearranging the theme colors, then recoloring any graphic elements on the Slide Master and Slide Layouts.

If you didn’t test the template or theme and you’ve already created a presentation before finding the theme problem, it’s more work to fix. Follow the same sequence: rearrange the colors in the theme, fix the Slide Master, then the Layouts and finally repair any element on each slide that still needs help.

But what about if there are multiple templates, or several decks that have been created from a faulty theme? Repairing color theme problems manually quickly becomes an ordeal. It’s time-consuming and error-prone to try to make all the changes by hand. Searching and Replacing using a text editor would be much quicker and more thorough. It’s time to hack some XML!


Repairing Color Themes – The Theme

If you haven’t editing XML directly before, please read XML Hacking: An Introduction. MacOS users should also read XML Hacking: Editing in macOS to avoid a couple of Mac-specific XML issues.

We’re going to fix all the color theme problems by searching for XML text and replacing it with corrected values. Professional test editors really shine for this kind of work because of their abilities to do search and replace on multiple folders full of files, saving you hours of work. NotePad++ for Windows and BBEdit for macOS are 2 excellent choices for this work, they both have multi-file search and replace.

If you’re using Windows, unzip the files in a separate folder. On a Mac, open the theme or template in BBEdit.

Start by correcting the color order of the theme file located in ppt\theme\theme1.xml. During design, you may have applied more than one theme and PowerPoint hoards them all. If you have more than one theme file, check the name attribute to ensure you’re changing the one actually used in your deck. (If the theme is called Office Theme, that’s a Microsoft default, you don’t have to update it.) You may also have more than one theme if your presentation contains more than one slide master. Here are before and after examples, showing only the first 4 colors:

Before: Theme1.xml
<a:clrScheme name="Broken">
  <a:dk1>
    <a:srgbClr val="333333"/>
  </a:dk1>
  <a:lt1>
    <a:srgbClr val="518CA3"/>
  </a:lt1>
  <a:dk2>
    <a:srgbClr val="FFFFFF"/>
  </a:dk2>
  <a:lt2>
    <a:srgbClr val="E4E4E4"/>
  </a:lt2>

This has blue in the lt1 (Light 1) slot and white in the dk2 (Dark 2) spot. One symptom is inserted SmartArt that shows blue text instead of the expected white.

Before: SmartArt Appearance
Repairing Color Themes - Before
After: Theme1.xml
<a:clrScheme name="Repaired">
  <a:dk1>
    <a:srgbClr val="333333"/>
  </a:dk1>
  <a:lt1>
    <a:srgbClr val="FFFFFF"/>
  </a:lt1>
  <a:dk2>
    <a:srgbClr val="518CA3"/>
  </a:dk2>
  <a:lt2>
    <a:srgbClr val="E4E4E4"/>
  </a:lt2>

If a presentation uses Chart Templates, you may also see files in the Theme folder like themeOveride1.xml. This override component allows a chart template to have a color theme different from the presentation into which it’s placed. All chart templates created from a template contain this themeOverride component, which is simply a copy of the main color theme. If the template color theme is bad, then you’ll also have to open all the chart templates and update chart/theme/themeOverride1.xml.


Repairing Color Themes – The Slide Master

For our simple example, we can skip this step, but for more complex repairs, it may also be necessary to adjust the color map in the slide master. If the presentation was based on a color theme exported from Word or Excel, this is necessary. It’s also often needed for legacy decks that have been imported from PowerPoint 2003 and earlier.

The Slide Master has 2 parts. First is the slide formatting that displays in the Slide Master view of PowerPoint. It’s tagged with <p:cSld>. Immediately after that are parameter storage sections holding references to the slide layouts, title, body and other text formatting, etc. The very first section <p:clrMap is what we’re looking for. The full default color map looks like this:

<p:clrMap bg1="lt1" tx1="dk1" bg2="lt2" tx2="dk2" accent1="accent1" accent2="accent2" accent3="accent3" accent4="accent4" accent5="accent5" accent6="accent6" hlink="hlink" folHlink="folHlink"/>

Compare this to a color map when a Word color theme is imported to PowerPoint:

<p:clrMap bg1="dk1" tx1="lt1" bg2="dk2" tx2="lt2" accent1="accent1" accent2="accent2" accent3="accent3" accent4="accent4" accent5="accent5" accent6="accent6" hlink="hlink" folHlink="folHlink"/>

You can see that the dark colors dk1 and dk2 are mapped to the background instead of the text, while text is formatted with lt1 and lt2. The color theme hasn’t been altered, just the way it is mapped to the presentation elements. There is nothing in the program interface to fix this, you must edit the XML. Mental organization becomes very important when changing both the theme and the color map, you can easily get confused.


Repairing Color Themes – Search and Replace

The above steps are preparatory to making the actual changes. Now we need to change the color tags attached to all affected elements in the Slide Master(s) and all Slide Layouts and Slides. Let’s use the example of switching the blue and white. The blue was in the lt1 slot, which is mapped in the Slide Master to bk1 by default. The white was in the dk2, mapped to tx2. After switching the color order, we need to change all bk1 color tags to tx2 and all tx2 tags to bk1.

Wherever a tag is used as an attribute, it has straight quotes before and after. Include these in your search terms so you don’t mess up the color map in the Slide Master. It’s simplest to run this on all files in the archive:

Find what: “bk1” – Replace with: “tx22”

Find what: “tx2” – Replace with: “bk1”

Find what: “tx22” – Replace with: “tx2”

That should do it! Zip up the files with the same file ending as the original, if you’re using Windows. On the Mac, just save the file. Test in PowerPoint.

After: SmartArt Appearance
Repairing Color Themes - After

This is the simplest repair scenario. Sometimes you have to move more colors around, particularly if the creator was someone unfamiliar with PowerPoint. Make notes ahead of time, to make sure you’ve got the right colors moving to the right slots. And always work on a copy of the file, not the original! If it gets too complicated, just send it to us, we do this kind of thing all the time.

Next time, I’ll be discussing PowerPoint SuperThemes. Brandwares has cracked the construction of these, so I’ll cover what you need to know.

OOXML Hacking: Recent Colors

Recent colors are handled inconsistently by Microsoft Office programs. Word and Outlook only retain recently used colors only as long as the program is running, and those colors are visible in every document that’s open. By contrast, PowerPoint and Excel both include them in the document. As soon as you open a different file, the previous colors disappear from the color picker. Return to the first document and there they are again.

If you’re creating files for clients, you may generate quite a few colors in the design process. Your work will look a little more professional if you purge the Recent Colors from the PowerPoint or Excel file before sending it on.

If you’re new to XML hacking, please read my intro: XML Hacking: An Introduction. If you’re working on a Mac, you should also read XML Hacking – Editing in macOS.

Recent Colors in the Windows Color Picker

The row of Recent Colors that PowerPoint and Excel include in the file is a distraction for your client.


Recent Colors Removal Steps

Under Windows, begin by unzipping the file. On a Mac, open it in BBEdit or other advanced text editor.

If this is a PowerPoint deck, look in the ppt folder for the presProps.xml file. The recent colors begin on the third line of a prettified (human-readable) file. Simply delete the entire clrMru section:

<p:clrMru>
  <a:srgbClr val="A54DA5"/>
  <a:srgbClr val="C8006E"/>
  <a:srgbClr val="64006E"/>
</p:clrMru>

To remove the Recent Colors from an Excel workbook, open the xl folder, then edit styles.xml. Look for the colors section, then delete the entire mruColors part:

<colors>
  <mruColors>
    <color rgb="FF640064"/>
    <color rgb="FF393939"/>
  </mruColors>
</colors>

After editing, rezip the files if you’re using Windows or save and close in your macOS text editor. Test that the file opens as expected and no longer has Recent Colors in the color picker, that send it off to the client.

Recent Colors Removed

A more presentable dialog for your client.


PowerPoint VBA to Remove Recent Colors

There’s a simple alternative if you’re using PowerPoint for Windows: you can run a macro to remove the recent colors. It’s dead simple, here’s the code:

Sub ClearRecentColors()
  ActivePresentation.ExtraColors.Clear
End Sub

Unfortunately, PowerPoint for Mac VBA is missing the .Clear method, so you’ll have to hack the file. There’s VBA no equivalent in Excel for Windows or Mac, you’ll have to edit the XML to get rid of them.


Don’t Reuse Recent Colors

Occasionally an artist will try to include special colors in the Recent Colors section, to give the client some additional color choices. This is a bad idea because the Recent Color section is dynamic. When any new color is created, it’s added to the left end of Recent Colors. If the row is full, the oldest color gets pushed off the right end. A better solution is to create Custom Colors. Here’s my how-to on the subject. Custom Colors don’t move or change and can be named, which is a little extra help for your client.

OOXML Hacking: Font Themes Complete

I wrote about how to create a basic font theme in 2015: XML Hacking: Font Themes. Thanks to everyone for the comments and feedback that have allowed me to refine the article and make it more helpful.

That article covered a bare bones font theme for European languages (referred to as Latin fonts in Microsoft-speak). International and multilingual users require a theme that can work with a greater variety of languages and fonts, so in this article I’m going to cover how these work and how to create them.


A More Complete Simple Theme

There’s more we can do with the very basic theme from the previous article. In the listing below, a font has been specced for only Latin fonts. Important Note: If you copy and paste these samples, you must change the non-breaking space characters to ordinary spaces. I need to use non-breaking spaces to format an HTML page, but Office will refuse to display your font theme if you don’t search and replace them with regular spaces.

<?xml version="1.0" encoding="UTF-8" standalone="yes"?>
<a:fontScheme xmlns:a="http://schemas.openxmlformats.org/drawingml/2006/main" name="Test">
  <a:majorFont>
    <a:latin typeface="Arial"/>
    <a:ea typeface=""/>
    <a:cs typeface=""/>
  </a:majorFont>
  <a:minorFont>
    <a:latin typeface="Arial"/>
    <a:ea typeface=""/>
    <a:cs typeface=""/>
  </a:minorFont>
</a:fontScheme>

In both the Major (Headings) and Minor (Body) categories, there are also ea (East Asian) and cs (Complex Scripts) entries. These theme entries are inactive until text is formatted as a relevant language. As long as your text is marked as US English (either by using the Review>Language>Set Proofing Language, or by setting the language in a Style), only the Latin theme fonts will be active. But if you mark text as Chinese, the Office program will check the theme and use the font in the ea tag instead. Likewise, Persian text will activate the cs theme font.

What will not work is to try to set an East Asian or Complex Scripts font in the Latin tag. Depending on the version and platform of Office, you’ll only get European characters showing, or the program will completely ignore your theme. Here’s a simple font theme that will work with Japanese, Arabic and European languages:

<?xml version="1.0" encoding="UTF-8" standalone="yes"?>
<a:fontScheme xmlns:a="http://schemas.openxmlformats.org/drawingml/2006/main" name="Test">
  <a:majorFont>
    <a:latin typeface="Arial"/>
    <a:ea typeface="Meiryo"/>
    <a:cs typeface="Andalus"/>
  </a:majorFont>
  <a:minorFont>
    <a:latin typeface="Arial"/>
    <a:ea typeface="Meiryo"/>
    <a:cs typeface="Andalus"/>
  </a:minorFont>
</a:fontScheme>

Depending on which ea or cs font you choose, it may support one or several languages. As an example, CJK fonts will support Chinese, Japanese and Korean. Of course, in a collaboration scenario, the fonts chosen should be available on both Mac and Windows, or the display of one of the langauges may get mangled with a font substitution. The best idea is to stick with fonts distributed by Microsoft with Office.


Complex Font Themes

When you crack open the XML on a document or theme, the font theme information is contained in theme/theme1.xml. This illustrates a font theme that is ready to take on the world:

<a:fontScheme name="Office Theme">
  <a:majorFont>
    <a:latin typeface="Calibri Light" panose="020F0302020204030204"/>
    <a:ea typeface=""/>
    <a:cs typeface=""/>
    <a:font script="Jpan" typeface="MS Pゴシック"/>
    <a:font script="Hang" typeface="맑은 고딕"/>
    <a:font script="Hans" typeface="宋体"/>
    <a:font script="Hant" typeface="新細明體"/>
    <a:font script="Arab" typeface="Times New Roman"/>
    <a:font script="Hebr" typeface="Times New Roman"/>
    <a:font script="Thai" typeface="Angsana New"/>
    <a:font script="Ethi" typeface="Nyala"/>
    <a:font script="Beng" typeface="Vrinda"/>
    <a:font script="Gujr" typeface="Shruti"/>
    <a:font script="Khmr" typeface="MoolBoran"/>
    <a:font script="Knda" typeface="Tunga"/>
    <a:font script="Guru" typeface="Raavi"/>
    <a:font script="Cans" typeface="Euphemia"/>
    <a:font script="Cher" typeface="Plantagenet Cherokee"/>
    <a:font script="Yiii" typeface="Microsoft Yi Baiti"/>
    <a:font script="Tibt" typeface="Microsoft Himalaya"/>
    <a:font script="Thaa" typeface="MV Boli"/>
    <a:font script="Deva" typeface="Mangal"/>
    <a:font script="Telu" typeface="Gautami"/>
    <a:font script="Taml" typeface="Latha"/>
    <a:font script="Syrc" typeface="Estrangelo Edessa"/>
    <a:font script="Orya" typeface="Kalinga"/>
    <a:font script="Mlym" typeface="Kartika"/>
    <a:font script="Laoo" typeface="DokChampa"/>
    <a:font script="Sinh" typeface="Iskoola Pota"/>
    <a:font script="Mong" typeface="Mongolian Baiti"/>
    <a:font script="Viet" typeface="Times New Roman"/>
    <a:font script="Uigh" typeface="Microsoft Uighur"/>
    <a:font script="Geor" typeface="Sylfaen"/>
  </a:majorFont>
</a:fontScheme>

For brevity, I’ve omitted the Minor font section. Instead of setting the ea and cs fonts, this font theme has entries for more tightly defined language groups and different fonts assigned to each one. This level of detail is necessary for a font theme that can be used around the world. Since I copied this listing from theme1.xml, it doesn’t have the XML opening that a standalone font theme would have.

For a complete list of all 4-letter script/language codes, search online for ISO 15924 Code Lists.

Setting up and testing a complex font theme like this is not a simple task. The font switching is automatic and is triggered by the language input setting on your computer, the language set in your template styles and the language set in the text being edited. Please post your comments, let me know of any hiccups or problems you notice and I’ll try to answer your questions.

Brandwares creates font themes to help global corporations support every language. Send me a message for ensure your files have worldwide useability: production@brandwares.com

OOXML Hacking: Styled Text Boxes Complete

My last post began the subject of styled text boxes. There I covered the parameters contained in the first line of each level definition. Today’s entry continues by introducing the XML elements inside the level definition that format text. As a reminder, a level definition is the equivalent of a PowerPoint style. Since a text box can have up to 9 text levels, we can format 9 unique styles.


Styled Text Boxes – Child elements

Child Elements are XML parameters that are within an a:lvl#pPr level definition, as opposed to the first line values covered in my last post. Here is a super simple level with only 2 enclosed parameters, shown in bold:

<a:lvl1pPr marL="0" indent="0">
  <a:buNone/>
  <a:defRPr sz="1400"/>
</a:lvl1pPr>

The first tag, a:buNone, sets the level to not have a bullet, while a:defRPr sets the text size to 14 points.

Next, here’s an example that shows line spacing and tab settings:

<a:lvl2pPr marL="0" indent="0">
  <a:lnSpc>
    <a:spcPct val="125000"/>
  </a:lnSpc>
  <a:spcBef>
    <a:spcPts val="1200"/>
  </a:spcBef>
  <a:spcAft>
    <a:spcPts val="500"/>
  </a:spcAft>
  <a:tabLst>
    <a:tab pos="457200" algn="l"/>
    <a:tab pos="914400" algn="l"/>
    <a:tab pos="1371600" algn="l"/>
  </a:tabLst>

In order, this block sets line spacing of 125% (or leading, for the designers), 12 points of space before and space after of 5 points. Finally, three left-aligned tabs are set. The units are EMUs, so these tabs are spaced 1/2″ apart.

Child Elements – Bullets

Out of 16 possible child elements, 11 are for bullet formatting. Creating bullets by editing XML is an exercise in frustration. It’s far easier to create bullets using the program interface and then transfer that XML to the p:defaultTextStyle section of presentation.xml.

For an overview of all level definition parameters, this page covers them: Datypic page for List Level Text Style


Styled Text Boxes – The Easy Way

Sure, you could do all of the above in a text editor, if you wanted to prove your coding prowess. But time is short and there’s a faster way to get this job done using PowerPoint’s program interface. This leverages the fact that the structure for list level text is exactly the same for p:titleStyle, p:bodyStyle and p:otherStyle as used in slideMaster1.xml, p:txBody, used in many slide layouts, and p:defaultTextStyle as seen in presentation.xml.

My preferred method is to start by making a copy of the Content with Caption slide layout, then deleting the title and content placeholder, leaving only a text placeholder preformatted with small text. Then I make 9 levels of text and format each to match a design or client specs for what the text box styles should look like. Do all your bullet formatting here. Save the file and exit PowerPoint.

Now expand the file and look in ppt/slideLayouts. The Content and Caption layout is usually slideLayout8.xml. If you duped it as suggested, open slideLayout9.xml and format the code to be humanly readable. Just below <a:lstStyle> are 9 level definitions with all the formatting you created in the program interface. Each level starts with <a:lvlXpPr where X is the level number. Copy all 9 level definitions, but not the starting <a:lstStyle> or closing </a:lstStyle> tags.

Now open ppt/presentation.xml, select all 9 level definitions (starting just below </a:defPPr>) and paste in the 9 levels from slideLayout9.xml. Save the file, zip everything back into a presentation. Each inserted text box should now have up 9 levels of styles that match the formatting you created on the duplicated layout. Delete the extra layout and you’re done.


Styled Text Boxes – What about the Font?

If you’ve tried these steps out, you might notice one glaring omission in the XML. When you format a slide layout and copy the XML, there is no font information in the level definitions. This is because the layout gets its font info from the slide master. There are 2 ways to fix this:

  • If all levels the text box are in the same font, open the presentation, create a text box, set the font, right-click on the text box and choose Set as Default Text Box.

This action fills an objectDefaults stub at the bottom of ppt/theme/theme1.xml. It looks something like this:

<a:objectDefaults>
  <a:txDef>
    <a:spPr>
      <a:noFill/>
    </a:spPr>
    <a:bodyPr wrap="square" rtlCol="0">
      <a:spAutoFit/>
    </a:bodyPr>
    <a:lstStyle>
      <a:defPPr>
        <a:defRPr dirty="0" smtClean="0">
          <a:latin typeface="+mn-lt"/>
        </a:defRPr>
      </a:defPPr>
    </a:lstStyle>
  </a:txDef>
</a:objectDefaults>

In this case typeface=”+mn-lt” sets the text box font to the Minor (hence mn) or Body theme font. The Heading theme font would appear as +mj-lt.

  • If there are different fonts for different levels, apply those fonts when formatting the duplicate slide layout.

Interesting fact: If a level is set by default to a theme font, clicking on the font dropdown and re-selecting the same theme font breaks the font inheritance from the slide master and specifies the theme font in the layout instead. Here’s the default XML from the layout level 1 again:

<a:lvl1pPr marL="0" indent="0">
  <a:buNone/>
  <a:defRPr sz="1400"/>
</a:lvl1pPr>

And here’s what it looks like after reapplying the theme font in the layout:

<a:lvl1pPr marL="0" indent="0">
  <a:buNone/>
  <a:defRPr sz="1400">
    <a:latin typeface="+mn-lt"/>
  </a:defRPr>
</a:lvl1pPr>

Styled Text Boxes = Instant Text Placeholders

I believe this hack vastly increases the utility of the text box. In effect, it becomes a text placeholder that a user can easily add to any slide. Accessing the styles works exactly the same as a text placeholder. Use the Increase List Level button (Indent More on a Mac) to move through the levels.

Here’s a visual comparison of a text placeholder and a styled text box:

Text Placeholder compared to Styled Text Box


Styled Text Boxes – Other Issues

I’ve run across a couple of minor problems that you will need to keep in mind.

  • Picture bullets aren’t going to work. These require building an XML relationship to the bullet image stored in the file, which is very hard to do manually. Don’t bother.

  • Similar to the theme font issue mentioned above, default paragraph spacing in the layout is inherited from the slide master. This means your text box paragraphs will be missing any space before or after that displays in the layout. To fix this, set the paragraph spacing for each level in the layout. It doesn’t have to change, but you still have to set it to include the spacing in the layout XML.

As always, I welcome your questions, feedback and suggestions. Contact me at production@brandwares.com. Keep hacking!